Publishing data produced by ESP8266 sensors to an MQTT broker server is a great option to making your IoT data visible to outside consumers with minimal consumption of precious MCU bandwidth. Simple, easy to implement and very light-weight.
What a great distribution system!
Simply publish your ESP8266 sensor data once, and many subscribers can consume the information, virtually at the same time. Sweet!
MQTT Basics
In case you are new to MQTT, here are a few basics. MQTT is the acronym for message queuing telemetry transport. Now that’s a mouthful! It is essentially a protocol that follows the publish/subscribe model to distribute information from one source to many users.
Here’s a few links for more MQTT information:
I’ve put together an ESP8266 MQTT demo project using an Arduino IDE sketch to publish data for consumption by subscribers using the MQTT protocol. Several options for consuming the data as a subscriber are also presented…
MQTT Broker/Server
For demo purposes, I wanted to use a free broker. After testing a few of the available options, I settled on using the Mosquitto MQTT server. While unsecured, meaning anyone who knows your “topic” can subscribe to the data, it works great for a proving out your design.
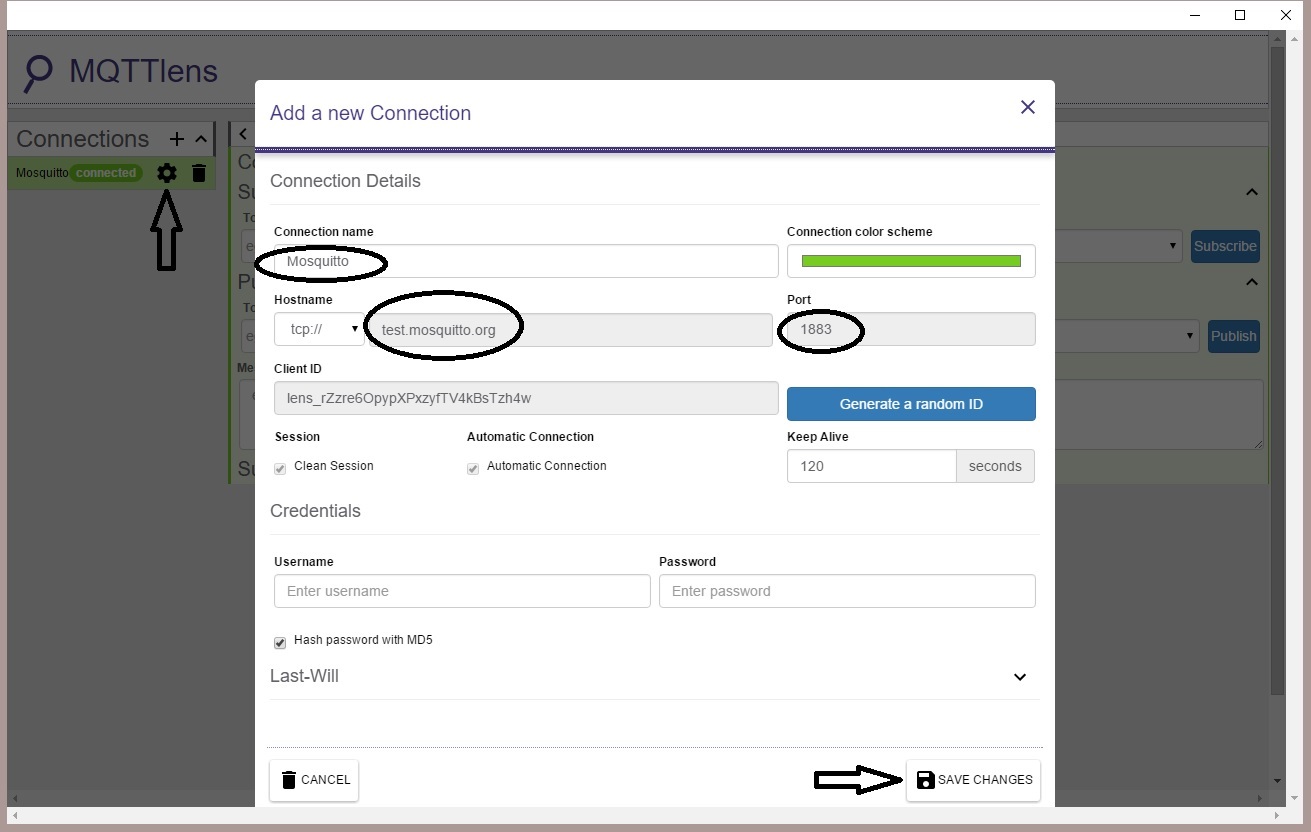
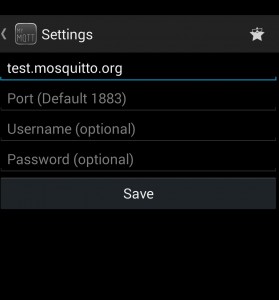
server: test.mosquitto.org
port: 1883
Arduino IDE Sketch
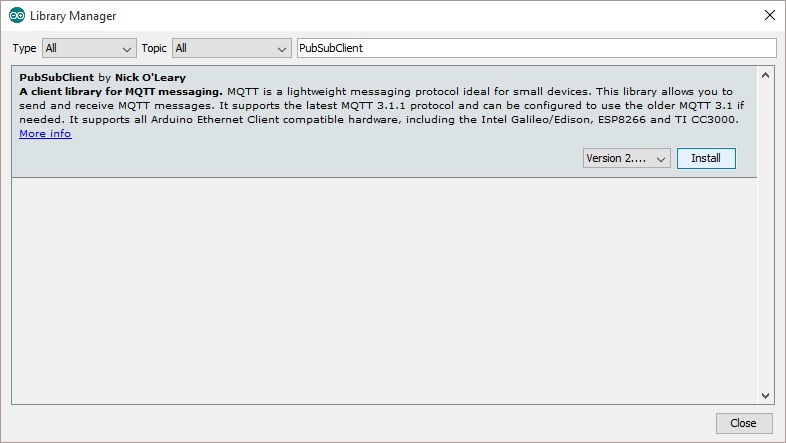
There is one library that needs to be added to the Arduino IDE to access the MQTT broker. It’s called “PubSubClient”. Here is how to install it…
Step 1: Open the Arduino IDE
Step 2: From the menu, select Sketch>Include Library>Manage Libraries…
Step 3: Enter “PubSubClient” in the search box.
Step 4: Click on the “Install” button
Now that was easy.
Great!
But there is one more thing to do after installing PubSubClient. I have found that the default maximum packet size (128 bytes) is insufficient. You should at least double it to 256 bytes.
How?
Just open the file “…/Arduino/libraries/pubSubClient/src/PubSubClient.h and change the following line:
From:
#define MQTT_MAX_PACKET_SIZE 128
To:
#define MQTT_MAX_PACKET_SIZE 256
Now lets talk about the sketch to test MQTT with the ESP8266…
The setup() function performs 3 basic tasks:
Setup()
- setup serial port
- connect to wifi
- set MQTT broker/server
And loop() maintains the Wifi and MQTT connections, reads the sensors, and publishes the values to the MQTT broker.
Loop()
- Reconnect to WiFi if disconnected
- Reconnect to MQTT broker/server if disconnected
- Read Sensor(s)
- Publish Sensor data
Here is a break-down of the sketch. First, the objects must be identified
#include <ESP8266WiFi.h>
#include <PubSubClient.h>

#define wifi_ssid "Your SSID"
#define wifi_password Your Wifi password"

#define mqtt_server "test.mosquitto.org"
#define mqtt_user "not used in this example"
#define mqtt_password "not used in this example"

#define topic1 "t1"
#define topic2 "t2"

WiFiClient espClient;
PubSubClient client(espClient);
And then the sketch setup…
 void setup() {
   Serial.begin(115200);
   setup_wifi();
   client.setServer(mqtt_server, 1883);
}
A typical Wifi connect function:
 void setup_wifi() {
   delay(10);
   // We start by connecting to a WiFi network
   Serial.println();
   Serial.print("Connecting to ");
   Serial.println(wifi_ssid);

   WiFi.begin(wifi_ssid, wifi_password);

   while (WiFi.status() != WL_CONNECTED) {
     delay(500);
     Serial.print(".");
   }

   Serial.println("");
   Serial.println("WiFi connected");
   Serial.println("IP address: ");
   Serial.println(WiFi.localIP());
}
The loop() simply makes sure a connection to the MQTT is made, reads the sensors, and publishes the results. The publish rate is set at 2 seconds minimum.
 void loop() {
  if (!client.connected()) {
    reconnect();
  }
  client.loop();

  //2 seconds minimum between Read Sensors and Publish
  long now = millis();
  if (now - lastMsg > 2000) {
      lastMsg = now;

      //Read Sensors (simulated by increasing the values, range:0-90)
      t1 = t1>90 ? 0 : ++t1;
      t2 = t2>90 ? 0 : ++t2;

      //Publish Values to MQTT broker
      pubMQTT(topic1,t1);
      pubMQTT(topic2,t2);
  }
}
Just copy and paste this complete sketch as a starting template to test your own MQTT publishing with the ESP8266. Remember, you will need to set the WIFI ssid & password in the sketch to your access point values before running.
#include <ESP8266WiFi.h>
#include <PubSubClient.h>

#define wifi_ssid "YOURSSID"
#define wifi_password "YOURPASSWORD"

#define mqtt_server "test.mosquitto.org"
#define mqtt_user "your_username"
#define mqtt_password "your_password"

#define topic1 "t1"
#define topic2 "t2"

WiFiClient espClient;
PubSubClient client(espClient);

void setup() {
    Serial.begin(115200);
    setup_wifi();
    client.setServer(mqtt_server, 1883);
}

void setup_wifi() {
    delay(10);
    // We start by connecting to a WiFi network
    Serial.println();
    Serial.print("Connecting to ");
    Serial.println(wifi_ssid);

    WiFi.begin(wifi_ssid, wifi_password);

    while (WiFi.status() != WL_CONNECTED) {
        delay(500);
        Serial.print(".");
    }

    Serial.println("");
    Serial.println("WiFi connected");
    Serial.println("IP address: ");
    Serial.println(WiFi.localIP());
}

void reconnect() {
    // Loop until we're reconnected
    while (!client.connected()) {
        Serial.print("Attempting MQTT connection...");
        // Attempt to connect
        if (client.connect("TestMQTT")) { //* See //NOTE below
            Serial.println("connected");
        } else {
            Serial.print("failed, rc=");
            Serial.print(client.state());
            Serial.println(" try again in 5 seconds");
            // Wait 5 seconds before retrying
            delay(5000);
        }
    }
}
//NOTE: if a user/password is used for MQTT connection use:
//if(client.connect("TestMQTT", mqtt_user, mqtt_password)) {

void pubMQTT(String topic,float topic_val){
    Serial.print("Newest topic " + topic + " value:");
    Serial.println(String(topic_val).c_str());
    client.publish(topic.c_str(), String(topic_val).c_str(), true);
}

//Variables used in loop()
long lastMsg = 0;
float t1 = 75.5;
float t2 = 50.5;

void loop() {
  if (!client.connected()) {
    reconnect();
  }
  client.loop();

  //2 seconds minimum between Read Sensors and Publish
  long now = millis();
  if (now - lastMsg > 2000) {
      lastMsg = now;

      //Read Sensors (simulate by increasing the values, range:0-90)
      t1 = t1>90 ? 0 : ++t1;
      t2 = t2>90 ? 0 : ++t2;

      //Publish Values to MQTT broker
      pubMQTT(topic1,t1);
      pubMQTT(topic2,t2);
  }
}
Testing Tools
While there are many tools available, here are a few I have found that you can use to verify the ESP8266 is actually publishing the data.
How?
Simply subscribe to the topic and watch the information updates in real-time.
Google Chrome Application
First try using MQTTLens, an off-the-shelf tool to subscribe to the published data. You can get MQTTLens here. Although this app is installed via Google Chrome, it runs as standalone application. At this time, Chrome apps are supported using Windows, Mac and Linux operating systems.
This app provides basic functionality for testing MQTT publish/subscribe messages.
Once the app has been installed and started, a few configuration steps are needed to connect to our MQTT broker and subscribe to the ESP8266 published topics.
Just click on the configuration icon and fill in the information as shown below:
Once you are connected to the broker, the only thing left to do is subscribe to the data feed. For this example, two topics are published by the ESP8266; t1 and t2. Enter one of these and click on the subscribe button to monitor the data as it is published.
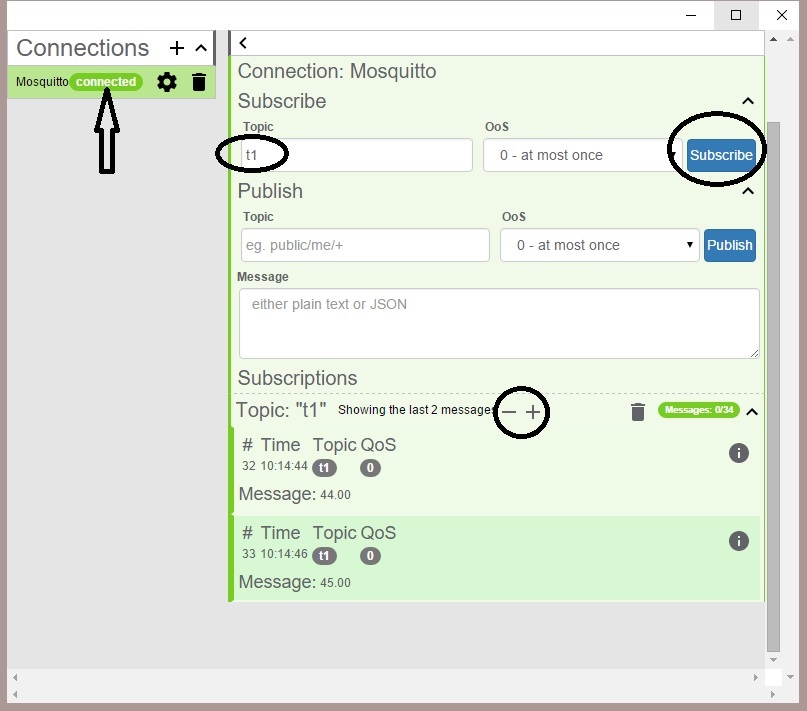
Notice you can change the number of messages displayed using the “-+” icons.
Web Page using JavaScript
MQTTLens is a great tool to get a quick look at your MQTT published data. But when you move from merely testing the data feed to developing a custom application, full control to manipulate and display the information is essential.
Fortunately, this is a simple task using only JavaScript and html.
I’ve developed the following html code to subscribe to the ESP8266 published data. This may be useful as a template on your own website. Simply open a file with this code in a web browser to test. Name this file as you please, using “.html” as the file name extension. In this example, I have named the file “mqtt_subscribe.html”.
<!DOCTYPE html>
<html>
 <head>
 <title>MQTT JavaScript Client Example</title>
 <!-- Latest compiled and minified CSS - add here as needed -->
 </head>
 <body>
 <!-- HTML to display MQTT topic values -->
 <div><strong>Published ESP8266 topics via MQTT:</strong></div><br>
 <div id="t1"></div>
 <div id="t2"></div>
 <!-- mosquitto MQTT -->
 <script type="text/javascript" src="http://test.mosquitto.org/mosquitto.js"></script>
 <!-- jQuery -->
 <script src="https://ajax.googleapis.com/ajax/libs/jquery/1.11.2/jquery.min.js"></script>
 <!-- Custom MQTT client for this example -->
 <script>
 // Create a client instance
 client = new Mosquitto();
 // Connect to MQTT broker
 var url = "ws://test.mosquitto.org:8080/mqtt";
 client.connect(url);
 // Callback executed upon connection
 client.onconnect = function(rc){
 var topic = 't1';
 client.subscribe('t1', 0);
 client.subscribe('t2', 0);
 };
 //Callback executed upon disconnection
 client.ondisconnect = function(rc){
 client.connect(url);
 };
 //Callback executed upon receipt of MQTT message
 client.onmessage = function(topic, payload, qos){
 if(topic=="t1") {
 $("#t1").html("Topic: t1 Value: " + payload);
 }
 if(topic=="t2") {
 $("#t2").html("Topic: t2 Value: " + payload);
 }
 };
 </script>
 </body>
</html>
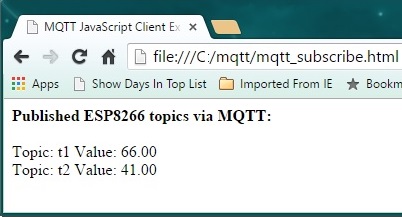
Just to keep things clean and simple, no css styling is included in this example. Here is a snapshot of the browser windows when this file is viewed:
Android
While I have not yet explored the development of a custom Android App to interface with an MQTT broker, it is certainly possible. What immediately comes to mind, in the spirit of App portable, would be to develop an Android Cordova App. This would allow you to reuse the above html code, without modification.
Here is my step-by-step guide to get started.
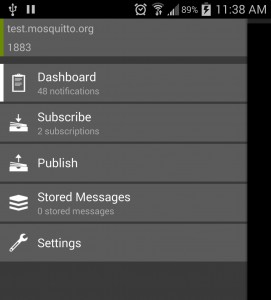
But if you are looking for an off-the-shelf MQTT test application, I recommend using MyMQTT . This is a free App available in Google Play Store. Once installed, there are only a few steps needed to subscribe to the ESP8266 example MQTT feed.
The App will startup with the following screen:
First set the app to connect with the broker we are using for this example. Click on “Settings” and enter the broker information as shown:
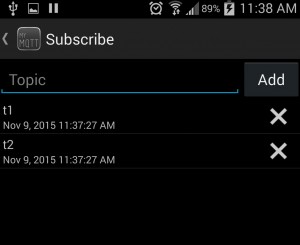
Then subscribe to the ESP8266 published topics (t1 and t2):
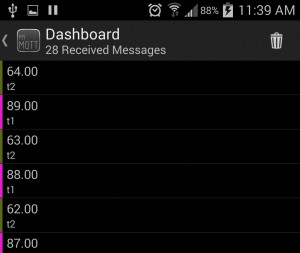
The dashboard will then display the topic data as it is published:
Iphone/iPad
MQTTInspector is the most popular App to test MQTT feeds from an iOS device. At $1.99, is not free, yet certainly low-cost. As a Windows, Android and Linux user, I cannot provide any additional information regarding this tool. It appears to be similar to other MQTT client test tools, and can be found on iTunes here.
In Conclusion
Here you have it. A simple guide to publishing topics from an ESP8266 device to an MQTT broker. All you need is a simple Arduino IDE sketch.
Once published, this data feed can be consumed cross-platform, on any device that supports MQTT. From this article, this includes but is certainly not limited to Windows, Mac and iOS. There are also Linux packages available to support MQTT clients.
As always, I hope you find this information useful…

