Want More Analog Inputs?
Do you have a project needing more than one analog input? If your using an ESP8266, that would seem to be a problem as it only offers a single input. Before you commit to using an Arduino, Spark Core, Raspberry PI or other higher priced micro-controller, one with multiple analog inputs, consider this…

Adding an 8-1 multiplexer chip to your ESP8266-07 or -12 circuit can expand your system capability from one to eight analog inputs. I recently tested this out, using a 74HC4051 CMOS analog multiplexer component I got from an AliExpress supplier.
The cost?
$2.19 for 10 chips, or $0.22 per chip.
They are available in a 16-pin DIP package with 2.54 pitch for easy use with a solder-less breadboard.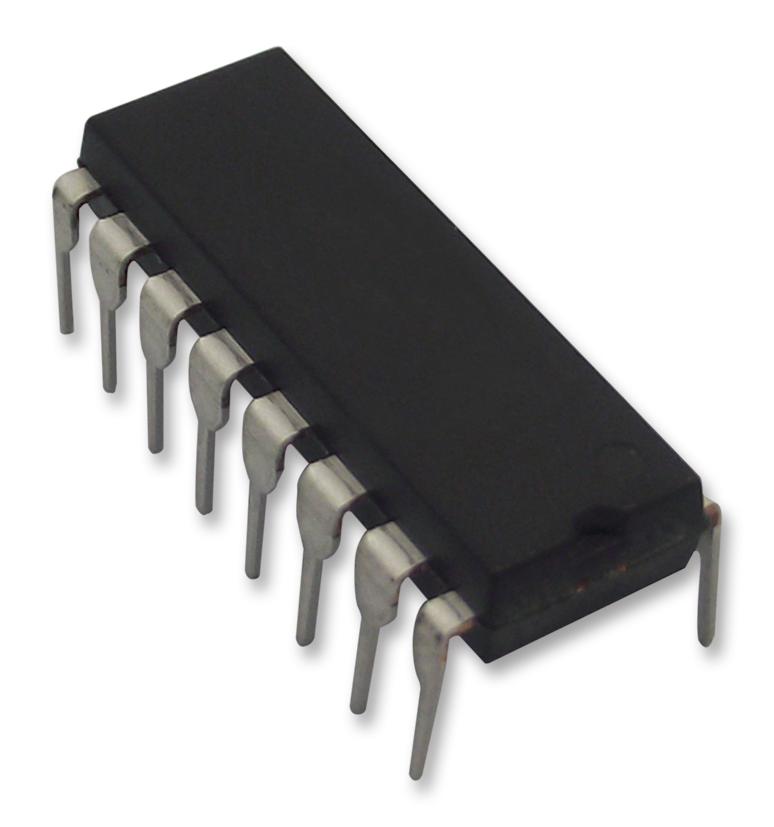 So what’s the downside? Well, selecting one of the 8 analog inputs will require 3 GPIO pins. For many applications, that should not pose a problem when using the ESP8266-07 or -12. These versions have 7 easily accessible GPIO pins available, leaving you with 4 GPIO pins for any digital input or output requirement after adding the 8 analog inputs.
Here is the circuit I used to test this configuration:
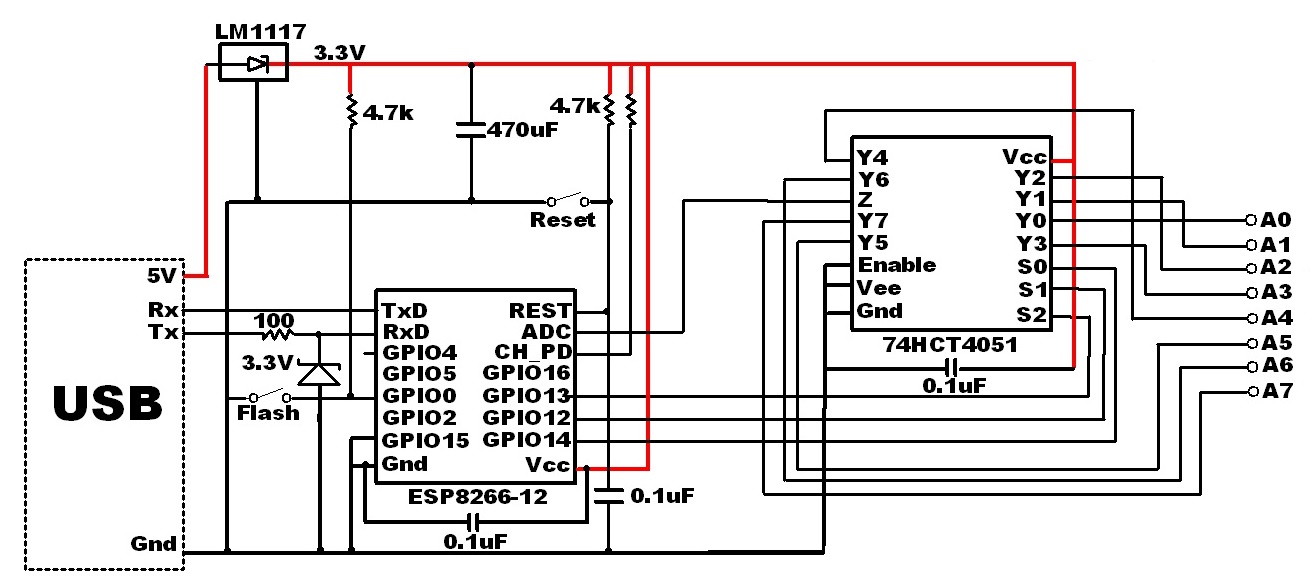
The left side of this drawing is the standard circuit I have been using for all of my ESP8266 projects. A typical USB to serial adapter is used when developing and flashing the circuit. When deployed, I use a USB plug with a wall adapter to provide a 5V source, without the Tx/Rx signals.
The analog multiplexer is controlled by 3 GPIO pins; 14,12 and 13. Setting the states of these 3 digital outputs determine which analog input will be measured.
The sketch used to test this circuit was developed using the ESP8266 Arduino IDE.
The serial output loops through each analog input, setting the multiplexer and reading an input every 2.5 seconds. The sketch also behaves as a web server. All 8 analog values can be retrieved in a single JSON string returned from an http GET request.
ESP8266 ADC Performance Evaluation
Using this circuit and software, I proceeded to collect some data to characterize the ESP8266 analog input range. First, the multiplexer selector was verified by connecting each input to ground and verifying the Analog count returned was 0. Likewise, each input was connected to 3.3V with a reading of 1024 returned when reading the ESP8266 ADC pin.
All good so far…
Then I connected the A0 input to a variable resistor to vary the input voltage voltage.
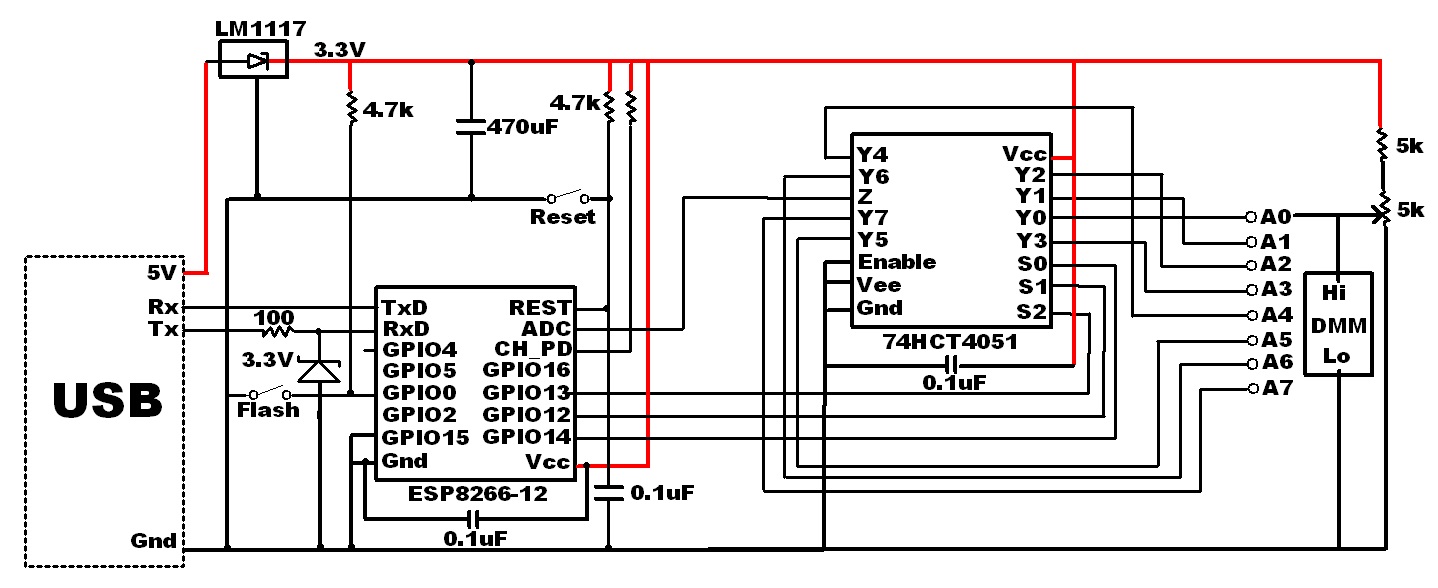
At the same time, an external Digital Multimeter (DMM) was used to monitor the voltage applied to the ESP ADC input via the multiplexer. For each voltage setting, I recorded the DMM reading and the ADC count returned from the ESP8266. It would have been great to have a calibrated bus controlled DMM to automate this process, but for the purpose of this DIY home project, I simply entered the values into an excel spreadsheet manually.
Thirty-seven voltage settings were applied in the range between 0.2V and 1.2V. Any voltage below 0.2V returned a 0 bit count while voltages above 1.2V returned 1024. I observed approximately 10 values returned from the ESP8266 for each voltage applied and recorded the high and low bit count readings for these measurements. The average of the high and low reading was then used to chart the results.
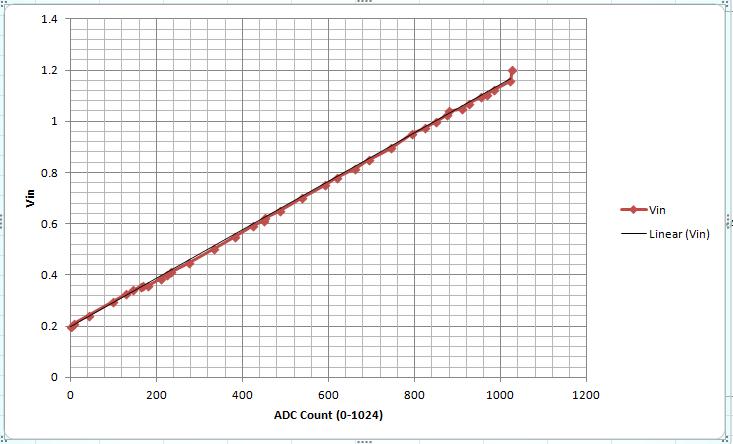
As you can see, the results were reasonably linear. But there is compression at the voltage extremes. For practical use, I would not use the non-linear ends, limiting the voltage swing from 0.25 to 1.15 V, a 0.9 V range.
The data collected can be reduced to a “best fit” equation. This would provide a method of converting the raw ADC value count to a voltage. Ideally, a data point should be collected for each ADC count value. The equipment I used for this exercise was not calibrated or accurate enough to do this. Given these uncertainties in my test setup, I am not sure if the variances I observed for consecutive readings…and they did vary somewhat…was result of the input voltage source or the ESP8266 ADC.
Still…with the data I had collected, the formula was determined to be:
Vain = (0.94* ADCcount + 200) mV
The slope was determined by dividing the voltage difference by the ADC count difference at each end of the voltage range. And 200 mV, the intercept, is the voltage when the ADC started reporting 0 for the count.
While there does not appear to be a definitive specification, this is consistent with what I have read regarding the ESP8266. The 10-bit ADC resolution is supposed to be approximately 1 mV with a 1 V range.
Resolving Sensor Incompatibilities
So what can you do if your sensor range is outside the ESP8266 0.2 to 1.2 V window?
Scaling of course.
This can be accomplished passively, using a resistor divider, or actively, with the addition of an op-amp. The interface of choice would be an active op-amp based circuit.
For example, suppose your sensor has a 0-5V range. This would need to be scaled to fit in the ESP8266 0.2 to 1.2 V input range. Obviously, resolution will be compromised as we go from a larger range to a smaller one, but it can be done. And with a single power supply.

Resistor values calculated here. The 24K/1K resistor divider supplies the 0.2V offset with the gain set for the 1.15 V output with a 5V maximum input applied. This circuit would need to be modified for your specific sensor voltage range.
In summary
So there you have it. Eight analog inputs measured using a single ESP8266 SoC. Possible simply by adding a 22 cent chip.
And I got to mention one more option. Just in case you want even more…
A 16 channel version of the multiplexer is also available (74HCT4067). That’s a whole lot of analog!
I hope you find this information useful.