
Using an MQTT Broker to publish and subscribe to IoT events is a critical aspect of many IoT infrastructures. And hosting your own broker retains complete control in your hands. This writing provides step-by-step instructions for installing the Mosquitto MQTT broker on a VPS running Linux Ubuntu 16.04.
Don’t have a personal Virtual Private Server (VPS)? Check here to find out how to get one.
MQTT Broker Installation Overview
Installing the Mosquitto MQTT broker on your Linux Ubuntu VPS can be broken down into 3 basic steps. And if you wish to also provide secure connections, four additional steps are needed.
- Install Mosquitto
- Configuring MQTT Passwords
- Configuring MQTT Over Websockets
- Securing your MQTT Broker
- Install Certbot
- Run Cerbot
- Setting up Certbot Automatic Renewals
- Configuring MQTT SSL
Installing Mosquitto
A telnet client is needed to install and configure the MQTT broker on your VPS. PuTTY is a widely used telnet client. It can be downloaded here. Make sure you have a telnet client installed and your non-root linux user credentials are handy before continuing.
Then, log in with your non-root user with PuTTY and install Mosquitto with apt-get by entering:
sudo apt-get install mosquitto mosquitto-clients
The MQTT broker service will start automatically after the installation has completed. To test, open a second command-line interface (CLI) using PuTTY. With one of the terminal windows, subscribe to a test topic named “mymqtttesttopic” by entering:
mosquitto_sub -h localhost -t mymqtttesttopic
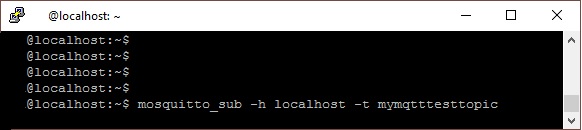
Then, publish a message from the other terminal:
mosquitto_pub -h localhost -t mymqtttesttopic -m “Sent from my own MQTT Broker”

If the installation is properly working, the subscribe terminal will receive the message:

Configuring MQTT Passwords
First level of security is to configure Mosquitto to use passwords. Mosquitto includes a utility to generate a special password file called mosquitto_passwd. Using this utility, you will be prompted to enter a password for the specified username, and place the results in /etc/mosquitto/passwd. From the terminal, enter:
sudo mosquitto_passwd -c /etc/mosquitto/passwd testuser
Note: Use “password” for the password for this test case when prompted
Now we’ll open up a new configuration file for Mosquitto and tell it to use this password file to require logins for all connections:
sudo nano /etc/mosquitto/conf.d/default.conf
This should open an empty file. Paste in the following:
allow_anonymous false
password_file /etc/mosquitto/passwd
allow_anonymous false will disable all non-authenticated connections, and the password_file line tells Mosquitto where to look for user and password information. Save and exit the file.
Now we need to restart Mosquitto and test our changes:
sudo systemctl restart mosquitto
Try to publish a message without a password:
mosquitto_pub -h localhost -t “test” -m “hello world”
The message should be rejected:
Connection Refused: not authorized.
Error: The connection was refused.
Before we try again with the password, switch to your second terminal window again, and subscribe to the ‘test’ topic, using the username and password this time:
mosquitto_sub -h localhost -t test -u “testuser” -P “password”
It should connect and sit, waiting for messages. You can leave this terminal open and connected for the rest of the tutorial, as we’ll periodically send it test messages.
Now publish a message with your other terminal, again using the username and password:
mosquitto_pub -h localhost -t “test” -m “hello world” -u “testuser” -P “password”
The message should be passed from one terminal to the other in the same way as the initial test without passwords. If the message was received, we have successfully added password protection to our Mosquitto MQTT Broker.
Passwords for multiple users
Most likely, your MQTT broker will need to support more than one user. Here is how to create a password file for multiple users:
First create a plain text file, adding a line for each user: <username>:<password>
sudo nano /etc/mosquitto/passwd
For 3 users, the file contents:
username1:password1
username2:password2
username3:password3
Then encrypt the plain text file by entering:
sudo mosquitto_passwd -U /etc/mosquitto/passwd
Configuring MQTT Over Websockets
You will probably want to have your MQTT Broker support Websockets. This makes it possible to communicate with your MQTT broker using JavaScript. Very useful for web applications. Here is how to add it to your Mosquitto configuration.
Open the configuration file to add port listeners:
sudo nano /etc/mosquitto/conf.d/default.conf
Add to the bottom of the file:
listener 1883 localhost
listener 8883
listener 8083
protocol websockets
listener 18083
protocol websockets
Then update the firewall to support these listener ports.
sudo ufw allow 8883
sudo ufw allow 8083
sudo ufw allow 18083
Restart Mosquitto to activate the listener configuration:
sudo systemctl restart mosquitto
Here is the MQTT port allocation:
[wptg_comparison_table id=”21″]
Note that the last listener on port 18083 is not a standard MQTT port. This port is used for insecure (non-encrypted connections). While it is not required, it can sometimes be useful when communicating with tiny IoT devices that cannot support the additional overhead required to connect using the SSL protocol.
Testing MQTT Websockets
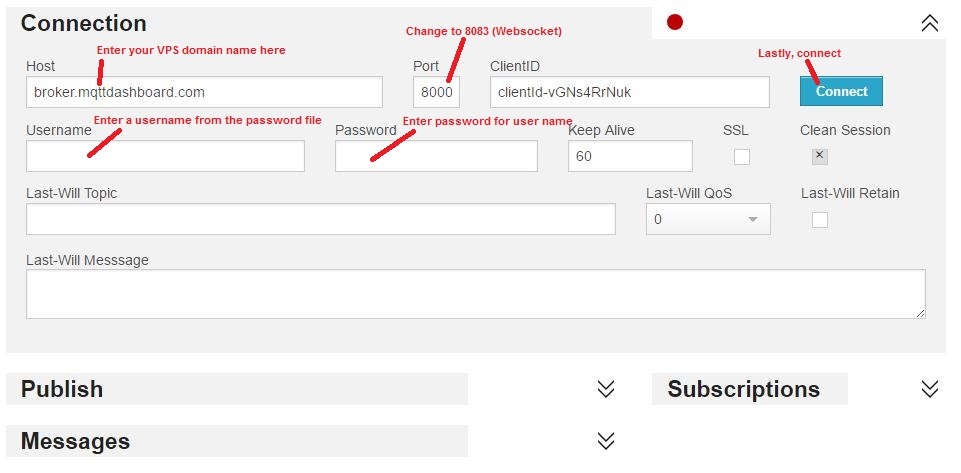
The easiest method of verifying the Websockets ports is to use a web browser MQTT client. While there are many such tools available, HiveMQ will be used for this demonstration.
First, open an incognito web browser window to this link.
Note: You must use an incognito window. A normal browser window sends extra information to track your browsing history. This extra http traffic will interfere with the MQTT websocket protocol and cause the connection to fail.
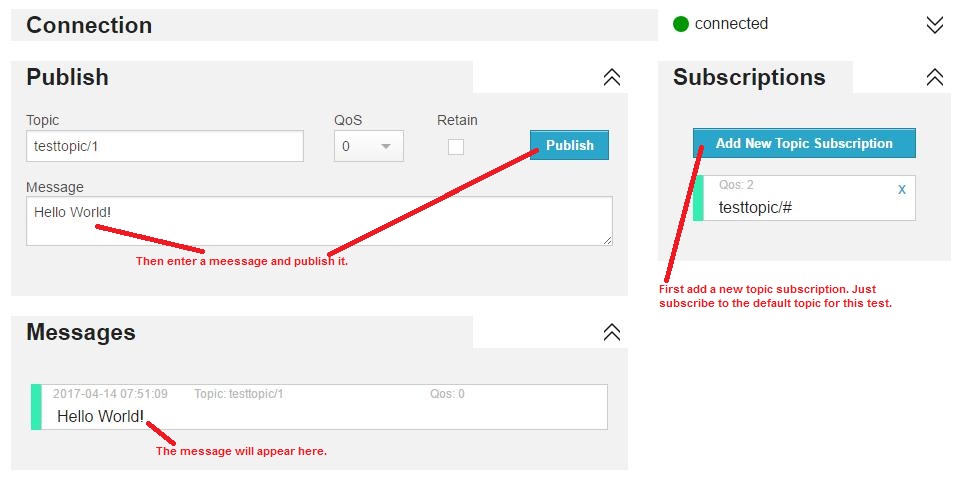
And create a new connection:
Once the connection is made, publish a test message:
Securing your MQTT Broker
There are four steps required to securing the MQTT Broker with SSL/TLS.
Step 1: Install Certbot
We must first install the official client from an Ubuntu PPA, or Personal Package Archive. These are alternative repositories that package more recent or more obscure software. First, add the repository from the VPS terminal.
sudo add-apt-repository ppa:certbot/certbot
Note: If this command is not found, the following package needs to be installed first:
sudo apt-get install software-properties-common
You’ll need to press ENTER to accept. Afterwards, update the package list to pick up the new repository’s package information.
sudo apt-get update
And finally, install the official Let’s Encrypt client, called certbot.
sudo apt-get install certbot
Now that we have certbot installed, let’s run it to get our certificate.
Step 2: Run Certbot
The Certbot that was just installed needs to answer a cryptographic challenge issued by the Let’s Encrypt API in order to prove we control our domain. It uses ports 80 (HTTP) and/or 443 (HTTPS) to accomplish this. We’ll only use port 80, so let’s allow incoming traffic on that port now:
sudo ufw allow http
Rule added
We can now run Certbot to get our certificate. We’ll use the --standalone option to tell Certbot to handle the HTTP challenge request on its own, and --standalone-supported-challenges http-01 limits the communication to port 80. -d is used to specify the domain you’d like a certificate for, and certonly tells Certbot to just retrieve the certificate without doing any other configuration steps.
sudo certbot certonly –standalone –standalone-supported-challenges http-01 -d mqtt.example.com
When running the command, you will be prompted to enter an email address and agree to the terms of service. After doing so, you should see a message telling you the process was successful and where your certificates are stored.
We’ve got our certificates. Now we need to make sure Certbot renews them automatically when they’re about to expire.
Step 3: Setting up Cerbot Automatic Renewals
Let’s Encrypt’s certificates are only valid for ninety days. This is to encourage users to automate their certificate renewal process. We’ll need to set up a regularly run command to check for expiring certificates and renew them automatically.
To run the renewal check daily, we will use cron, a standard system service for running periodic jobs. We tell cron what to do by opening and editing a file called a crontab.
sudo crontab -e
You’ll be prompted to select a text editor. Choose your favorite, and you’ll be presented with the default crontab which has some help text in it. Paste in the following line at the end of the file, then save and close it.
. . .
15 3 * * * certbot renew --noninteractive --post-hook "systemctl restart mosquitto"
The 15 3 * * * part of this line means “run the following command at 3:15 am, every day”. The renewcommand for Certbot will check all certificates installed on the system and update any that are set to expire in less than thirty days. --noninteractive tells Certbot not to wait for user input.
--post-hook "systemctl restart mosquitto" will restart Mosquitto to pick up the new certificate, but only if the certificate was renewed. This post-hook feature is what older versions of the Let’s Encrypt client lacked, and why we installed from a PPA instead of the default Ubuntu repository. Without it, we’d have to restart Mosquitto every day, even if no certificates were actually updated. Though your MQTT clients should be configured to reconnect automatically, it’s wise to avoid interrupting them daily for no good reason.
Now that automatic certificate renewal is all set, we’ll get back to configuring Mosquitto to be more secure.
Step 4. Configuring MQTT SSL
To enable SSL encryption, we need to tell Mosquitto where our Let’s Encrypt certificates are stored. Open up the configuration file we previously started:
sudo nano /etc/mosquitto/conf.d/default.conf
Replace the file content with the following:
allow_anonymous false
password_file /etc/mosquitto/passwd

listener  1883 localhost

listener 8883
certfile /etc/letsencrypt/live/<yourVPSdomainname>/cert.pem
cafile /etc/letsencrypt/live/<yourVPSdomainname>/chain.pem
keyfile /etc/letsencrypt/live/<yourVPSdomainname>/privkey.pem

listener 8083
protocol websockets
certfile /etc/letsencrypt/live/<yourVPSdomainname>/cert.pem
cafile /etc/letsencrypt/live/<yourVPSdomainname>/chain.pem
keyfile /etc/letsencrypt/live/<yourVPSdomainname>/privkey.pem

listener 18083
protocol websockets
certfile /etc/letsencrypt/live/<yourVPSdomainname>/cert.pem
cafile /etc/letsencrypt/live/<yourVPSdomainname>/chain.pem
keyfile /etc/letsencrypt/live/<yourVPSdomainname>/privkey.pem
listener 8883 sets up an encrypted listener on port 8883. This is the standard port for MQTT + SSL, often referred to as MQTTS. The next three lines, certfile, cafile, and keyfile, all point Mosquitto to the appropriate Let’s Encrypt files to set up the encrypted connections.
Save and exit the file, then restart Mosquitto to update the settings:
sudo systemctl restart mosquitto
Now we test again using mosquitto_pub, with a few different options for SSL:
mosquitto_pub -h <your VPS domainname> -t test -m “hello again” -p 8883 –capath /etc/ssl/certs/ -u “user1” -P “password”
Note that we’re using the full hostname instead of localhost. Because our SSL certificate is issued for <yourVPSdomainname>, if we attempt a secure connection to localhost we’ll get an error saying the hostname does not match the certificate hostname (even though they both point to the same Mosquitto server).
--capath /etc/ssl/certs/ enables SSL for mosquitto_pub, and tells it where to look for root certificates. These are typically installed by your operating system, so the path is different for Mac OS, Windows, etc. mosquitto_pub uses the root certificate to verify that the Mosquitto server’s certificate was properly signed by the Let’s Encrypt certificate authority. It’s important to note that mosquitto_pub and mosquitto_sub will not attempt an SSL connection without this option (or the similar --cafile option), even if you’re connecting to the standard secure port of 8883.
If all goes well with the test, we’ll see hello again show up in the other mosquitto_sub terminal.
You can also run additional tests using the HiveMQ MQTT client again to verify the websocket port 8083, which is now configured securely. This time, make sure the “SSL” checkbox is selected when making a connection.
Once this final test has been performed successfully, your MQTT broker is fully set up!
In Closing
With your own secure MQTT broker running on a VPS, you have a powerful platform at your disposal. Using a reliable provider, you no longer need to keep any hardware running 24-7, no longer vulnerable to power interruptions or computer crashes. And there are no constraints on your custom configuration options. That is all taken care of by the VPS provider.
I hope you find this information useful
Social tagging: MQTT > VPS MQTT Installation
Hi There, do you know any way to publish our message on certain topic via html/php?
This post should provide sufficient information to do what you want using html/JavaScript. You can, of course, "echo" the html/JavaScript from a PHP server file.
Not sure what you have in mind. You could easily replace the JavaScript timing loop with a button click that would publish your message every time the button is clicked. Or you could use the timing loop to fetch the message you wish to publish at the loop interval.