
Securing your IoT things is critical. MQTT connections are definitely at risk. But simply using username/password combinations for your MQTT connection is NOT secure.
Why not?
Well, even with passwords, everything sent over the Internet is unencrypted…open for any and all prying eyes to see…and possible maliciously manipulate.
Fortunately, we can solve that problem by creating TLS connections for secure MQTT data transfers. And yes, this encryption layer can even be brought to the ESP8266 platform.
But it does come at a cost…a huge bite out of the limited ESP RAM heap. With grave consequences. I certainly experienced catastrophic results during in my initial attempts. Finally, and after several iterations, the implementation presented here now manages the heap successfully. Using this approach, we achieve the desired results…a stable, reset-free ESP8266 platform with a secure interface to an MQTT broker.
Cutting to the Chase
At this point, if you would like to jump in without the benefit of additional explanation, please find the code for this Arduino 1.8.2 IDE compiled project here.
Compiler Issue
The first step towards adding TLS to the ESP8266 framework was to access a secure MQTT Broker. Installation of a TLS MQTT Broker was presented in my last post. After setting up the TLS MQTT broker on a VPS host, the next step was to update the ESP8266 IoT platform developed previously to support the secure connection. This required the addition of a new class to the project; WiFiClientSecure. This class supports secure TCP connections.
But I soon discovered the first problem…
You see, the project simply would not compile with the introduction of this class.
Through much research and frustration, I finally discovered the root cause of the problem and better yet, a solution.
As it turned out, one of the compiler flags used by the Arduino IDE was incompatible with the new WiFiClientSecure class library, and had to be revised. While your computer may have a different path to the compiler options file, mine was located on a Windows 10 PC at:
C:\Users\owner\AppData\Local\Arduino15\packages\esp8266\hardware\esp8266\2.2.0\platform.txt
Here is the line that needs to be changed in order to compile the project:
#OLD: compiler.c.elf.libs=-lm -lgcc -lhal -lphy -lpp -lnet80211 -llwip -lwpa -lcrypto -lmain -lwps -lsmartconfig -lmesh -lssl
#NEW: compiler.c.elf.libs=-lm -lgcc -lhal -lphy -lpp -lnet80211 -llwip -lwpa -lcrypto -lmain -lwps -lsmartconfig -lmesh -laxtls
A Heap of Trouble
After a successful compilation and upload to my development ESP8266 hardware, I soon discovered that the TLS connection consumed a huge chunk of the ESP heap (RAM). Somewhere between 12 and 15 kB. This was such a big resource hog that the ESP8266 would reset anytime a TLS MQTT connection was attempted.
And I also discovered that the configuration screen also used a large amount of ESP heap. That was because, even though the page’s HTML was stored in program memory as a constant, it had to be brought into the heap for run-time modifications before the page was rendered.
These two processes, ESP configuration and TLS MQTT connection negotiation were fighting for the same limited heap space. While each process would work on its own, they simply could not both exists at the same time.
So the project was modified to start up in one of two modes:
- Configuration Mode – Sets unique ESP8266 operational parameters
- MQTT Connection Mode – Connects to TLS Sensor and continuously reads sensors
Start-up Mode
Upon power-up, the ESP8266 had to know which mode to start up in. That would limit the heap usage to the requirements of the selected mode. This was implemented as a EEPROM location that is read in the programs setup() function.
SetSysCfgFromEeprom(); // Set Session Cfg from EEPROM Values
Two EEPROM locations are now used for MQTT initialization.
    GetEepromVal(&Param, EEPROM_MQTTSSLEN, EEPROM_CHR);
    mqtt_ssl_enable = os_strcmp(Param.c_str(), "true")==0;

    GetEepromVal(&Param, EEPROM_MQTTCLEN, EEPROM_CHR);
    mqtt_cl_enable = os_strcmp(Param.c_str(), "true")==0;
If MQTT is configured to be enabled (mqtt_cl_enable), then the second parameter (mqtt_ssl_enable) is used to determine whether a TLS connection (sslClient) or a standard connection (espClient) is to be used at ESP8266 startup:
if(mqtt_cl_enable) {
    client = mqtt_ssl_enable ? new PubSubClient(sslClient) : new PubSubClient(espClient);
    MqttServer_Init();              // Start MQTT Server
}
These two parameters are set within the operational mode that the ESP8266 is currently operating.
Identifying the Start-up Mode
There are two methods to determine which mode the ESP8266 start up running. You can either look at the start-up output from the serial port or query the ESP8266.
Configuration Mode with Web Server:
The start-up output will include the following if the ESP has started up in configuration mode, with the web server running:
ESP8266 IP: 192.168.0.133
ESP8266 WebServer Port: 9705
ESP8266 Mode: Web Server Running – Type = SDK API
Of course, the port and IP values may vary if they are configured differently.
MQTT Mode:
The start-up output will include the following if the ESP has started up in MQTT Mode:
MQTT Rx Topic: mqtt_rx_18fe34a26629
MQTT Tx Topic: mqtt_tx_18fe34a26629
ESP8266 Mode: MQTT Client Running
Note the MQTT topics are provided. These values need to be known in order to communicate with the ESP, which acts like a server for this project.
Start-up Mode Query
The start-up mode can also be determined from the response to a query. This method may be preferred for applications that do not have access to the ESP serial port or are using the serial link for other purposes.
The ESP will not respond if it is not running in the queried mode. For configuration mode, simply enter the configuration URL (or any other valid web server URL). If the ESP responds, it is running in this mode.
Likewise, attempt to send a message to the ESP MQTT “server”. If is running in MQTT mode if a response is received
Configuration Mode
The configuration screen from the last iteration of this project was modified to add the new MQTT parameters. Just as before, this screen is accessed by entering the ESP8266 IP (or domain name) with it’s assigned web server port with the following suffix :
http://192.168.0.133:9705/config
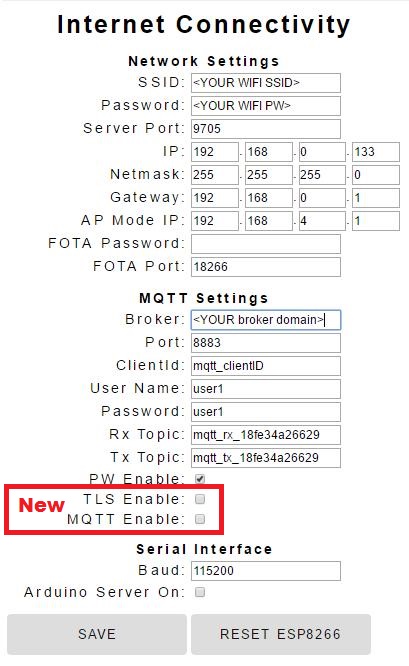
If you want to switch to the TSL MQTT operating mode at power-up, just check the 2 new boxes, click SAVE, and then RESET ESP8266.
A URL has also been provided to switch modes within your application code:
http://192.168.0.133:9705/?request=MqttSslOn
This will change the EEPROM content to switch modes and reset the ESP8266 so it starts-up in the selected mode.
MQTT Mode
When the ESP8266 starts up in MQTT mode with TLS connection enabled, it will respond to server requests just like it did in the last iteration of this project. And switching back to ESP web server/configuration mode is simply a matter of sending the request in an MQTT message:
/?request=HttpOn
Conclusion
We now have a secure MQTT connection to the ESP8266. Here is the project code link again. And with careful management of the RAM (heap), it will perform reliably. More functionality in this case requires the distribution of tasks between two operating modes which are only loaded in memory when needed. This technique can be used in other cases as well to stretch the capabilities of this amazing little system on a chip (SoC) we call ESP8266.
Social tagging: Secure ESP8266 MQTT > TLS MQTT
Historia, amazing project, it can be used to connect to Amazon iot? Or which Iot service offer this encryption capability?
This project will connect to any MQTT broker that supports TLS 1.2. I am not familiar with Amazon IoT. But I did make an ESP8266 project a few years ago that connected to Amazon Web Services (AWS) (https://wp.me/p5NRQ8-bV)
Hi Brilliant posts, I have followed the setting up the server post and it all seems fine and dandy.
I've tried compiling your arduino code but it can't find PubSubClient.h I am assuming this is todo with the MQTT library.
Which library did you use?
Thanks for pointing this out as the library was missing from the GitHub repository. While it is available on-line, I have added the library to the repository. Hope your project compiles after adding the PubSubClient library. The library files are in the PubSubClient/src folder.
Hi and thanks for your great article.
How do you feed TLS certificate to the sketch? I went through your codes and couldn't find any tls certificate. how does this connect to tls without certificate?
The certificate is maintained on the server, not the ESP8266 client. The server establishes a secure (encrypted) connection if the ESP8266 communicates using the secure TLS port.
This is the same mechanism used when you point your web browser to a secure (https) site.
thanks for replying. This is very strange. For TLS, both client and server must have the same certificate. The reason we do not need to install certificate when we visit https websites is that the websites' owners usually purchase their tls certificate from well known certificate authorities and browsers always maintain latest version of certificates from well known certificate authorities.
that is my however my understanding after researching few days.
I can connect to my mqtt server using javascript only if I install the certificate in my browser.
I am very confused now.
I just bought a nodeMCU to try your code. However after uploading the code I see this in serial:
Local ESP IP:0.0.0.0
From EEPROM IP:255.255.255.255
From EEPROM NM:255.255.255.255
From EEPROM GW:255.255.255.255
From EEPROM AP:255.255.255.255
ESP8266 IP:255.255.255.255
Fixed IP:255.255.255.255
IP now set to: 255.255.255.255
Connecting to ………………..
Could not connect to wifi, initializing AP
ESP8266 IP: 255.255.255.255
ESP8266 Mode: Web Server Running – Type = SDK API
FOTA Initialized using IP address: 255.255.255.255
thanks all… it does not give me an ip to connect to and 192.168.4.1 also does not work. do you have any advice for me please?
esp8266 12 is rebooting every time I try to hit the config page while in SVR_HTTP_SDK mode. However, the config page loads fine in AP mode. Also the url parameters work fine in SVR_HTTP_SDK mode.
Can't load the config page without getting a Exception (29)
Exception (29):
epc1=0x4000e1b2 epc2=0x00000000 epc3=0x00000000 excvaddr=0x00000000 depc=0x00000000
ctx: sys
sp: 3ffff990 end: 3fffffb0 offset: 01a0
>>>stack>>>
3ffffb30: 3fff3814 00001f52 3fff81c4 401004f4
If it keeps rebooting and you get an exception error, your flash memory section that is used in this sketch may not have been initialized. The first time booting up, the program needs to be compiled with the file "sketch.h" line set to:
#define EEPROM_INIT 1
Once initialized, it will need to be recompiled with the original setting:
#define EEPROM_INIT 0