Do you have an Arduino Nano that is non-operational? Failing to upload sketches? Behaving basically as a dead device. Non-responsive. Essentially a brick.
My Nano started behaving that way when I pulled it off the shelf to help someone with a project. This became another problem to be solved. It had to be corrected before using the device again.
So I searched for an answer on-line. It soon became clear that the root of the problem was the FTDI USB-to-serial conversion chip. Everyone was offering the same solution.
But, unfortunately, none of the information I found worked for my unique case. You see, my first attempt at solving this problem, in reality, made things worse. The contents of the FTDI flash had been altered. Making it unrecognizable and inaccessible. I had to come up with an answer to that issue first before addressing problem most users had been experiencing.
After much research and failed attempts, I have now come up with the complete solution. You may not need to do all these steps, unless you corrupted the nano’s EEPROM as I did.
Problem Discovery
After several unsuccessful attempts at uploading a compiled sketch, I had a closer look. The first thing to do was to monitor the devices serial port. This interface (USB at my PC) was spewing “NOT GENUINE DEVICE FOUND!” endlessly at 115200 baud.
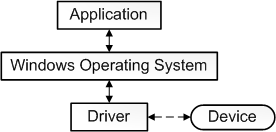
After some thought, I concluded that somehow the device claimed to be “Arduino-compatible” was in-fact, counterfeit. And somehow, the driver used to communicate with it’s FTDI interface chip knew it. Blocking it’s normal operation, replacing it with the message I was observing.
As it turns out, this “blocking message” was placed in the driver by the OEM, FTDI. Since everything worked initially, going back about a year and a half, but not now, a driver update had to be responsible for this new, unwanted behavior.
But what can be done to fix it?
From Bad to Worse
From what I had read, the problem was that the “updated” driver had a method to detect “non-genuine” chips. In those cases, the USB device descriptor ProductID (PID) was altered from 6001 to 0000.
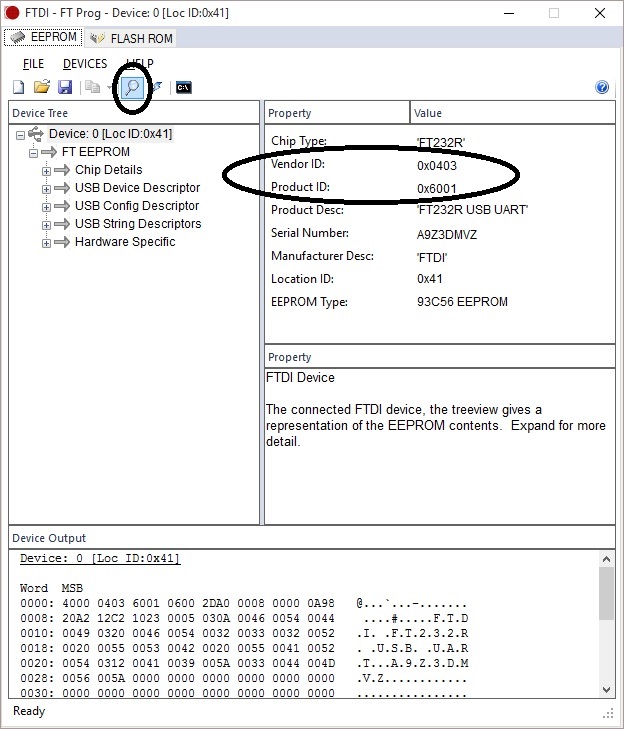
The trick was to change the PID back to 6001. Fortunately, FTDI provides a utility to do just that. It is called FT_PROG, available here.
Changing the PID was easy with this program. Just start it with the nano plugged in, click on the scan icon, and your nano device settings are displayed. Just play with this program a bit and you will figure out how to change the Product ID.
Yet after correcting my Product ID, the problem did not go away. I carefully looked at the instructions in an article with the “solution” and found one thing missing…
The Vendor ID was set to 0401 in the article and mine was 0403.
So I changed the nano VID to 0401. And that’s when things got really bad.

IMPORTANT: DO NOT CHANGE YOUR NANO’s FTDI chip Vendor ID.
With the VID modified, the device driver no longer recognized the device. And the FT_PROG utility could no longer find the nano. There was no way to change it back.
It appeared that the device was now permanently bricked. Useless. Unless the Vendor ID could be restored to the original value.
Fixing the Vendor ID
A review of the FTDI driver .inf files (ftdibus.inf and ftdiport.inf) uncovered the presence of many instances of “VID_0403”. I thought that changing it to “VID_0401” would make it recognize my altered FTDI device on the Arduino nano.
But trying this revealed yet another problem…
When attempting to install the driver, an error message popped up suggesting the driver had been tampered with. OK-OK, I changed the Vendor ID! The error occurs as result of a mismatch of the digital signature files (*.cat) with the driver files (*.inf).
No problem, just delete the .cat files and the driver installation should work. I was expecting a warning that the driver did not have a digital signature with “want to proceed anyway”, but that was not the case. It would not allow the installation to finish without the signature.
There is a way to resolve this new dilemma…
All that is needed is to disable driver signature verification. Instructions on how to do that can be found here.
With the signature verification disabled, I was able to install the driver with my modified (*.inf) files for the altered VendorID. This restore access to the FTDI device with the FT_PROG utility. The VendorID was then revised back to the correct value, 0403.
But I was still unable to download sketches to the nano.
Installing a Working Device Driver
In order to restore the original functionality to the FTDI chip, an older version of the driver must be installed. A version prior to the one FTDI released to brick “non-genuine” chips. You can get version 2.08.30 WHQL Certified here.
Scroll down to the “No Longer Supported” section to find this older driver. Download the zip file so can revise the *.inf files as needed. This driver will work to unbrick your FTDI device.
But first the existing driver must be removed from your computer using the FTDI CDMUninstaller tool. This tool should be self-explanatory.
One more consideration. Windows regularly checks to see if any of your drivers are out of date. If your FTDI driver gets updated, possibly automatically, you will be right back where this all began. With a bricked device.
To avoid this, you can trick Windows into thinking your older driver is in-fact, the most current. Just edit the ftdibus.inf and ftdiport.inf files as follows prior to installing the device driver:
change the line from:
DriverVer=07/12/2013,2.08.30
to:
DriverVer=07/12/2023,2.08.30
Credits
The following posts provided the essential information I needed to unbrick my Arduino-compatible nano…a.k.a China clone. Many thanks! These posts provide some of the details I have left out of this post. This info may prove to be useful in resolving your Arduino nano FTDI issues…
- Unbrick bricked FTDI chip
- How to over-write Windows System Files
- How to fix moody Arduino nano
- How to fix the USB-FTDI Problem
- How to Disable Digital Signature Verification
- FTDI FT_PROG User Guide
Conclusion
Having a bricked device is always an unsettling feeling. Yet like most challenges in this DIY game, there is usually a remedy. Sometimes it takes some persistent effort to make things right. But what a relief when things are made whole again. Rest easy. Armed with the solutions presented here , you now know how to make those cheap Chinese clones behave as intended.
I hope this information helps solve your FTDI issues…
Social tagging: Arduino nano > bricked FTDI > NOT GENUINE DEVICE FOUND
I have two nano boards that have ftdi chips that now cause bluescreen crash of my win 7 system. Can’t do anything about it that I know of if I plug them in the system goes down! Help?
I have never heard of or experienced that behavior. Do you have access to a different computer to see if the nanos take down any computer or just the one you have been working with?
If I had your problem, I would attempt a recovery using Linux. I have had much success resolving issues using the Linux OS instead of windows. I always use a USB installation so my computer’s hard-drive is not impacted. Install USB stick and you boot to Linux, normal computer operation when the USB stick is removed.
Here is one Linux solution I found with a quick search. You might need to do more research if this method does not work:
http://www.m0yom.co.uk/ftdi-serial-killer-quite/
And here is how I set up a USB Linux installation:
USB Linux Installation
In the above article, you only need to install the Linux OS. It is very quick and easy.
Good luck. I cannot advise more on your condition as it is fortunately something I have not come across.
I am still trying to install my Nano and wonder if what you explain here applies to my situation. At first I installed the latest driver: CDM v2.12.24 WHQL Certified, but this resulted in a error code 10. Here is a video of my installation process https://youtu.be/s3CqmapqUOg.
Now when I scan my devices with FT-Prog, nothing is found. Does that mean that I bricked my Nano and that I should follow your procedure. As it is right now my device appears as an unknown USB device in my Device Manager.
Note:
Windows 10 64bits
Properties>Events I see the following string: USB\VID_0000&PID_0002\5&2a23b6a8&0&1
Thanks
You need to make sure your PID and VID are set correctly as I have noted. That was essential for my recovery.
From what you have shown, your nano vid/pid are currently incorrect.
I would fix that first.