App Inventor is a visual, easy-to-use online Android Application development platform. It is a great vehicle that empowers the do-it-yourself enthusiast to develop mobile IoT clients without battling the steep learning curve of traditional text-based development platforms.
Aside from the basic programming language constructs, all you need is a method of accessing your Internet enabled devices. And many developers prefer to use MQTT, a machine-to-machine connectivity protocol, to communicate externally with their IoT “things”.
But up to now, there has not been a lot of information available showing how to use MQTT with App Inventor. Here is what I have come up. It’s a working example of an Android App Inventor project using MQTT.
The Concept
When I first looking into this, it seemed that those looked into this were trying to adapt the existing App Inventor Web components to work with MQTT. But that just won’t work. MQTT requires a TCP connection to remain open for the entire time the App is running. And App Inventor only provides an http interface.
App Inventor also did not appear to provide a method of adding a c-based MQTT library. Another possibility was to interface with JavaScript. After all, I had already been successful in implementing an MQTT webpage using JavaScript.
But how can you interface with JavaScript using App Inventor?
After investigating App Inventor features deeper, the answer popped into my head like a light bulb flipping on. The solution was right there…
WebViewString .
That’s it! You can set the WebViewString from App Inventor. And JavaScript can read and act upon the contents of the WebViewString object. All I had to do was setup a basic communication scheme with this and MQTT communication would be possible.
Overall Communication Structure
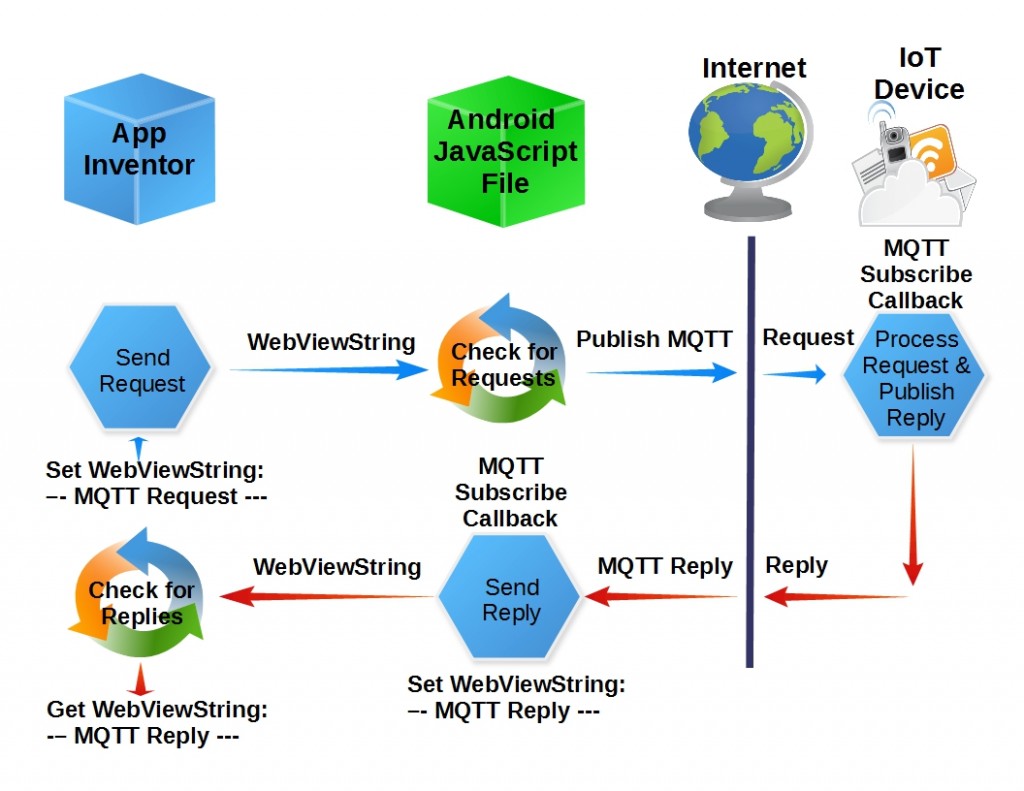
Here is how it works…
App inventor sets the WebViewString to the MQTT topic payload that it wants to publish. Then, a JavaScript file monitoring the value of the WebViewString for MQTT requests picks up the payload and publishes it. The IoT device that subscribes to the topic then detects the request, acts on it, and returns a reply via an MQTT topic publication.
The rest of the sequence should be obvious. The JavaScript subscribing to the MQTT topic published by the IoT device then forwards the reply back to App Creator by changing the value of the WebViewString .
That’s it. And here is the implementation…
App Inventor GUI
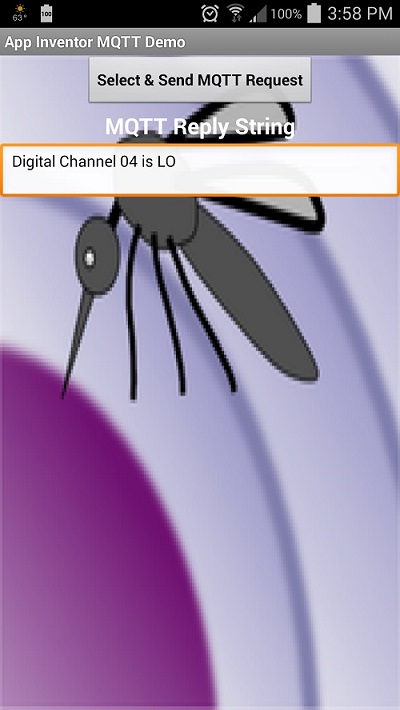
For this example, the App Inventor GUI has intentionally been kept simple. Just one user action provided: Click on the button to select an MQTT request and wait for the reply string to appear.
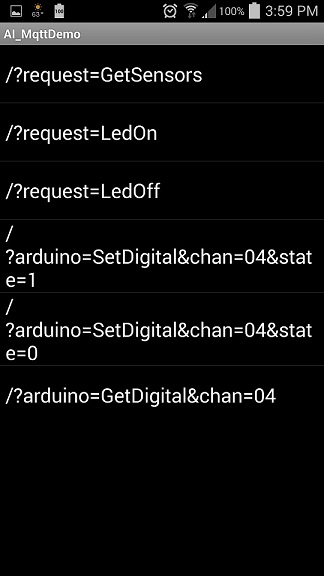
Since this example uses the Triple Server Update ESP8266 sketch from my previous post, these are the options that can be selected when the button is clicked. They can be easily customized for your own system requirements.
These selections are currently just the raw strings sent to the IoT based MQTT server. The App Inventor code could be refined, if desired, to make it more user friendly. Such as using a channel selector input as well as a logic state selector (HI or LO). But for this example, raw strings are suffice.
App Inventor Initialization Code
Here is the App Inventor code used to initialize the MQTT request options. This code executes when the App’s one and only screen opens. Just change the text in the list for your own MQTT topic payloads.
Note that the JavaScript MQTT server file pointer is also initialized here. This file, locally stored in the Android SDcard, is open when the App starts. More about that later in this article.
App Inventor Send MQTT Request Code
When one of the request options are selected (picked), the WebViewString is set to this request value. It is prefaced with “GET:” so the JavaScript code knows what is to follow is an MQTT request.
App Inventor Receive Reply Code
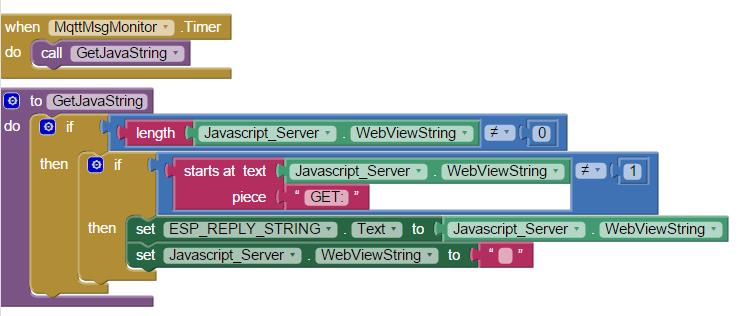
Finally, the App Inventor continuously monitors the WebViewString for replies from the JavaScript. While I do not prefer to use polling loops, that was the only mechanism I was able to come up with for this. The polling timer is set to repeat every 100 ms, or 10 times per second.
WebViewString is first validated as a reply by confirming it is not blank and does not start with the request “GET:” prefix. If these conditions are met, the GUI reply string is set to the WebViewString value. Note that the WebViewString value is set to “” after read so this polling function does not process it more than once.
JavaScript For MQTT
Since I already had a working MQTT webpage from a prior project, it was simply reused for this example. Of course, the irrelevant parts were remove and the WebViewString object was added. While it can be saved anywhere, for this project, the file is stored on the Android device’s SD card. File installation instructions are provided in the GitHub repository for this project.
JavaScript Initialization Code
The initialization code first brings in the required MQTT and jquery libraries from online sources:
- <!-- mosquitto MQTT ---------------------------------------------------------------->
- <script type="text/javascript" src="http://test.mosquitto.org/mosquitto.js"></script>
- <!-- jQuery ------------------------------------------------------------------------>
- <script src="https://ajax.googleapis.com/ajax/libs/jquery/1.11.2/jquery.min.js"></script>
Next, default values are set for the request, MQTT broker, and the request/reply topics. An instance of a Mosquitto client is also created,
- // Set Default Request ------------------------------------------------------------->
- $("#request").val("/?request=GetSensors");
- // Set Default MQTT Url ------------------------------------------------------------>
- var mqtturl = "ws://test.mosquitto.org:8080/mqtt";
- var txtopic = "MyMqttSvrRqst";
- var rxtopic = "MyMqttSvrRply";
- // Create MQTT client instance ----------------------------------------------------->
- client = new Mosquitto();
- client.run = 0;
Finishing the initialization, the MQTT broker connection is established and the WebViewString polling loop is started.
- //executes once after window is loaded --------------------------------------------->
- function windowloaded() {
- client.connect(mqtturl); // Connect to MQTT broker
- AppInventorServer(); // Start polling WebViewString
- }
- window.onload = windowloaded; // Launch windowloaded()
JavaScript Receive Request Code
Here is the polling loop, which checks for new MQTT requests from App Inventor.
- // 10 Hz WebViewString polling timer function -------------------------------------->
- function AppInventorServer() {
- var request = window.AppInventor.getWebViewString(); // Get WebViewString
- if(request.substring(0, 4)=="GET:") { // Validate request
- window.AppInventor.setWebViewString(""); // Reset String (process once)
- $("#request").val(request.substring(4, request.length)); //set request html textbox
- SendMqttRequest(); // Send Mqtt Request
- }
- setTimeout(AppInventorServer, 100); // run AppInventorServer() in 100 ms
- }
- // Publishes MQTT topic contained in html #request object -------------------------->
- function SendMqttRequest() {
- client.publish(txtopic,$("#request").val(),0,0);
- }
If the WebViewString starts with “GET:”, it is considered to be valid. In that case, the WebViewString is first set to “” to avoid processing the request again at the next 100 ms interval. The request string is then stripped from the WebViewString and published as an MQTT topic. This polling loop restarts every 100 ms.
JavaScript Reply Callback Code
Whenever the subscribed MQTT topic message is received, a JavaScript callback function is executed.
- // Callback executed upon receipt of MQTT message ---------------------------------->
- client.onmessage = function(topic, payload, qos){
- if(topic==rxtopic) {
- setpayload(payload);
- }
- };
- // Sets WebViewString and html payload text box to 'payld' ------------------------->
- function setpayload(payld) {
- window.AppInventor.setWebViewString(payld); // Set WebViewString
- $("#payloadmqqt").html(payld); // Set html textbox
- }
This callback simply passes the reply (MQTT topic payload) back to App Inventor through the WebViewString. An html textbox is also filled with this reply string.
That’s it!
The App Inventor project file and JavaScript html file is available on GitHub here. Instructions for installing the JavaScript file on an Android device is also provided at this same GitHub location.
Hope you find this information useful.
And stay tuned. My next step will be adding non-volatile configuration for the MQTT parameters. This will provide the capability to change MQTT brokers and topics without changing the contents of the installed html file.
![]()


Hi,
I am new to App inventor and MQTT. I running mosquitto mqtt broker on windows machine by running the command: mosquitto -v
The following lines were displayed in the command window:
1453043054: mosquitto version 1.4.5 (build date 09/11/2015 14:34:52.97) starting
1453043054: Using default config.
1453043054: Opening ipv6 listen socket on port 1883.
1453043054: Opening ipv4 listen socket on port 1883.
from this I noticed that the port is 1883 and not 8080. So in the html file I changed “ws://test.mosquitto.org:8080/mqtt” to “ws://test.mosquitto.org:1833/mqtt”
But still I am not receiving any message from the topic “TheMqttSvrRqst” when I am running the app. What could be wrong in my steps?
Looks like the script is using websocket method. But websocket method is not supported in windows yet. Is it possible to change to TCP?
Thanks for your comment. I am away right now and may not be able to provide answers to your questions until Monday afternoon.
Could you please clarify a few things with your setup that might help me understand:
1. From your 1st comment, it sounds like you are running your own Mqtt broker on a Windows computer. If that is correct, you will not be able to connect to it from the referenced url, regardless of the port and method. That domain is for an on-line broker.
I got to go, I’ll try to provide more info later
One more thing. The topics need to match. That is, the publish topic in the html needs to match the subscribe topic in your device, an esp8266 in my example. I noticed the topic in the html starts with ‘The’ but the esp default starts with ‘My’. My mistake, these need to match. You might want to change the topics to something unique for you since there would be a conflict if someone else using my example uses the same these same default topics.
Hi, Thanks for your reply. I will tell you my exact requirement. I want to send accelerometer data from the android phone to intel galileo. For that I chose mqtt as medium of communication. I am a noob to android app development. So I chose App inventor and when exploring in the internet, your tutorial was helpful. I am going to set up the mqtt broker in the intel galileo (yocto linux). I will subscribe to a topic in the galileo. The app should send the accelerometer data to that topic.
I couldn’t configure the mqtt broker with websocket protocol. Is it possible to modify your script to publish in default protocol?
Security issues make it difficult to support a TCP connection to an MQTT Broker with a web-based solution. And as you know, App Inventor does not support MQTT TCP connections.
While I am sure you must have a good reason to embed your mqtt broker in the galileo device, it creates a problem when needing to connect to an App Inventor App. The best way to solve this is by introducing a proxy server app on your android device, running as a background process. This App would need to be developed using a native Android development environment, which is much more detailed than an App Inventor project. I use the Eclipse IDE for Android App development. Not for the faint hearted. The proxy server would translate websocket (or http GET if desired) communication into TCP sockets compatible with your Galileo device. But if you are going to go through that much trouble, you might as well make your entire app this way and skip App Inventor. That would be the cleanest way to go; no need for a proxy server.
Please review the following for my recommended solution:
RECOMMENDATION: Use a 3rd party MQTT broker. That is what it is designed for. Many brokers, including the one I have been testing with (test.mosquitto.org) support both websockets and raw tcp sockets(the kind compatible with your galileo MQTT client). They do not need to use the same protocol on the publisher and subscriber sides. This should be feasible with the least amount of pain (effort) needed from your current configuration.
Please note that I have researched Google Play Store for a suitable off-the-shelf Proxy Server for this purpose, but found none that would satisfy your requirements. It looks like a custom app would be needed.
I have successfully built and tested my own mosquitto 1.4.7 broker on a PuppyLinux USB flash drive installation. It supports both MQTT default tcp and websocket protocols. While I do not own a raspberry pi, there should be nothing stopping you from building your own mosquitto 1.4.7 application on your raspberry pi, with websocket support. I’ll be posting an article next week with step-by-step instructions on how I did it. Your steps should be very similar.
But a note of caution: While I do not have 1st hand experience, I have read numerous users complain about the slow response using a raspberry pi hosted MQTT broker.
I am using a cheap old netbook that’s been sitting around collecting dust for my MQTT broker. Just plug in the USB flash drive, boot the computer and the MQTT broker is running! Remove the flash drive, reboot and you have the untouched Windows OS running.
Good luck with your project.
Hi
This is fantastic, just what I needed. I can confirm that your app will work via a websocket to a mosquitto broker running on my raspberry pi version B with no problems at all.
I’ve had the pi running a mosquitto broker for months getting data to & from many esp8266 boards and a few raspberry pi’s.
The Pi also runs an openvpn server and Node-red (excellent for IOT) .
As I use mqtt a lot I did a search to see if app inventor could use it, that is how I found your web page.
Keep up the good work, I will be interested to see how it progresses.
Regards
Gareth.D
I have been trying to implement the same solution. Unfortunately have not been successful so far. Request if someone could guide me the mistake i am doing.
I have kept the html file in the local Android storage and have updated the file path as below. And am trying to running the Mobile application. It doesnot give any error nor an message.
file:///Internal storage/mqtt/mqtt_appinventor.html
Plz do help, what could be the issue for which it is not running.
It is not clear from your comment the exact issue you are encountering. But I did notice you are using first iteration of this project.
I suggest you review and use the code in my latest post MQTT for App Inventor – Adding TLS Security
This more recent and refined solution supports TLS security and passwords. You will likely be using a public broker for your initial run so TLS and username/password security will not be used.
You should break it down into manageable steps. First get the Android app to connect and exchange information with a broker that you can verify using a desktop web browser or Android App. Once you get that working, you can introduce the ESP8266.
I just installed the Android App on my Samsung S8+ and verified everything works. No problem turning an ESP8266 LED on/off and reading the sensor values, whatever request you send it.
You will find that my latest implementation uses the paho MQTT library. The original design uses a mosquitto js library. The mosquitto library was not as robust and did not support the security features that are now integrated into the design.
Here is the configuration file (cfg.txt) settings that works with the broker referenced. It should work with your Android Device:
<code>
{
"mqtt_broker":"broker.mqttdashboard.com",
"mqtt_txtopic":"mqtt_request",
"mqtt_rxtopic":"mqtt_reply",
"mqtt_un":"",
"mqtt_pw":"",
"mqtt_port":"8000",
"mqtt_clientId":"clientID-!!@@$",
"mqtt_keepalive":"60",
"mqtt_lastWillTopic":"lwt",
"mqtt_lastWillMessage":"closing down….",
"mqtt_lastWillQoS":"0",
"mqtt_TLS_enable":"false"
}
</code>
Here is a Chrome Browser MQTT client you can use to test your Android App with:
MQTT Browser Client
Good luck. This is a great bridge between App Inventor and MQTT, and it works!
Hi,I have been working on designing a switch board for my room. The switchboard can handle 8 electrical devices which can be operated using Alexa (voice control), 8 touch switches on the switchboard and via internet. The internet part has been implemented using MQTT with io.adafruit as the broker. The 8 switches share one byte for their status (use bits) and share only 1 feed. I am now stuck at designing the android app. Can you help me in starting the android app so that it can receive the byte as a subscription for the buttons and publish the changed status byte back to the broker as and when any button is pressed on the android app. The panel is built around ESP8266 (NodeMCU). Struggling with Android Studio.
My experience developing Android apps has been limited to using the Eclipse IDE and and App Inventor. I too never mastered Android Studio, there was a steeper learning curve than I wanted to endure. At this time, it is my understanding that using the Eclipse IDE to develop native Android Apps is an obsolete method.
Here are a few suggestions if you still need some help with the Android App:
Option 1: Android App using Cordova
This, too uses the Eclispe IDE. But rather than making the app dependent on the Android OS, it is really about compiling a webpage into an Android App. The advantage is that the same code can be compiled into an iOS app for the iPhone platform. Using contemporary web development methods, it is possible to make a webpage gui look a lot like an App.
https://internetofhomethings.com/homethings/?p=663
https://internetofhomethings.com/homethings/?p=691
Option 2: Android App using Android Studio
No examples. Let me know if you are still in need and want to pursue this path. It is an avenue I may want to revisit. In fact, am currently developing a simple "Hello World" app using the Android Studio. If that is successful, the MQTT interface should be achievable. We shall see.
Option 3: Android App using App Inventor
This example should help as a guide, using Javascript again to publish on button click/tap. And subscribe to display status:
https://internetofhomethings.com/homethings/?p=1317
Option 4: Embed webpage in your ESP8266 code (Like my config page) and use Javascript to respond to button clicks/taps on webpage.
https://internetofhomethings.com/homethings/?p=1270
Option 5: Host webpage on your own server, accessible on your android device using web browser:
https://internetofhomethings.com/homethings/?p=1758
How do I have to change mqtt_appinventor.html to connect to my iobroker on 192.168.178.xyz:8081.
Check out this follow-up post which provides information about adding broker parameters.
https://internetofhomethings.com/homethings/?p=1401