App Inventor is a visual, easy-to-use online Android Application development platform. It is a great vehicle that empowers the do-it-yourself enthusiast to develop mobile IoT clients without battling the steep learning curve of traditional text-based development platforms.
Aside from the basic programming language constructs, all you need is a method of accessing your Internet enabled devices. And many developers prefer to use MQTT, a machine-to-machine connectivity protocol, to communicate externally with their IoT “things”.
But up to now, there has not been a lot of information available showing how to use MQTT with App Inventor. Here is what I have come up. It’s a working example of an Android App Inventor project using MQTT.
The Concept
When I first looking into this, it seemed that those looked into this were trying to adapt the existing App Inventor Web components to work with MQTT. But that just won’t work. MQTT requires a TCP connection to remain open for the entire time the App is running. And App Inventor only provides an http interface.
App Inventor also did not appear to provide a method of adding a c-based MQTT library. Another possibility was to interface with JavaScript. After all, I had already been successful in implementing an MQTT webpage using JavaScript.
But how can you interface with JavaScript using App Inventor?
After investigating App Inventor features deeper, the answer popped into my head like a light bulb flipping on. The solution was right there…
WebViewString .
That’s it! You can set the WebViewString from App Inventor. And JavaScript can read and act upon the contents of the WebViewString object. All I had to do was setup a basic communication scheme with this and MQTT communication would be possible.
Overall Communication Structure
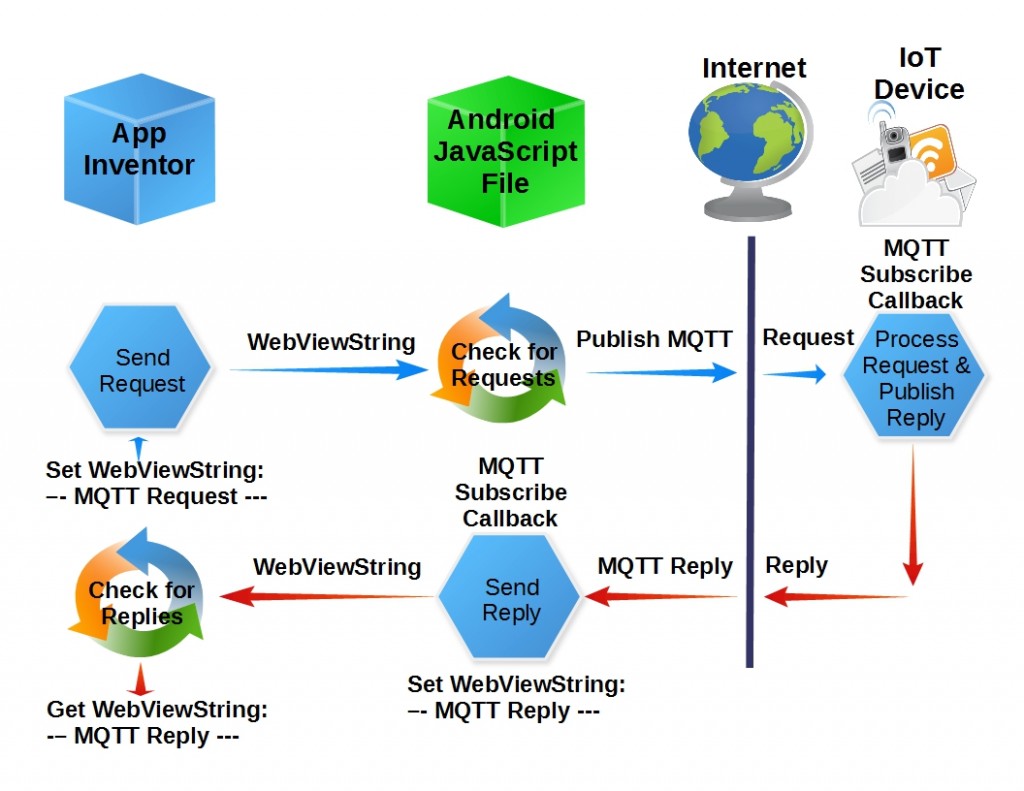
Here is how it works…
App inventor sets the WebViewString to the MQTT topic payload that it wants to publish. Then, a JavaScript file monitoring the value of the WebViewString for MQTT requests picks up the payload and publishes it. The IoT device that subscribes to the topic then detects the request, acts on it, and returns a reply via an MQTT topic publication.
The rest of the sequence should be obvious. The JavaScript subscribing to the MQTT topic published by the IoT device then forwards the reply back to App Creator by changing the value of the WebViewString .
That’s it. And here is the implementation…
App Inventor GUI
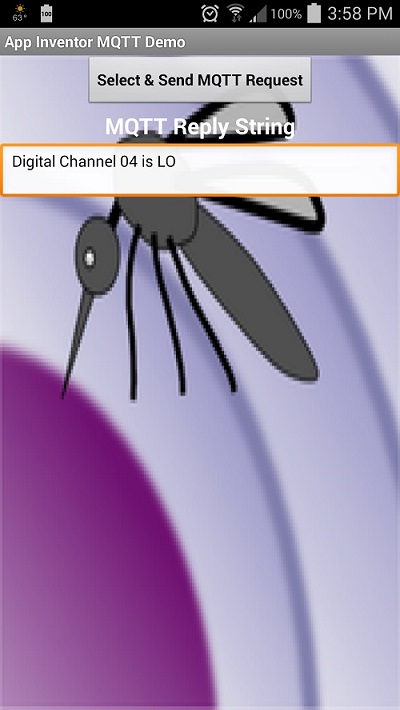
For this example, the App Inventor GUI has intentionally been kept simple. Just one user action provided: Click on the button to select an MQTT request and wait for the reply string to appear.
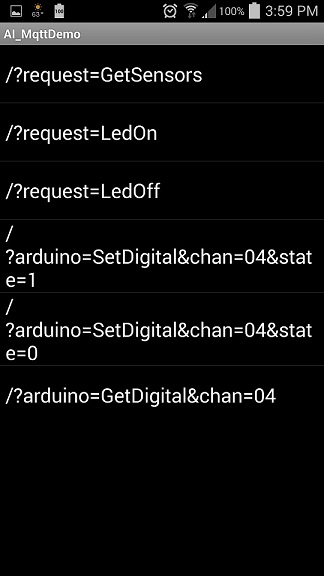
Since this example uses the Triple Server Update ESP8266 sketch from my previous post, these are the options that can be selected when the button is clicked. They can be easily customized for your own system requirements.
These selections are currently just the raw strings sent to the IoT based MQTT server. The App Inventor code could be refined, if desired, to make it more user friendly. Such as using a channel selector input as well as a logic state selector (HI or LO). But for this example, raw strings are suffice.
App Inventor Initialization Code
Here is the App Inventor code used to initialize the MQTT request options. This code executes when the App’s one and only screen opens. Just change the text in the list for your own MQTT topic payloads.
Note that the JavaScript MQTT server file pointer is also initialized here. This file, locally stored in the Android SDcard, is open when the App starts. More about that later in this article.
App Inventor Send MQTT Request Code
When one of the request options are selected (picked), the WebViewString is set to this request value. It is prefaced with “GET:” so the JavaScript code knows what is to follow is an MQTT request.
App Inventor Receive Reply Code
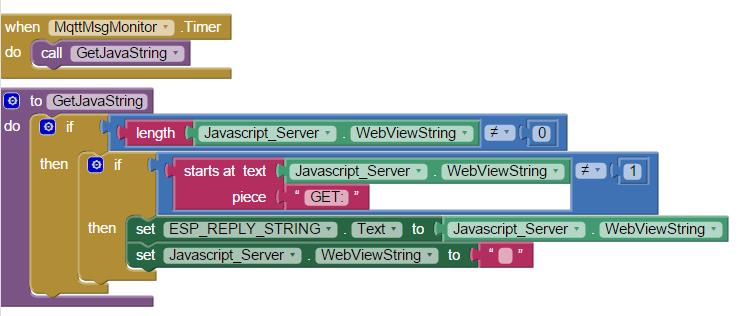
Finally, the App Inventor continuously monitors the WebViewString for replies from the JavaScript. While I do not prefer to use polling loops, that was the only mechanism I was able to come up with for this. The polling timer is set to repeat every 100 ms, or 10 times per second.
WebViewString is first validated as a reply by confirming it is not blank and does not start with the request “GET:” prefix. If these conditions are met, the GUI reply string is set to the WebViewString value. Note that the WebViewString value is set to “” after read so this polling function does not process it more than once.
JavaScript For MQTT
Since I already had a working MQTT webpage from a prior project, it was simply reused for this example. Of course, the irrelevant parts were remove and the WebViewString object was added. While it can be saved anywhere, for this project, the file is stored on the Android device’s SD card. File installation instructions are provided in the GitHub repository for this project.
JavaScript Initialization Code
The initialization code first brings in the required MQTT and jquery libraries from online sources:
 <!-- mosquitto MQTT ---------------------------------------------------------------->
 <script type="text/javascript" src="http://test.mosquitto.org/mosquitto.js"></script>

 <!-- jQuery ------------------------------------------------------------------------>
<script src="https://ajax.googleapis.com/ajax/libs/jquery/1.11.2/jquery.min.js"></script>
Next, default values are set for the request, MQTT broker, and the request/reply topics. An instance of a Mosquitto client is also created,
 // Set Default Request ------------------------------------------------------------->
 $("#request").val("/?request=GetSensors");

 // Set Default MQTT Url ------------------------------------------------------------>
 var mqtturl = "ws://test.mosquitto.org:8080/mqtt";
 var txtopic = "MyMqttSvrRqst";
 var rxtopic = "MyMqttSvrRply";

 // Create MQTT client instance ----------------------------------------------------->
 client = new Mosquitto();
 client.run = 0;
Finishing the initialization, the MQTT broker connection is established and the WebViewString polling loop is started.
 //executes once after window is loaded --------------------------------------------->
 function windowloaded() {
     client.connect(mqtturl);   // Connect to MQTT broker
     AppInventorServer();       // Start polling WebViewString
 }
 window.onload = windowloaded;  // Launch windowloaded()
JavaScript Receive Request Code
Here is the polling loop, which checks for new MQTT requests from App Inventor.
 // 10 Hz WebViewString polling timer function -------------------------------------->
 function AppInventorServer() {
     var request = window.AppInventor.getWebViewString(); // Get WebViewString
     if(request.substring(0, 4)=="GET:") {                // Validate request
         window.AppInventor.setWebViewString("");         // Reset String (process once)
         $("#request").val(request.substring(4, request.length)); //set request html textbox
         SendMqttRequest();                               // Send Mqtt Request
     }
     setTimeout(AppInventorServer, 100);   // run AppInventorServer() in 100 ms
 }
 // Publishes MQTT topic contained in html #request object -------------------------->
      function SendMqttRequest() {
          client.publish(txtopic,$("#request").val(),0,0);
 }
If the WebViewString starts with “GET:”, it is considered to be valid. In that case, the WebViewString is first set to “” to avoid processing the request again at the next 100 ms interval. The request string is then stripped from the WebViewString and published as an MQTT topic. This polling loop restarts every 100 ms.
JavaScript Reply Callback Code
Whenever the subscribed MQTT topic message is received, a JavaScript callback function is executed.
// Callback executed upon receipt of MQTT message ---------------------------------->
client.onmessage = function(topic, payload, qos){
    if(topic==rxtopic) {
        setpayload(payload);
    }
};

// Sets WebViewString and html payload text box to 'payld' ------------------------->
function setpayload(payld) {
    window.AppInventor.setWebViewString(payld);  // Set WebViewString
    $("#payloadmqqt").html(payld);               // Set html textbox
}
This callback simply passes the reply (MQTT topic payload) back to App Inventor through the WebViewString. An html textbox is also filled with this reply string.
That’s it!
The App Inventor project file and JavaScript html file is available on GitHub here. Instructions for installing the JavaScript file on an Android device is also provided at this same GitHub location.
Hope you find this information useful.
And stay tuned. My next step will be adding non-volatile configuration for the MQTT parameters. This will provide the capability to change MQTT brokers and topics without changing the contents of the installed html file.
