Have you ever moved your ESP8266 system from one Wifi location to another? Or perhaps made an extra one for your friend? In many cases, the initial setup requires a change to the sketch, to adjust the Wifi parameters to match the new access point—that is—unless the local settings are stored in the ESP8266 EEPROM.
What’s great about the EEPROM is that once updated, the configuration is non-volatile, That is, the values remain the same after the system power is removed and re-applied.
This post provides a method of setting and saving parameters likely to change with WiFi location, without changing the installed firmware sketch.
Once you’ve got you IoT device finished, you really should not have to modify the software again. That is, unless enhancements are made or bugs corrected.
Configurable Parameters
I started out with intentions on building a reusable configuration template. This would include the parameters most likely to change with system location and cloud-based servers used.
Using the Triple Server sketch I had developed recently as a test case, the configurable network and MQTT parameters were first identified. Then, these parameters were mapped to the ESP8266 EEPROM.
For the project presented in this post, the following parameters were singled out to be configurable:
- WIFI SSID
- WIFI Password
- IP – Static IP assigned to ESP8266 when used in Station mode
- NM – Network Mask
- GW – Gateway (Wifi Router IP)
- AP – Static IP assigned to ESP8266 when used in Access Point mode
- Web Server network port
- MQTT Broker
- MQTT Username
- MQTT Password
- MQTT Request Topic
- MQTT Reply Topic
- Serial Port baud
- Arduino Server Enable
EEPROM Memory Map
The ESP8266 EEPROM configuration space is typically the first 512 bytes of memory. And here is how I allocated the configurable parameters to this EEPROM.
[wptg_comparison_table id=”14″]
Note that while 32 bytes are allocated for the character array parameters, this size is the maximum; it is not required to use this entire space. But each character array must be terminated in EEPROM with a NULL (0x00) character.
Webpage Structure
The next thing needed was a way to construct a webpage for viewing, altering, and saving these configuration parameters. All of the page rendering is done on the client side browser. With this in mind, the web page was developed using only html, css for styling, and Javascript.
In order to conserve program memory, the webpage source is saved into flash memory. Two character arrays were used, one for the html and JavaScript and a separate one for the css styling.
Next time, I am planning to separate out the JavaScript as well for cleaner partitioning. This can easily be done from the example code provided here and is highly encouraged as an exercise.
A token was placed at the top of the html character array for insertion of the css styling. Likewise, tokens have been placed in the Javascript jquery section for each configurable parameter. These tokens are replaced with the values stored in EEPROM prior to sending the completed webpage string to the client browser for rendering.
In this example:
     $("#ssid").val("set_ssid");
     $("#password").val("set_pass");
     $("#ip_0").val("set_ip0");
     $("#ip_1").val("set_ip1");
     $("#ip_2").val("set_ip2");
     $("#ip_3").val("set_ip3");
     .
     .
set_ssid is the first parameter token, which is replaced with the value read from EEPROM.
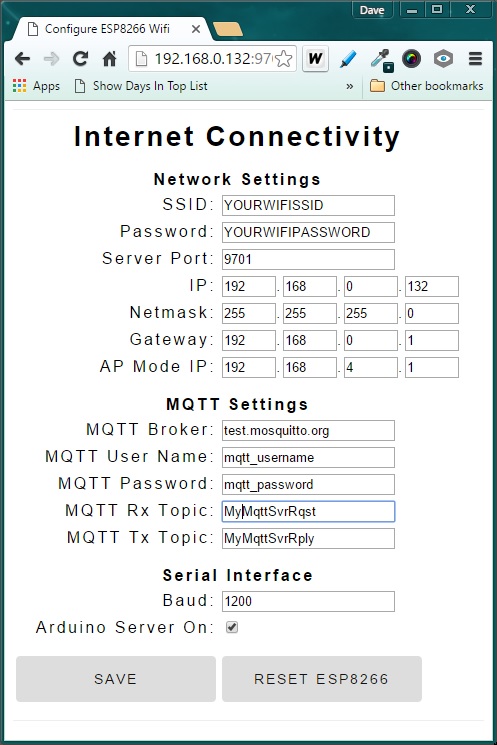
Here is what the rendered configuration page looks like:
The parameters are structured in html as a form with the two buttons shown. The save button is of type “submit” which sends all of the parameters back to the ESP8266 as a GET request for saving to the EEPROM.
But this merely saves the values back to EEPROM. Since the startup setup() function has already been run, the saved parameters do not become effect until an ESP8266 reset is performed. That is accomplished either with a power cycle or clicking on the “RESET ESP8266” button on this configuration page.
ESP8266 Webpage Request/Reply Code
Code was added to the ESP8266 URL request processing algorithm to handle web page requests. This is performed in the sketch’s Server_ProcessRequest function. For webpage requests, a slightly different URL format is used than requests to read a sensor.
The familiar example is the URL to get the sensor values:
192.168.0.132:9701/?request=GetSensors
When we want the ESP8266 to display the configuration page, enter:
192.168.0.132:9701/config
Note that there is no “?” for webpage requests. In order to parse the URL correctly for this case, the SdkWebServer_parse_url_params() function required modification.
Note that while the sketch provided in this example only supports the configuration page, a review of the code should make it obvious how to expand this to support your own custom webpages.
// --------------------------------------------------------------
// Serving Web Pages
// --------------------------------------------------------------
//
// ------------- Load Config Page -------------------------------
if(os_strcmp(pURL_Param->pParam[0], "config")==0) {
    GetEepromCfg(&WebPage);
    SdkWebServer_senddata_html(ptrespconn, true,
                               (char *) WebPage.c_str());
}
// -------------- Save config or Reset ESP8266 -------------------
if(os_strcmp(pURL_Param->pParam[0], "ssid")==0) {
    if(os_strcmp(pURL_Param->pParVal[0], "reset")==0){
    // ------------- Reset ESP8266 -------------------------------
        WebPage = reinterpret_cast<const __FlashStringHelper *>
                  (PAGE_WaitAndReset);
        SdkWebServer_senddata_html(ptrespconn, true,
                                   (char *) WebPage.c_str());
        os_timer_arm(&ResetEspTimer, 3000, false);
    }
    else {
        // --- Save config to EEPROM and reload config page ------
        SetEepromCfg((void *)pURL_Param);
        WebPage = reinterpret_cast<const __FlashStringHelper *>
                  (PAGE_WaitAndReload); //reload config page
        SdkWebServer_senddata_html(ptrespconn, true, (char *)
        WebPage.c_str());
    }
}
The first parameter parsed is used to determine the webpage request type. This example only processes 2 possibilities. If the first parameter is “config”, the configuration page is rendered.
That is accomplished by building the webpage string. First using the template, and then substituting values for the css and parameter tokens. This is all done in the GetEepromCfg() function:
 void GetEepromCfg(String *page)
{
    *page = reinterpret_cast<const __FlashStringHelper *>
            (PAGE_NetCfg);
    String css = reinterpret_cast<const __FlashStringHelper *>
                 (PAGE_Style_css);
    page->replace("ADDSTYLE",css);
    css = "";

    SetCfgPageWithEepromVal(page, "set_ssid", EEPROM_WIFISSID,
    EEPROM_CHR);
    SetCfgPageWithEepromVal(page, "set_pass", EEPROM_WIFIPASS,
    EEPROM_CHR);
    SetCfgPageWithEepromVal(page, "set_ip0", EEPROM_WIFI_IP0,
    EEPROM_INT);
    SetCfgPageWithEepromVal(page, "set_ip1", EEPROM_WIFI_IP1,
    EEPROM_INT);
    .
    .
But if the first parameter is ssid, the value of the parameter must first be read in order to determine what action is requested. That is because the method of returning values to the ESP8266 code for both of the WebPage button is by submitting the form.
When the reset button is clicked, the ssid value is changed to “reset” before submitting. In that case (above code), as message is displayed indicating the ESP8266 is resetting. Note that a 3-second delay is implemented using a timer before the ESP8266 resets itself. That is necessary to allow time for the reloading of the configuration webpage to complete prior to the reset.
And in the case that the Save button is clicked, the ssid value from the webpage form input is not modified (set to “reset”) and thus, the values are simply saved to EEPROM.
Webpage Expansion
Again, all you need to do is add a suffix to the ESP8266 access url and add your processing code to expand this webpage server:
192.168.0.132:9701/YOURCUSTOMPAGE
if(os_strcmp(pURL_Param->pParam[0], "YOURCUSTOMPAGE")==0) {
    //Do whatever you want here to handle this request
}
In case you missed part 1, the same code is used for this part 2. It is available on GitHub here.
In Closing
That’s it. A working framework for saving configuration parameters to ESP8266 EEPROM. And as an added bonus, you have a structure to expand this to render webpages of your own choosing. To control or monitor your own IoT things visually.
Hope you find this information as useful to you as it is for me…
Credits
Developing this example required research and reuse of material found in public domain sources. Special credit must be given to the following source which inspired my effort presented here. It also may be of use to others…
MQTT and Easy Web Config – by “The Godfather” – Posted October 22, 2015

