Archives for November 2017

Expanding ESP8266 ADC 1 VDC range

An obvious weakness of the ESP8266 is the limited capability of it’s single ADC input. At best, the voltage range is 0-1 Vdc. While coupling an Arduino module to the ESP8266 solves this problem, is does introduce significant data acquisition delays for the Arduino-to-ESP8266 communication. A preferred solution uses the ESP8266 without requiring an additional processor.

The method presented here adds 4 ADC inputs, each supporting voltages from 0-5V. In addition, one true DAC output is available to replace the PWM feature used for that purpose.

And no additional processor is required.

This is a very inexpensive addition, requiring hardware that acquired for approximately 1 USD.

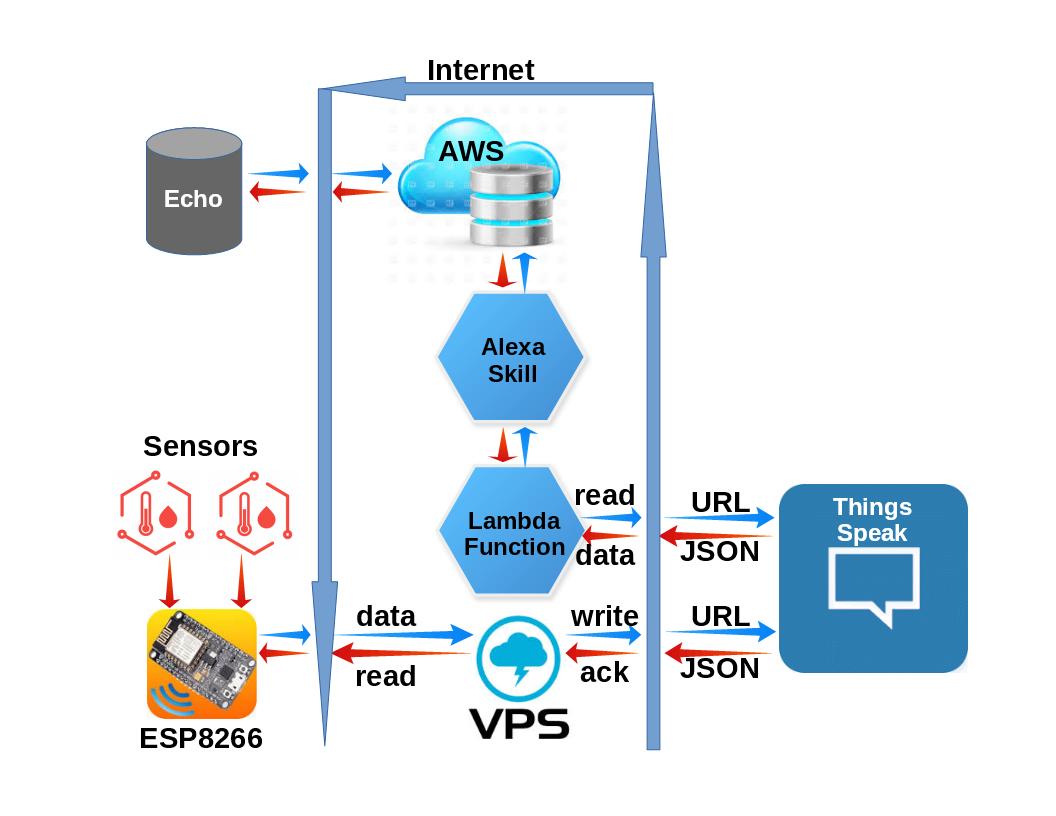
ESP8266 ADC Range Improvement

The enhancement is achieved by adding an external i2C bus ADC device to the ESP8266 system. This module, PCF8591, was added to my project recently, purchased from Ali-Express for 93 cents. It sports 4 ADC channels, one DAC channel, a potentiometer, thermister, and a photo-sensor. But for my needs, I have disabled the additional components and use it strictly as a 4-channel ADC.

The device uses an i2C bus, which requires 2 digital pins (any two) to operate.

There are two limitations I discovered while testing this module, neither of which adversely impact it’s functionality in my application.

  1. The ADCs and DAC are 8-bit devices. This results in a somewhat course resolution of 19mV-per-bit when using a 5V reference.
  2. The DAC range is linear 0-4Vdc, but compresses beyond that and tops out at 4.25Vdc.

Even with these constraints, I was still pleased to have the capability of measuring voltages 0-5V. This was a huge improvement over the ESP8266 native 0-1Vdc ADC.

The ADCs can be used single-ended (4 channels) or differential (2 channels), an added capability which allows you to measure signals with a common-mode voltage. Changing the ADC mode is a simple matter of changing the control byte when setting up the ADC for a measurement. As you will see in the sketch below, single-ended measurements are made using the control bytes:


  1. #define PCF8591_ADC_CH0 0x40 //Measure Ain0 single-ended at CH0
  2. #define PCF8591_ADC_CH1 0x41 //Measure Ain1 single-ended at CH1
  3. #define PCF8591_ADC_CH2 0x42 //Measure Ain2 single-ended at CH2
  4. #define PCF8591_ADC_CH3 0x43 //Measure Ain3 single-ended at CH3

Other options, if desired, would expand the set of control bytes:


  1. #define PCF8591_ADC_CH0 0x40 //Measure Ain0 single-ended at CH0
  2. #define PCF8591_ADC_CH1 0x41 //Measure Ain1 single-ended at CH1
  3. #define PCF8591_ADC_CH2 0x42 //Measure Ain2 single-ended at CH2
  4. #define PCF8591_ADC_CH3 0x43 //Measure Ain3 single-ended at CH3
  5. #define PCF8591_ADC_DIFF_CH0CH3_CH0 0x50 //Measure Ain0-Ain3 differentially at CH0
  6. #define PCF8591_ADC_DIFF_CH1CH3_CH1 0x51 //Measure Ain1-Ain3 differentially at CH1
  7. #define PCF8591_ADC_DIFF_CH2CH3_CH2 0x52 //Measure Ain2-Ain3 differentially at CH2
  8. #define PCF8591_ADC_MIXED_CH0 0x60 //Measure Ain0 single=ended at CH0
  9. #define PCF8591_ADC_MIXED_CH1 0x61 //Measure Ain1 single=ended at CH1
  10. #define PCF8591_ADC_MIXED_CH2_CH3 0x62 //Measure Ain2-Ain3 differentially at CH2
  11. #define PCF8591_ADC_DIFF_CH0CH1_CH0 0x70 //Measure Ain0-Ain1 differentially at CH0
  12. #define PCF8591_ADC_DIFF_CH2CH3_CH1 0x71 //Measure Ain2-Ain3 differentially at CH1


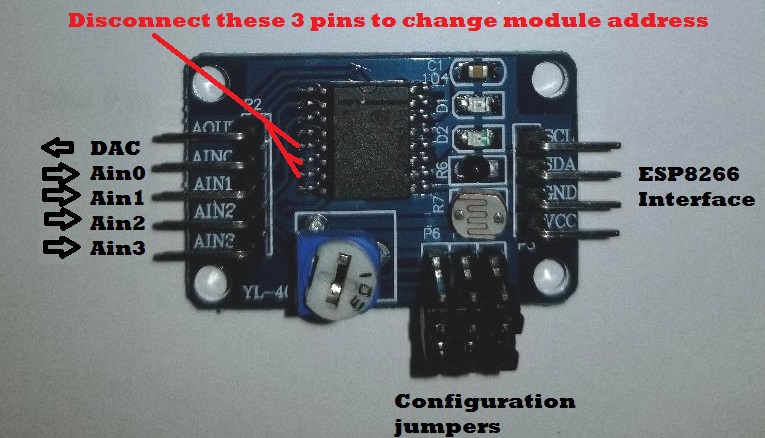
ADC Module Interfaces

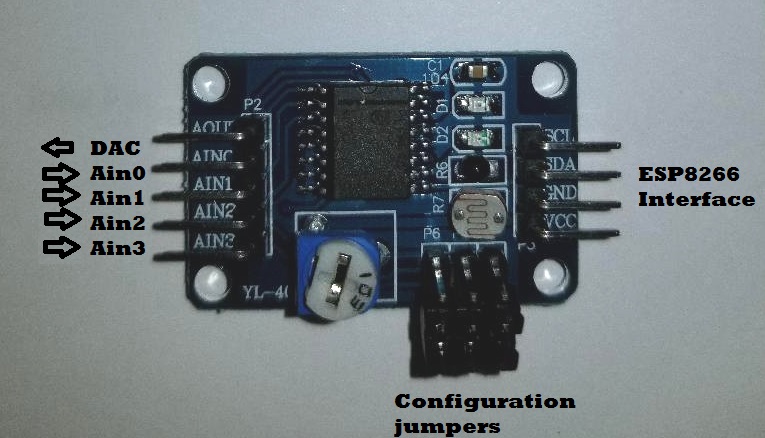
The ESP8266 interface requires 4 signals:

  1. Vcc (5 Vdc, before the 3.3 Vdc regulator)
  2. Gnd (Ground)
  3. SDA (Any ESP8266 Digital pin – GPIO4 in this example)
  4. SCL (Any EAP8266 Digital pin – GPIO2 in this example)

The jumper pins (P4-P6) are removed for 4-channels ADC configuration.

Here is the minimal Arduino sketch I used to test this ADC. As you can see, the ADC read code can easily be included in a more complex sketch.


  1. #include "Wire.h"
  2. #define PCF8591 (0x90 >> 1)
  3. #define PCF8591_DAC_ENABLE 0x40
  4. #define PCF8591_ADC_CH0 0x40 //Measure Ain0 single-ended at CH0
  5. #define PCF8591_ADC_CH1 0x41 //Measure Ain1 single-ended at CH1
  6. #define PCF8591_ADC_CH2 0x42 //Measure Ain2 single-ended at CH2
  7. #define PCF8591_ADC_CH3 0x43 //Measure Ain3 single-ended at CH3
  8. #define SDA 4
  9. #define SCL 2
  10. byte adcvalue0, adcvalue1, adcvalue2, adcvalue3;
  11. byte dac_value=0;
  12. byte adc_value;
  13. void putDAC(byte dac_value)
  14. {
  15. Wire.beginTransmission(PCF8591); //Calls the 8591 to attention.
  16. Wire.write(PCF8591_DAC_ENABLE); //Send a DAC enable word.
  17. Wire.write(dac_value); //Send the desired DAC value (0-255)
  18. Wire.endTransmission();
  19. }
  20. byte getADC(byte config)
  21. {
  22. Wire.beginTransmission(PCF8591);
  23. Wire.write(config);
  24. Wire.endTransmission();
  25. Wire.requestFrom((int) PCF8591,2);
  26. while (Wire.available())
  27. {
  28. adc_value = Wire.read(); //This needs two reads to get the value.
  29. adc_value = Wire.read();
  30. }
  31. return adc_value;
  32. }
  33. void setup()
  34. {
  35. Wire.begin(SDA,SCL);
  36. Serial.begin(115200);
  37. putDAC(0);
  38. Serial.println("dac,ain0,ain1,ain2,ain3");
  39. }
  40. void loop()
  41. {
  42. adcvalue0 = getADC(PCF8591_ADC_CH0);
  43. adcvalue1 = getADC(PCF8591_ADC_CH1);
  44. adcvalue2 = getADC(PCF8591_ADC_CH2);
  45. adcvalue3 = getADC(PCF8591_ADC_CH3);
  46. Serial.print(dac_value++);
  47. Serial.print(",");
  48. Serial.print(adcvalue0);
  49. Serial.print(",");
  50. Serial.print(adcvalue1);
  51. Serial.print(",");
  52. Serial.print(adcvalue2);
  53. Serial.print(",");
  54. Serial.print(adcvalue3);
  55. Serial.println();
  56. putDAC(dac_value);
  57. delay(100);
  58. }

This simple sketch configures the I2C library to attach to ESP8266 GPIO2 and GPIO4 and loop through a sequence of setting the DAC and reading all 4 ADC channels. For this setup, the DAC output is connected to all 4 ADC inputs and jumpers P4-P6 are removed. As one would expect, for each DAC setting, identical ADC values are measured for all 4 ADCs. But there are some deviations from the DAC setting:

DAC Limitations

The ADC measured values deviate from the DAC setting by no more than 1 bit (~ 20mV) from 0-2 Vdc. This deviation increases to 4 bits around 4 Vdc, with the DAC output topping out at about 4.2 Vdc.

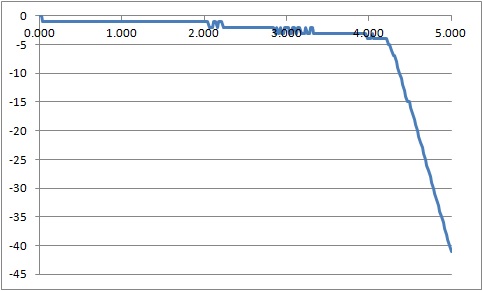
From this we can conclude that the DAC has a functional range from 0-4 Vdc with an error no greater than 4 bits (80mV). Not super accurate, but it is adequate for many applications.

I measured the ADC output with a DVM (digital voltmeter) to confirm the DAC output never exceeded 4.2 Vdc.

ADC Voltage Range

And to confirm the ADC has a full range of 0-5VDC (0-255 byte value), I applied 5 Vdc to one of the Ain inputs and verified the measure value as 255 (5 Vdc). I also used the built-in potentiometer to swing the ADC measurements between 0 and 255 (0-5 Vdc). With a slight modification to the sketch to display the ADC readings from the potentiometer (Ain3) in Vdc, we observe good correlation between the applied voltage and the ADC measurement.

Great!

This confirms the ADC can read voltages over the full 0-5 Vdc range.

Expanding the Channels

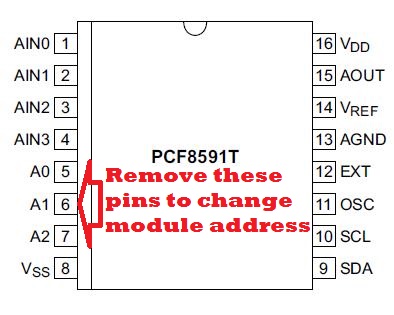
The PCF8591 ADC has 3 programmable address lines which makes it possible to expand the ADC channel count from 4 to 32. Even better, this still only requires 2 ESP8266 digital (GPIO) channels as the control pins would all be connected in parallel.

But there is a catch with the XL-40 carrier module that holds the PCF8591. The 3 address lines are hard-wired to ground. So, to expand the channels, you would need to cut the traces (lift the pins) to set a different address for each added module in your ESP8266 configuration.

No impossible, but you have to be careful not to overheat the device when desoldering the pins.

In Closing

Here is a low-cost (1 USD) addition to your ESP8266 setup that expands the ADC capability to 4 channels with the bonus of a real DAC output. While the DAC is limited to a 0-4Vdc range, you have the full 0-5 Vdc available for analog measurements with reasonable accuracy.

Hope you find this a useful addition to your projects.


Loading

Share This:
FacebooktwitterredditpinterestlinkedintumblrFacebooktwitterredditpinterestlinkedintumblr

Alexa, Ask ESP8266 for Temperature Readings

Uttering Alexa voice commands to turn your ESP8266 connected device on or off is cool. There is plenty of information readily available explaining how to make that happen.

But what a custom command?

Like having Alexa tell you something unique. Using data gathered by reading your specific IoT device sensors?

Such as ESP8266 measured values that change over time.

For example, temperature or other weather sensors.

Having the ability to interact verbally with your IoT device in this manner opens up a wide range of possibilities. Yet, as I discovered, information on this topic was more challenging to find with a google search.

So here is how I did it.

And so can you.

The Problem

What is needed is a method of converting your verbal request into a command that can be sent to your ESP8266 (or other IoT device) to get the requested information, and to return the information to Alexa in a format that she can read back to you.

The solution presented here uses the Amazon Web Services (AWS) to do all the voice interfacing with Alexa, Things Speak as a repository for the ESP8266 sensor data, and a VPS CRON script to move the sensor data from the ESP8266 to Things Speak.

You might wonder why a VPS and Thing Speak are used. Why not communicate directly with the ESP8266 from the AWS Lambda Function?

Truth is, you can cut out these intermediate steps. But for security, I have added this layer to hide my IoT credentials within my heavily fortified Virtual Private Server (VPS). But do not be concerned, as you will see, this does not make the system overly complicated.

System Diagram

Test Scenario

We start with a voice command: “Alexa, ask ESP8266-12 for the indoor temperature”

Alexa responds with: “The indoor temperature is 73.2 degrees”

So what just happened?

Since we are dealing with the Amazon Echo device, Amazon lingo is needed (bold).

The voice command was received by the Amazon Echo device and recognized as an Alexa skill.

Invocation of the skill triggered the Lambda function which, in-turn, sent a request to ThingSpeak for the current ESP8266 sensor readings,

The readings returned were passed back to the Alexa skill which recites the values of the temperature sensors.

Implementation

We need three components to make this system function as intended.

Data Source (ESP8266 Sensor Data)

  • From ThingSpeak Channel or
  • Directly from ESP8266

Amazon Skill to convert your voice to a command to retrieve the requested information

Amazon Lambda function to receive the Skill request, query for the requested information and return a reply to the Amazon Skill

Let’s do it…

You will need to setup two accounts with Amazon, If you do not already have these accounts, create them now. No worries, they are FREE:

Create Amazon Developer Account (For Alexa Skill)

Start by pointing your browser to:

https://developer.amazon.com/

Select “Sign In” located on the page’s top-right header:

Next, select the “Create your Amazon Developer Account” button

Follow the instructions to create your free Amazon Developer Account

Create free AWS account (For Lambda Function)

Start by pointing your browser to:

https://portal.aws.amazon.com/billing/signup#/start

Follow the instructions to create your free AWS (Amazon Web Services) Account

Creating the Alexa Skill

Sign in to https://developer.amazon.com/ and go to the Developer Console.

Select the Alexa tab.

Select “Get Started” Alexa Skills Kit.

Select “Add a New Skill”

Note: The rest of the skill creation can be customized for your needs. It is suggested that you follow along with this guide for your first skill, and customize after getting this example to work. For this example, my publicly shared ThingSpeak Channel is used for the dynamic data source

For the first tab (Skill information), enter:

Name: ESP8266

Invocation Name: e s p eighty two sixty six dash twelve

Then click “Save” at the bottom.

For the Interaction Model tab, enter:

Intent Schema (copy/paste):


  1. {
  2. "intents": [
  3. {
  4. "slots": [
  5. {
  6. "name": "Sensor",
  7. "type": "ESP_SENSORS"
  8. }
  9. ],
  10. "intent": "GetEspInfoIntent"
  11. },
  12. {
  13. "intent": "AMAZON.HelpIntent"
  14. },
  15. {
  16. "intent": "AMAZON.StopIntent"
  17. },
  18. {
  19. "intent": "AMAZON.CancelIntent"
  20. }
  21. ]
  22. }

Custom Slot Types:

Enter Type: ESP_SENSORS
Enter Values:
every
indoor
outdoor
attic

Then click “Add” below the “Enter Values” box..

Now click “Save” at the bottom.

Sample Utterances: GetEspInfoIntent for {Sensor} temperature

Click “Save” at the bottom.

Then click “Next” at the bottom.


Creating the Lambda Function

Sign in to https://portal.aws.amazon.com

Make sure you are on the URL https://console.aws.amazon.com

From the Console, select Services > Compute > Lambda

Click “Create Function”

Click “Author from scratch”.

Enter the following Basic Information:

Name: ESP8266V2

Role: Create new role from templates

RoleName: myEspRole

Policy Templates: CloudFormation stack read-only permissions

Then click “Create Function”

Select Runtime: “Node.js 4.3”

Then paste the following code in the index.js field:


  1. /**
  2. Copyright 2014-2015 Amazon.com, Inc. or its affiliates. All Rights Reserved.
  3. Licensed under the Apache License, Version 2.0 (the "License"). You may not use this file except in compliance with the License. A copy of the License is located at
  4. http://aws.amazon.com/apache2.0/
  5. or in the "license" file accompanying this file. This file is distributed on an "AS IS" BASIS, WITHOUT WARRANTIES OR CONDITIONS OF ANY KIND, either express or implied. See the License for the specific language governing permissions and limitations under the License.
  6. */
  7. /*
  8. This file has been modified under the terms of the above license October 2017
  9. */
  10. /**
  11. * This code is dependant on data retreived from a ThingsSpeak channel
  12. * It is a Lambda function for handling Alexa Skill requests.
  13. *
  14. * Examples:
  15. * One-shot model:
  16. * User: "Alexa, ask ESP8266 for temperature readings"
  17. * Alexa: "Indoor temperature is 75.2 degrees and outdoor temperature is 86.2 degrees"
  18. */
  19. /**
  20. * App ID for the skill
  21. */
  22. var APP_ID = undefined; //OPTIONAL: replace with "amzn1.echo-sdk-ams.app.[your-unique-value-here]";
  23. //var APP_ID = "amzn1.ask.skill.018df58b-9e42-4e0f-927c-fd06ba2edb5b"; //OPTIONAL: replace with "amzn1.echo-sdk-ams.app.[your-unique-value-here]";
  24. /**
  25. * The AlexaSkill prototype and helper functions
  26. */
  27. var AlexaSkill = require('./AlexaSkill');
  28. var https = require('https');
  29. //ThingSpeak Data Access
  30. var channel_id = 33251;                        //ThingSpeak Channel ID
  31. var speak_key = '9VGQ4X79MQJC90RD';            //ThingSpeak Channel Read Key
  32. var p_at,p_ou,p_in;                            //Sensor Readings
  33. // Create URL to retrieve latest temperature reading from my ThingsSpeak channel (JSON format)
  34. var url = 'https://api.thingspeak.com/channels/' + channel_id + '/feed/last.json?api_key=' + speak_key;
  35. /**
  36. * ESP8266 is a child of AlexaSkill.
  37. * To read more about inheritance in JavaScript, see the link below.
  38. *
  39. * @see https://developer.mozilla.org/en-US/docs/Web/JavaScript/Introduction_to_Object-Oriented_JavaScript#Inheritance
  40. */
  41. var Esp8266 = function () {
  42. AlexaSkill.call(this, APP_ID);
  43. };
  44. // Extend AlexaSkill
  45. Esp8266.prototype = Object.create(AlexaSkill.prototype);
  46. Esp8266.prototype.constructor = Esp8266;
  47. Esp8266.prototype.eventHandlers.onSessionStarted = function (sessionStartedRequest, session) {
  48. //console.log("onSessionStarted requestId: " + sessionStartedRequest.requestId + ", sessionId: " + session.sessionId);
  49. // any initialization logic goes here
  50. };
  51. Esp8266.prototype.eventHandlers.onLaunch = function (launchRequest, session, response) {
  52. //console.log("onLaunch requestId: " + launchRequest.requestId + ", sessionId: " + session.sessionId);
  53. handleEsp8266Request(response);
  54. };
  55. /**
  56. * Overridden to show that a subclass can override this function to teardown session state.
  57. */
  58. Esp8266.prototype.eventHandlers.onSessionEnded = function (sessionEndedRequest, session) {
  59. //console.log("onSessionEnded requestId: " + sessionEndedRequest.requestId + ", sessionId: " + session.sessionId);
  60. // any cleanup logic goes here
  61. };
  62. Esp8266.prototype.intentHandlers = {
  63. "GetEspInfoIntent": function (intent, session, response) {
  64. var speechOutput;
  65. var cardTitle;
  66. var sensorSlot = intent.slots.Sensor,
  67. sensorName = "every";
  68. if (sensorSlot && sensorSlot.value){
  69. sensorName = sensorSlot.value.toLowerCase();
  70. }
  71. switch(sensorName) {
  72. default:
  73. case "every":
  74. speechOutput = "Indoor temperature is " + p_in + " degrees" +
  75. " and the Outdoor temperature is " + p_ou + " degrees and " +
  76. "the Attic temperature is " + p_at + " degrees";
  77. cardTitle = "Temperature Readings";
  78. break;
  79. case "indoor":
  80. speechOutput = "Indoor temperature is " + p_in + " degrees";
  81. cardTitle = "Indoor Temperature Reading";
  82. break;
  83. case "outdoor":
  84. speechOutput = "Outdoor temperature is " + p_ou + " degrees";
  85. cardTitle = "Outdoor Temperature Reading";
  86. break;
  87. case "attic":
  88. speechOutput = "Attic temperature is " + p_at + " degrees";
  89. cardTitle = "Attic Temperature Reading";
  90. break;
  91. }
  92. response.tellWithCard(speechOutput, cardTitle, speechOutput);
  93. },
  94. "AMAZON.HelpIntent": function (intent, session, response) {
  95. response.ask("You can say ask ESP8266 for indoor temperature, or, you can say exit... What can I help you with?", "What can I help you with?");
  96. },
  97. "AMAZON.StopIntent": function (intent, session, response) {
  98. var speechOutput = "Goodbye";
  99. response.tell(speechOutput);
  100. },
  101. "AMAZON.CancelIntent": function (intent, session, response) {
  102. var speechOutput = "Goodbye";
  103. response.tell(speechOutput);
  104. }
  105. };
  106. /* -------------------------------------------------------------
  107. * Get all sensors temperatures and return speech to the user.
  108. * -------------------------------------------------------------
  109. */
  110. function handleEsp8266Request(response) {
  111. // Create speech output
  112. var speechOutput = "Greetings, I did not understand what you want. How may I serve you?";
  113. var cardTitle = "Initial Request";
  114. response.tellWithCard(speechOutput, cardTitle, speechOutput);
  115. }
  116. // Create the handler that responds to the Alexa Request.
  117. exports.handler = function (event, context) {
  118. https.get(url, function(res) {
  119. // Get latest sensor data from home IoT SoC
  120. res.on('data', function(d) {
  121. p_in = JSON.parse(d).field1;
  122. p_ou = JSON.parse(d).field2;
  123. p_at = JSON.parse(d).field3;
  124. // Create an instance of the SpaceGeek skill.
  125. var Esp8266_skill = new Esp8266();
  126. Esp8266_skill.execute(event, context);
  127. });
  128. res.on('end', function() {
  129. });
  130. res.on('error', function(e) {
  131. context.fail("Got error: " + e.message);
  132. });
  133. });
  134. };

Now save this function (Click “Save and test”)

Exit out of the “Test” screen and click on the “Triggers” tab

Then click “Add Trigger” and click in the dotted box:

Select “Alexa Skills Kit”:

And click “Submit”.

Now Lets link the Lambda Function to the Alexa skill:

Return to the Alexa Skill developed earlier:

Click Alexa Skills Kit > Get Started

Click on the Name of the Skill created earlier

Click “Configuration”

Click the Endpoint “AWS Lambda ARN” radio button

Paste the ARN from the paste buffer in the “Default” box

Click bottom “Save” button

That’s it!

Now let’s test it…

The next tab on the Alexa Skills page is called “Test”. Select it and scroll down to the “Service Simulator”

Using the “Text” table, simply enter one of the following utterances, click “Ask ESP8266” and verify you get an appropriate “Service Response”:

every temperature
indoor temperature
outdoor temperature
attic temperature

For example, the utterance “attic temperature” should produce the following Service Response in JSON format:


  1. {
  2. "version": "1.0",
  3. "response": {
  4. "outputSpeech": {
  5. "text": "Attic temperature is 49.2 degrees",
  6. "type": "PlainText"
  7. },
  8. "card": {
  9. "content": "Attic temperature is 49.2 degrees",
  10. "title": "Attic Temperature Reading"
  11. },
  12. "speechletResponse": {
  13. "outputSpeech": {
  14. "text": "Attic temperature is 49.2 degrees"
  15. },
  16. "card": {
  17. "content": "Attic temperature is 49.2 degrees",
  18. "title": "Attic Temperature Reading"
  19. },
  20. "shouldEndSession": true
  21. }
  22. },
  23. "sessionAttributes": {}
  24. }

The actual temperature readings will vary, depending on the current temperature in my attic.

You should now be able to invoke this skill using your Amazon Echo using voice commands.

You can verify that this new skill is enabled on your Alexa echo at https://alexa.amazon.com

Select “Skills” and then “Your Skills”. This new skill should be listed and enabled.

The rest of the system has been covered in previous blog posts:

Things Speak Channel:

  • Write values
  • Read Values

Refer to my ThingSpeak Channel

Virtual Private Server (VPS):

  • Read from ESP8266
  • Write to Things Speak

Uses a Linux CRON script scheduled to run at the start of every hour.

See this post: PHP Script to move ESP8266 data

ESP8266 Sensor data source:

  • Read Sensors Continuously
  • Send Sensor Values on request as JSON string

ESP8266 Temperature Sensor Project

In Conclusion

As you can see, you can make the information collected by your IoT device, such as an ESP8266 accessible via audio commands/responses using the Amazon Echo device. The commands and responses can be customized to the exact words you wish to use. This opens up infinite possibilities.

Hope you find this information useful and fun to explore.

Loading

Share This:
FacebooktwitterredditpinterestlinkedintumblrFacebooktwitterredditpinterestlinkedintumblr

Press Ctrl+C to copy the following code.
"