
In my previous post, a comparison was made between ESP8266 Http and MQTT hosted servers. But the evaluation was not complete…it did not include CoAP. So I decided to add CoAP to the ESP8266 server sketch and revisit the performance.
Like MQTT and Http, CoAP is deployed in IoT things for M2M communication. But what is it?
Simply stated, CoAP, or Constrained Application Protocol is a web communication structure designed for use with limited resource Internet Things. For some light reading (zzzz) with all the details, refer to RFC 7252 upon which it is based. This protocol is designed to be light-weight, using connection-less UDP over IP.
But this is not a CoAP tutorial.
The purpose of this article is to compare the performance of CoAP with my previous comparison of MQTT to Http. To keep things on a level playing field, CoAP was evaluated using the same server get command that we used to test MQTT and Http servers.
Building on the initial design, the dual server sketch was simply updated to include CoAP. This example now supports three IoT communication protocols: CoAP, Mqtt and http. And just as before, there are two build options for the http server; one using the Arduino Wifi library for ESP8266 and the other using the EspressIf SDK API.
And as is the case with many of my first-time endeavors, an unexpected finding was uncovered…
Triple Protocol Server Sketch
Since this was my first attempt with a CoAP implementation, I started out searching for a suitable example as a basis for the sketch. Fortunately, there was one available, microcoap. That library is used in my sketch. It turned out to be a bit more than a trivial library addition to the sketch.
In addition to the sketch changes, the CoAP protocol required 3 new files;
coap.h       - Header file for coap library
coap.c       - Coap library code
endpoints.c  - CoAP interface for this example sketch
The coap.h,c files were added to the Arduino library while the endpoints.c is added to the sketch folder.
All of the typedefs and #defines were moved from the sketch to a separate header file; sketch.h.
The CoAP communication relies on UDP over IP. While a callback is preferred, this CoAP implementation requires polling in the loop() function to check for incoming CoAP packets. This added step to the 3-protocol server loop() function is implemented in the function “ProcessCOAPMsg()”.
 void loop() {
    util_startWIFI();                    // Connect wifi if connection dropped

    #if MQTT_SVR_ENABLE==1
    MqttServer_Processor();              // Service MQTT
    #endif

    #if SVR_TYPE==SVR_HTTP_LIB
    ArduinoWebServer_Processor();        // Service Web Server
    #endif

    ProcessCOAPMsg();                    // Service CoAP Messages

    ReadSensors(2500);                   // Read 1 sensor every 2.5 seconds or longer
}
But there is one way to reduce the loop() tasks. Fortunately, we have the option of using the SDK for the web server, which uses callbacks instead of polling in loop(). As you can see, the pre-compiler directive only includes the web server in loop() when the LIB option is selected. The callback is executed anytime an external http connection is made, eliminating the need to poll in loop().
In order to add some functionality to the original server, a fourth command was added to the 3 included with the dual mqtt and http server:
- Turn LED On
- Turn LED Off
- Get Sensor Values
- Blink LED n times
The added command in this example serves two new purposes:
First, this was an opportunity to have a command example that also required a parameter, In this case, the “blink” command needs a parameter to identify the number of blinks to perform.
Secondly, this command needs to be run asynchronous with the server reply. So that the reply is complete while the LED blinks continued. This would also be the case for any command that may require significant time to complete. Requiring a server reply before the command execution finishes.
In this case, a non-blocking function is launched using a timer. The timer receives a parameter identifying how many times remain in the blink sequence, as well as the state (on or off) to set the LED. Each time the timer is called (with a 500 ms delay to provide time for the observer to see the LED state), the LED changes state and the timer is called again. This continues until the commanded number of blinks finishes.
 ********************************************************
 * Callback for Blink timer
 * Function: BlinkCallback(int *pArg)
 *
 * Parameter    Description
 * ---------    -----------------------------------------
 * *pArg        int - number of times to blink LED
 * *pArg+1      int - set LED state (0=off,1=on)
 * *pArg+2      int - set to 1 first time to print header
 * return       no return value
 ********************************************************/
void BlinkCallback(int *pArg) {
    int i;
    int nblinks,ledstate,start;

    nblinks = *(int *)pArg;                           // Number of LED blinks
    ledstate = *(int *)(pArg+1);                      // LED state to program
    start = *(int *)(pArg+2);                         // Set to 1 first time this is
                                                         called

    if(start == 1)
    {
        Serial.print("Blink countdown:");             // LED countdown header to serial                                                         port
        blinkarg[2] = 0;                              // Do not print header next time
    }

    if(ledstate==1)
    {
         Serial.print( nblinks);                      // Current Blink number
         if(nblinks>1)
         {
             Serial.print(".");                       // Blink countdown separator
         }
         else
         {
             Serial.println("...");                   // Separator after last blink
         }
         digitalWrite(LED_IND, HIGH);                 // Set LED On
         blinkarg[1] = 0;                             // Set LED off next time
         os_timer_arm(&BlinkLedTimer, 500, false);    // Execute this function 1 time
                                                         after 500 ms
    }
    else
    {
         digitalWrite(LED_IND, LOW);
         blinkarg[1] = 1;                             // start with led on cmd
         if(--nblinks!=0) {                           // Execute until blinks remaining                                                                                            is 0
            --blinkarg[0];                            // Decrement remaining blinks
            os_timer_arm(&BlinkLedTimer, 500, false); // Execute this function 1 time
                                                         after 500 ms
         }
    }
}
Ready to download this Arduino IDE server code?
You can get the triple CoAP, MQTT & HTTP Web Server sketch and associated files here.
CoAP Server
The commands the CoAP server responds to is defined in the file “endpoints.c” All the methods for the CoAP server are defined in the “endpoints array:
 //////////////////////////////////////////////////////////////////////////
// Define all CoAP Methods for this Server
//////////////////////////////////////////////////////////////////////////
const coap_endpoint_t endpoints[] =
{
    {COAP_METHOD_GET, handle_get_well_known_core, &path_well_known_core, "ct=40"},
    {COAP_METHOD_GET, handle_get_light, &path_light, "ct=0"},
    {COAP_METHOD_GET, handle_get_light_blink, &path_light_blink, "ct=0"},
    {COAP_METHOD_GET, handle_get_request, &path_request, "ct=0"},
    {COAP_METHOD_PUT, handle_put_request, &path_request, NULL},
    {COAP_METHOD_PUT, handle_put_light, &path_light, NULL},
    {COAP_METHOD_PUT, handle_put_light_blink, &path_light_blink, NULL},
    {(coap_method_t)0, NULL, NULL, NULL}
};
The function names, starting with "handle_", identify the callbacks executed when a request is received corresponding
The function names, beginning with “handle_”, identify the callbacks executed when a request is received corresponding the service path. And the service paths which are returned from CoAP “Discovery” requests are defined in this file for each method:
 //////////////////////////////////////////////////////////////////////////
// Define URI path for all CoAP Methods for this Server
//////////////////////////////////////////////////////////////////////////
static const coap_endpoint_path_t path_well_known_core = {2, {".well-known", "core"}};
static const coap_endpoint_path_t path_light_blink = {1, {"light_blink"}};
static const coap_endpoint_path_t path_request = {1, {"request"}};
static const coap_endpoint_path_t path_light = {1, {"light"}};
The list can be expanded to meet your own custom server requirements. In order to test the CoAP server in operation, a CoAP client is needed.
CoAP Client
My initial plan was to expand the html/Javascript test page used to compare Mqtt with http servers to include CoAP. But every implementation found required an http to CoAP proxy. This proved to be more challenging to implement than I had planned. At this time, I was unsuccessful. This may come later. But for now, for this evaluation, I settled for a browser plugin. The choices were limited. That is to say, only one was available.
It is called Copper (Cu) CoAP user-agent. At this time, it is only supported with the Mozilla Firefox browser.
Installation is simple:
First, if not already on your computer, you need to install the Mozilla Firefox browser.
Then, using this browser open the URL “https://addons.mozilla.org/en-US/firefox/addon/copper-270430/” and click on the “+ Add to Firefox” button.
So how do we use this client?
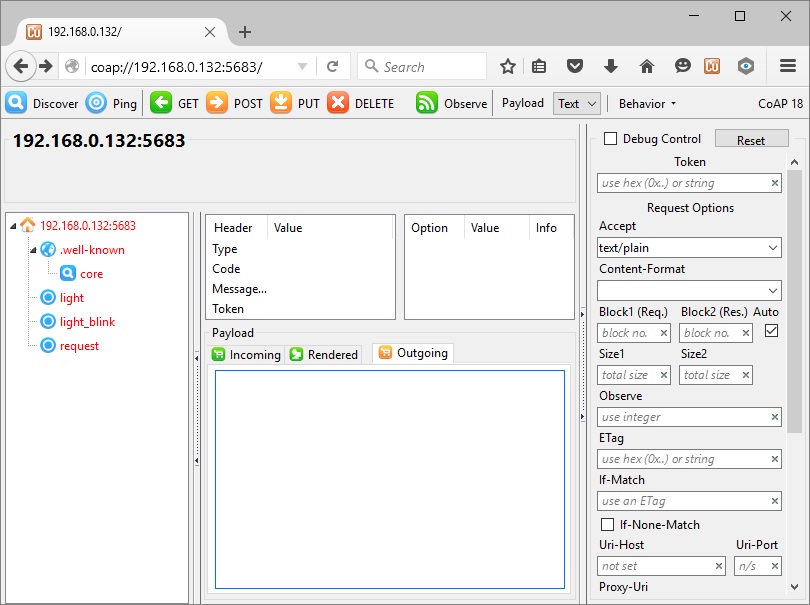
Fortunately, the interface to the ESP8266 CoAP server is easy to access with this plugin. Once added to Mozilla Firefox, start the ESP8266 with the triple server sketch running and enter the following into the browser URL field:
coap://192.168.0.132:5683/
Of course, if you have your own domain pointing to your broadband connection with your router configured to forward port 5683 to your ESP8266, you would enter:
coap://<your domain>:5683/
This will open your interactive CoAP interface tool. It should appear initially similar to this:

A nice feature of the CoAP protocol is discovery. Click on the Discover button for the CoAP server (our ESP8266 device) to report back the services it will support:
The command/response mechanism is straightforward. Click on one of the 3 services shown, enter the “Outgoing” payload, and click on the PUT button. The ESP8266 CoAP server reply will appear at the “Incoming” payload tab. Here are all the services & payloads supported.
[wptg_comparison_table id=”11″]
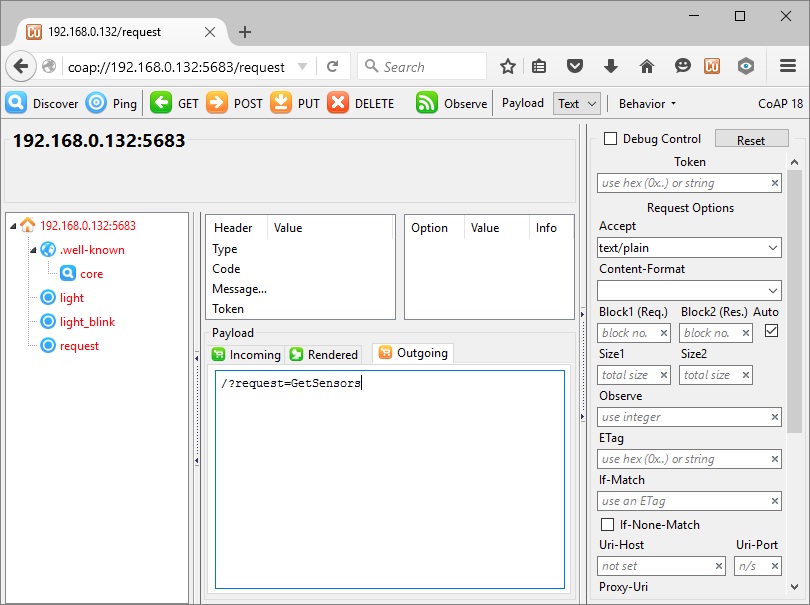
The “request” service supports identical commands for all three server types. Again, to keep things consistent, the “GetSensors” request will be used for this evaluation, the same command that was used for the dual server test.
In that case, select the “request” service, enter /?request=GetSensors in the Outgoing payload window, and click on the “PUT” button.
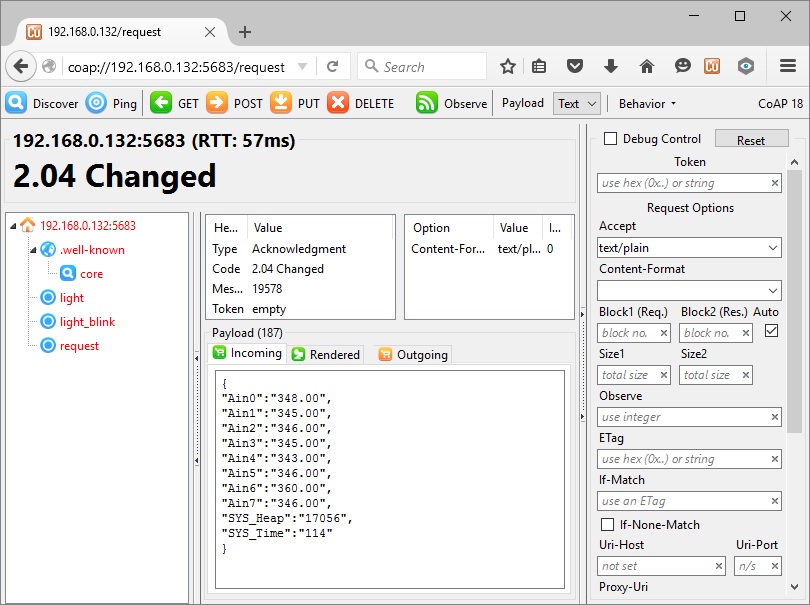
The response (Incoming payload) will be the same as the reply received using the MQTT or HTTP servers:
Response Delay Evaluation
For the MQTT and HTTP servers, a simple web page, using only html and JavaScript was used to measure the delay from the time a request was sent to the time the reply was received. The web page file is called “mqtt_server.html”; it is on GitHub here.
And the CoAP server evaluation used the Firefox Modzilla browser plug-in.
MQTT and HTPP Response Time
With mqtt_server.html open, the time starts when the button is clicked to send a request to the server. When the reply is received, the end time-stamp was captured. But what I found was that this end stamp was not saved immediately, resulting in inaccurate readings. This is likely due to the asynchronous nature of JavaScript. To correct this, a 1 second callback was added from the time the reply time-stamp was captured to the time the lapse time was calculated. This resulted in repeatable results which appear to accurately report the response delay.
CoAP Response Time
The response time is reported directly from the Firefox Mozilla tool when a request was sent by clicking on the “Put button. The time is referenced as RTT in the Mozilla windows in the format:
<IP or domain name>:5683 (RTT: 26 ms)
In this example, the response time was 26 ms.
Results
Ten requests were made for each of the three server setups. The average of the ten readings are shown in this table:
[wptg_comparison_table id=”12″]
The time is measured in milliseconds. From this experiment, the HTTP SDK API and CoAP servers offer significantly less latency than either the HTTP Wifi Library or MQTT. From this, we can conclude that callbacks that do not use the sketch loop() function are more efficient. And the UDP over IP result in faster replies than TCP connections when polling is used, but reply at comparable speeds when HTTP callbacks are used.
The Unexpected Discovery
As I mentioned in the beginning, an unexpected discovery was made in the course of this evaluation. Unfortunately, it is not a good thing, but it must be told. Hopefully, this may allow someone to avoid the pitfall. This finding was made using Arduino IDE version 1.6.5. Later versions might have corrected the issue.
This has to do with the HTTP Wifi Library based server. What I have found is that with every server request made, the system heap shrinks. This is returned as the “SYS_Heap” value (bytes) from a “GetSensors” request. The bytes do not return to the heap for a while, sometimes minutes later, sometimes, it appears never to be relinquished.
What does this mean?
Well, if requests are made often enough, the heap will shrink to the point that the ESP8266 resets, sometimes without recovery (crashes). None of the other server types presented here exhibit any heap shrinkage from receiving and replying to request.
I checked this with some of my earlier Arduino IDE sketches. Regretfully, they all exhibit this same heap shrinkage when server requests are made.
Recommendation: Avoid using the HTTP Wifi Library based server. Instead, use the EspressIf SDK API, similar to what has been presented in this sketch.
Especially if you have experienced unexplained ESP8266 crashes or resets when your sketch runs for an extended period of time. The depletion of the heap could definitely be the root cause.
In Closing
As you can see from the results, CoAP performs well as compared to polling MQTT and HTTP servers.
CoAP is indeed a viable option as an IoT M2M communication protocol, This method provides a solution that is lightweight, fast and there are many implementation options available. Unfortunate, these options do not directly include client side JavaScript webpages. A proxy is needed to translate the UDP CoAP to http. This proxy would undoubtedly slow down the message transfers, but this alone is unlikely to be significant enough to discount CoAP.
And as “lightweight” as CoAP is intrinsically, the implementation code is more complex and lengthy than any other server.
I hope this example provides anyone interested with a framework to pursue ESP8266 CoAP communications further. My next step will to create custom CoAP clients. For my needs, two platforms will be useful. An Android based smartphone App and a browser solution accessible from any browser.
How would you use best use CoAP with your ESP8266 IoT thing?
Social tagging: ESP8266 CoAP > ESP8266 CpAP Server
Great work!
There are other COAP implementations for the ESP8266 like
https://www.google.de/url?q=http://www.lobaro.com/lobaro-coap-on-esp8266/&sa=U&ved=0ahUKEwjnv4OAhvLJAhXLnRoKHbokBusQFggUMAQ&usg=AFQjCNGomYNjnr4S3GkUam2sbEBwayzkgw
Or
https://github.com/semiotproject/semiot-device-prototype
Do you have any plans to test with
Thanks for the coap implementation references. I will check those out as time permits.
Btw, there are an android coap client app called Aneska (http://www.sixpinetrees.pl/2014/03/aneska-simple-coap-browser-for-android.html)
Dear
Please look this link:
https://github.com/okleine/spitfirefox
What your think.
Best Regards
Ricardo
Here are my thoughts…
Well, up to now I have developed all my Android Apps using the Eclipse IDE. And switching to a new platform, Android Studio, was not appealing knowing that it would likely consume precious time.
But after finally getting through the Android Studio setup, I built the project you have inquired about and installed it on my Android device. The client App starts up but will not connect or discover my coap server services. I checked my coap server using the Firefox client and everything works correctly.
While this app looks like a great foundation to add a coap client to an Android App, I expected it to work out of the box. I may spend some time reviewing the code. But how much time is it worth, without any guarantee that is a viable solution?
From my ESP8266 Coap Server serial port, I can see a difference in the discovery packet sent by the SpitFireFox App vs the FireFox browser coap client (that works properly). The root cause of this difference needs to be identified and corrected in the SpitFireFox Android App.
hey!! i tried to implement this triple server project ..but this code in arduino ide is not compile successfully ..i am getting error as undefined template .plz suggest some solution so that i can able to this project successfully.
The sketch on GitHub has recently been updated for compatibility with Arduino IDE 1.6.12.
Unfortunately, the Arduino IDE updates are not always backward compatible.
Hey, I am new to arduino and i tried to compile the code. I got this error. I first tried with Arduino 1.8 it didn't work and then i tried in Arduino 1.6.12 as well. I end up with same result. please take a look at the error message below. Thank you!
ERROR:
Arduino: 1.6.12 (Windows 7), Board: "NodeMCU 1.0 (ESP-12E Module), 80 MHz, 4M (1M SPIFFS), v2 Lower Memory, Disabled, None, Only Sketch, 115200"
In file included from C:\Users\Balaganesh Baskar\Documents\Arduino\http_coap_mqtt_server\http_coap_mqtt_server.ino:24:0:
C:\Users\Balaganesh Baskar\Documents\Arduino\libraries\webserver/mem_manager.h:72:38: error: declaration of C function 'void* pvPortMalloc(size_t)' conflicts with
void *pvPortMalloc(size_t xWantedSize) ;//ICACHE_FLASH_ATTR;
^
In file included from C:\Users\Balaganesh Baskar\AppData\Local\Arduino15\packages\esp8266\hardware\esp8266\2.4.1\cores\esp8266/pgmspace.h:10:0,
from C:\Users\Balaganesh Baskar\AppData\Local\Arduino15\packages\esp8266\hardware\esp8266\2.4.1\cores\esp8266/Arduino.h:255,
from sketch\http_coap_mqtt_server.ino.cpp:1:
C:\Users\Balaganesh Baskar\AppData\Local\Arduino15\packages\esp8266\hardware\esp8266\2.4.1/tools/sdk/include/ets_sys.h:189:7: error: previous declaration 'void* pvPortMalloc(size_t, const char*, int)' here
void *pvPortMalloc(size_t xWantedSize, const char* file, int line) __attribute__((malloc, alloc_size(1)));
^
In file included from C:\Users\Balaganesh Baskar\Documents\Arduino\http_coap_mqtt_server\http_coap_mqtt_server.ino:24:0:
C:\Users\Balaganesh Baskar\Documents\Arduino\libraries\webserver/mem_manager.h:74:24: error: declaration of C function 'void vPortFree(void*)' conflicts with
void vPortFree(void *pv) ;//ICACHE_FLASH_ATTR;
^
In file included from C:\Users\Balaganesh Baskar\AppData\Local\Arduino15\packages\esp8266\hardware\esp8266\2.4.1\cores\esp8266/pgmspace.h:10:0,
from C:\Users\Balaganesh Baskar\AppData\Local\Arduino15\packages\esp8266\hardware\esp8266\2.4.1\cores\esp8266/Arduino.h:255,
from sketch\http_coap_mqtt_server.ino.cpp:1:
C:\Users\Balaganesh Baskar\AppData\Local\Arduino15\packages\esp8266\hardware\esp8266\2.4.1/tools/sdk/include/ets_sys.h:191:6: error: previous declaration 'void vPortFree(void*, const char*, int)' here
void vPortFree(void *ptr, const char* file, int line);
^
exit status 1
Error compiling for board NodeMCU 1.0 (ESP-12E Module).
Earlier versions of the Arduino IDE did not have prototypes define for all the external SDK libraries needed.
It appears that the more recent versions have corrected this.
Try commenting out in your Arduino sketch:
//#include "mem_manager.h"
I did and my compile completed successfully. Perhaps this will resolve the conflicts you have identified.
Thank you for your post. awesome!
can you inform your ESP pinout? i´m trying to reproduce your testbed here.
thanks in advance.
Renato
I have always used a basic circuit built on a soldered copper breadboard for my ESP8266 projects. Schematic can be found in this article:
https://internetofhomethings.com/homethings/?p=691