A web server is certainly not complete without a database server. Currently, the one-source server of choice is mySQL. At first, adding this database server to my Linux setup update appeared to be simple and straight-forward. Just add another package to the Puppy Linux installation and restart – instant mySQL server capability. But then I soon found that it was not going to be that simple.
Still, after persistent effort to overcome several patience-trying obstacles, the installation was finally complete. Presented here are the successful steps to adding mySQL Server, without having do deal with the problems. And for those who do not want to go through all the setup steps, a Linux session save file is included with this post.
Simply replace your existing save file with this one and you will be 99% complete with a web server that supports both php and mySQL server. Here it is. You can also refer to the Quick and Easy section of this post minimal installation steps.
But if you would like to understand the steps to installing mySQL on the USB Puppy Linux setup, read on. Now let’s add the mySQL server to the USB LAMP web server installation from part 2 of this series.
Adding mySQL Server to the USB Web Server
Start the USB installed Precision Puppy Linux from part 2. Then launch the Puppy Package Manager. In the search window (Find), enter “mysql”.
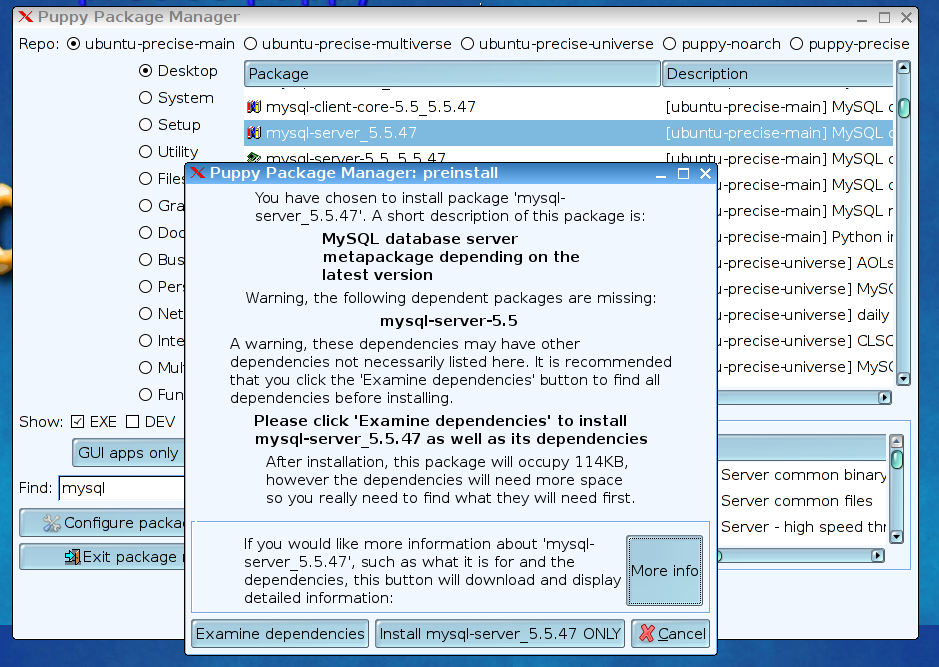
From the list of results, select mysql-server-5.5-47 metapackage.
Then click on “Examine dependencies”.
When a window pops up, click on the “Download and install selected packages” button.
Then click on “Download packages”.
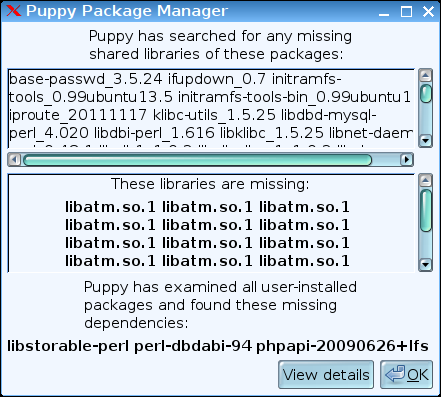
After the installation finishes, the following prompt appears:
In order to add the missing library, first close and then re-opening the Puppy Package Manager.
This time, enter “libatm” in the find input. You will probably only find one results from searching all the repositories, “libatm1_2.5.1-1.3”.
Select it and install the package as done for the mySQL server package.
Backing up the installed packages
Now is the time to create a backup of the installed programs. Do not exit Puppy Linux until this is completed.
First, install a blank USB memory stick of at least 4MB into the computer that is running Puppy Linux. This drive will appear as an added device in the bottom left of the Linux screen. Take note of the name assigned to this drive (it will be something like sdb1 or sdc1).
From a console window, enter:
cd /
mksquashfs etc root usr /mnt/<drive name from above>/mybackup.sfs
Wait for the SFS file creation to complete.
Now remove the added thumb drive and then hold down the PC start button until the PC shuts off.
Restoring the backed up configuration
These steps need to be performed from a PC running Windows OS.
Using the same USB memory stick we have been using to prepare this setup, first copy the save file (see red text above) to the root directory.
Then copy the “mybackup.sfs” file created above to the USB memory stick root directory.
Now lets boot from the USB memory stick, which should start in the Puppy Linux OS again.
NOTE: Make sure the PC you are using for this step has at least 4 GB of ram installed. I tried it with a 1GB netbook which failed the process after running out of RAM.
Open two file browser windows (Menu->Filesystem->ROX-Filer).
In one window, navigate to /etc/home/mybackup.sfs. After clicking on the file, select “view”. A folder with the 3 backed up directories (etc root usr) will appear.
In the other file manager windows, navigate to the top-level folder. Among the other directories, this window will also include etc, root, and usr. Copy the files from the first window to the second window.
This can be done by pressing Ctl-A in a blank space in the first window (Selects the 3 folders) and dragging these selected folders to the second window.
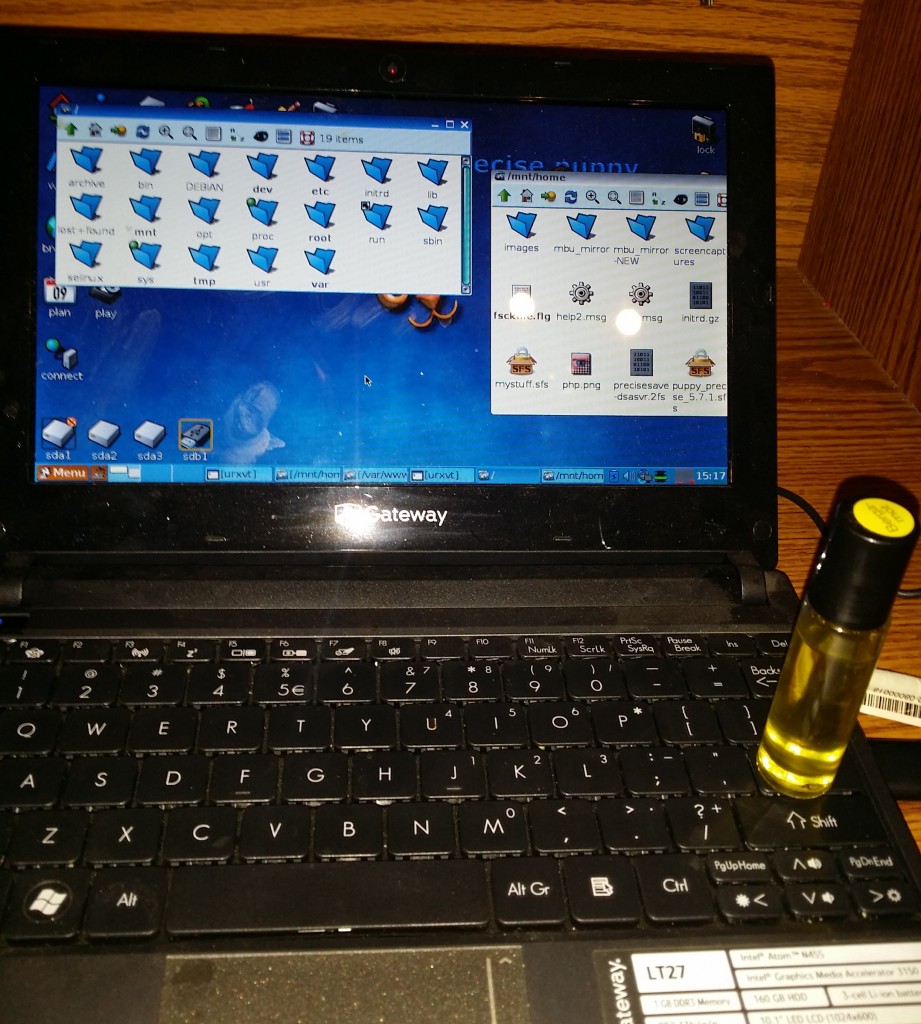
I found that a prompt to confirm the over-write of each file was required and could not figure out how to suppress it. Since there are thousands of files to copy, this requires many mouse clicks or pressing the enter key. As a work-around to automate this step, I used an object that was heavy enough to hold the enter key down. A bottle of essential oil worked well for my enter key.
Use your imagination here!
And here is where patience is needed. This copy process took over an hour to complete.
Remember, a save file (*.sfs) is provided with this post which already includes these steps, so you don’t have to repeat this lengthy but necessary step.
Once the copy is completed, restart the Linux computer. This should created a clean save file.
Alas, we are ready to resume the mySQL installation!
Console Entries
A few steps are now needed to complete the installation of mySQL. Open a console window and enter the following:
# mkdir /var/lib/mysql
# adduser mysql
# chown -R mysql:mysql /var/lib/mysql
# chgrp -R mysql /var/lib/mysql
#mysql_install_db
# mkdir /var/run/mysqld
# chown mysql:mysql /var/run/mysqld
That’s it. The installation of mySQL Server is complete.
mySQL Server commands
Here are a few console commands to run the server:
Start Server:
# mysqld
Stop Server (Do this from a second console window):
# mysqladmin -u root -p shutdown
Change rood password:
# mysqldadmin -u root password ‘new-password’
or
# /usr/bin/mysqldadmin -u root password ‘new-password’
Here is a reference of other commonly used mySQL server commands.
Quick and Easy Setup
And as promised, I am providing a system image of the full USB LAMP installation in this section, so you can skip most of the steps outlined above and in the first two posts of this series.
Just follow these simple steps, eliminating most of the time-consuming setup:
Step 1: Create a Linux USB Memory stick installation per the first part of this post. You can stop prior to installing Apache Server. That package is included with the *.2fs file referenced below.
Step 2: Shut-down the Linux OS running from the USB stick. This will create a save file.
Step 3: Boot a PC to Windows. Install the USB memory stick and delete the save (*.2fs) file from the root directory. Then copy the *.2fs file from this location to the root directory.
NOTE: The file is contained in a ZIP compressed file. The compressed file is over 280MB in size and 1GB uncompressed. Expect the download to require some time (17 minutes with my connection).
Step 4: Boot a PC with the USB Stick installed to Puppy Linux. This stick now has a complete LAMP stack. But you may need to adjust the IP and port of the server to your specific system. The defaults are IP=192.168.0.110 and port=9777.
Step 5: Set the IP for your system
Step 6: Set the listen port for your system
Step 7: Reboot one more time to create your own save file.
Be sure and review the 3 posts in this series as a guide to using this LAMP stack. A sample HTML and PHP file is provided in the root folder for web pages, /var/www
In Conclusion
In these 3 articles, we have created a USB memory stick Linux environment and added an Apache Web Server, php and mySQL client libraries, and now the popular mySQL Server. Next, we will add phpmyAdmin as a basic tool for administering the mySQL database.
As always, I hope you find this information useful…
![]()


