Web Coding Tips

Your Own VPS for IoT and More

Having a Virtual Private Server (VPS) at your disposal opens up boundless IoT possibilities – all under your direct control – with no reliance on third-party cloud services. Like hosting your own MQTT broker, CoAP server, and scheduling periodic tasks to monitor and control your IoT devices or store/retrieve information using a database. Website hosting, including popular CMS sites such as WordPress, Joomla!, Drupal and more as well as file/picture sharing are also possible with your VPS.

Does this seem like a daunting task? Difficult to set-up? And expensive?

It doesn’t have to be.

Building on a past project, all  I did initially was port my USB Thumb Drive LAMP server to a VPS. And the basic framework, including the Linux distribution  you choose to use, are installed automatically for you. This greatly simplifies the setup…

Shared Host vs VPS

Before moving on with VPS, it should be noted that “Shared Host” are also available. They are tempting as the lowest cost available, they do not provide the capabilities or flexibility of VPS, and thus are not addressed in this post. Here is one decent article I have found that provides clear support for the superiority of VPS over a shared host. You are in control with a VPS, free from the restrictions placed on a shared host account.

Selecting a VPS Provider 

First thing you have to do is select a VPS provider. There are many to choose from. All options I have seen start with a basic package and scale up to fit your needs. For basic DIY IoT enthusiasts, the entry-level offering provides more capability that you should ever need. Here are a few of the VPS providers and their basic features:

Website Cost/month CPU Cores RAM Storage Transfer
LiNode linode.com $5.00 1 1G 20G SSD 1 TB
LiNode linode.com $10.00 1 2G 30G SSD 2 TB
iPage iPage.com $19,99 1 1G 40G 1 TB
HostGator HostGator.com $19,95 2 2G 120G 1.5 TB
FatCow fatcow.com $19,99 1 1G 40G 1 TB
JustHost justhost.com $19,99 2 2G 30G 1 TB
Bluehost bluehost.com $19,99 2 2G 30G SAN 1 TB

I found that the Linode option offered the best value. At 10 USD per month, this provider was the lowest cost of the ones I had looked at. And recently, they have added even a lower, 5 USD per month package. In fact, there were many others that offered teaser rates initially, only to cost much more than the rates listed above. Those providers were eliminated from my consideration.

LiNode uses Solid-State Disks (SSD) which yield lightning fast performance, even with the entry level package that uses a single CPU core. I have been had an active VPS account with LiNode for about a year now, with 100% uptime.

If you do choose to setup a VPS using LiNode, please consider using this link, which, full disclosure, would provide me with a referral credit to help fund my own VPS account and continue sharing information.

Operating System Options 

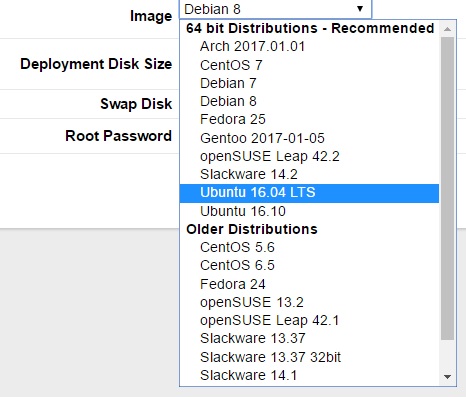
LiNode VPS provides step-by-step instructions for setting up your system. While I do not have any personal experience, I suspect other VPS providers offer similar directions to simplify the setup procedure. or those familiar with Linux, here are the distributions that LiNode offers for immediate deployment:

I chose to deploy Ubuntu 16.04 LTS, which is a widely used distribution. With that basic configuration, I have customized the setup for my own personal needs.

Exploiting Your VPS Platform 

Once your VPS is setup, it is ripe and ready for practical applications. The first thing many DIY enthusiasts will want to add is a private MQTT broker. As an avid ESP8266, the first 3 applications listed below can interface directly with the VPS. This and other uses for the VPS will be covered in follow-up posts…

  • VPS Application 1: MQTT Broker
  • VPS Application 2: CoAP Server
  • VPS Application 3: Scheduled IoT Monitor/Control Scripts
  • VPS Application 4: Hosting a Website
  • VPS Application 5: Private Email Server

And this is just the beginning.

Hope you find this information useful.

Loading

Share This:
FacebooktwitterredditpinterestlinkedintumblrFacebooktwitterredditpinterestlinkedintumblr

USB LAMP Web Server Part 4 – phpMyAdmin for mySQL Administration

phpmyadmin

My last post completed the USB LAMP web server. And at this point, the server already has the powerful essential foundation. Here is what we have so far.

But there is still a need for at least one additional tool to fully utilize the mySQL server. The basic functions of creating and deleting databases, creating tables and stored procedure, and importing and exporting data and SQL require an admin tool.

And while there are some third-party tools available to externally support database administration (my favorite is mySQL Workbench), there is still a need for an embedded tool accessible on the server computer.

So here we go the installation of one of the most common mySQL administration tools on the USB LAMP server, phpMyAdmin.

And, just like with my last post, for those who do not want to go through all the setup steps, a Linux session save file is included with this post.

Simply replace your existing save file with this one and you will be 99% complete with a web server that supports both php and mySQL server. Here it is. You can also refer to my Quick and Easy section from the previous post on this series for minimal installation steps.

But if you would like to understand the steps to installing phpMyAdmin on the USB Precision Puppy Linux setup, read on.

Adding phpMyAdmin to the USB Web Server

Start the USB installed Precision Puppy Linux from part 3. Then launch the Puppy Package Manager. In the search window (Find), enter “phpMyAdmin” and search all repositories.

Select phpmyadmin_3.4.10.1-1.

Then click “Examine dependencies”   and “Download and install selected packages”.

And as with other packages, there are a few post-installation steps required. After the installation has completed, open a console windows and enter:

# ln -s /etc/phpmyadmin/apache.conf /etc/apache2/conf.d/phpmyadmin
# ln -s /etc/apache2/mods-available/mime* /etc/apache2/mods-enabled/

Now, to enable initial access to phpMyAdmin, passwordless logins need to be enabled. This is easy. Just open the file:

/etc/phpmyadmin/config.inc.php

Un-comment the line:

//$cfg[‘Servers’][$i][‘AllowNoPawwords’] = TRUE;

Testing phpMyAdmin

In order to access phpMyAdmin, the mySQL server must be running. And to start mySQL, you must know the IP of the computer hosting the server. This should already be known from installing parts 1-3. This is the same IP that should be in the host file.

A quick refresher…

Identify the IP :

From a console, enter:

# /sbin/ifconfig eth0

The computer will respond with several lines. The second line should contain the ip. My second line began with:

inet addr:192.168.0.11

The host file: /etc/host

Now lets start the mySQL and apache servers and test the phpMyAdmin installation:

Start the mySQL Server:

From a console, enter:

# mysqld –bind-address 192.168.0.11

Start Apache Server:

From a second console, enter:

# /etc/init.d/apache2 restart

Now go to another computer on your network and enter the following URL from a browser to start phpMyAdmin:

http://192.168.0.11:9777/phpmyadmin

The following initial screen should appear:

phpmyadmin

Use the Username “root” with no password and enter “Go” to begin the phpMyAdmin session.

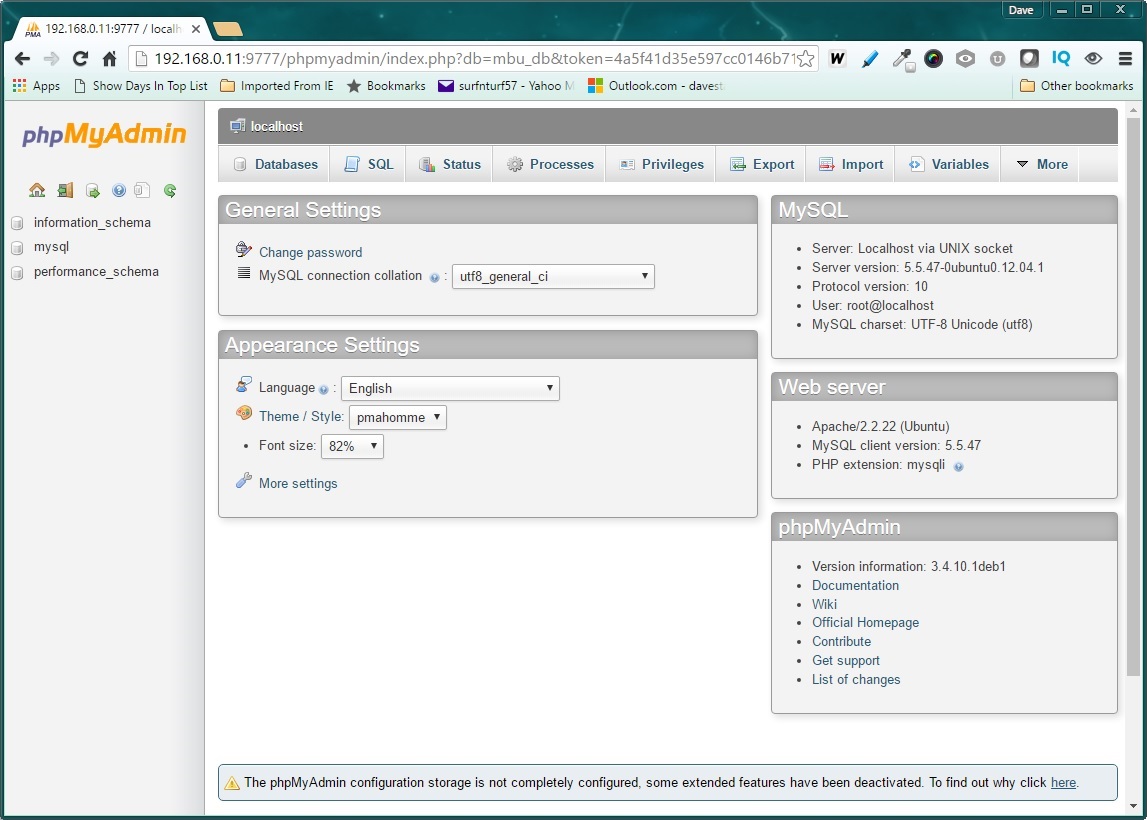
The opening screen will look similar to this:

phpmyadmin-opened

Configuring phpMyAdmin

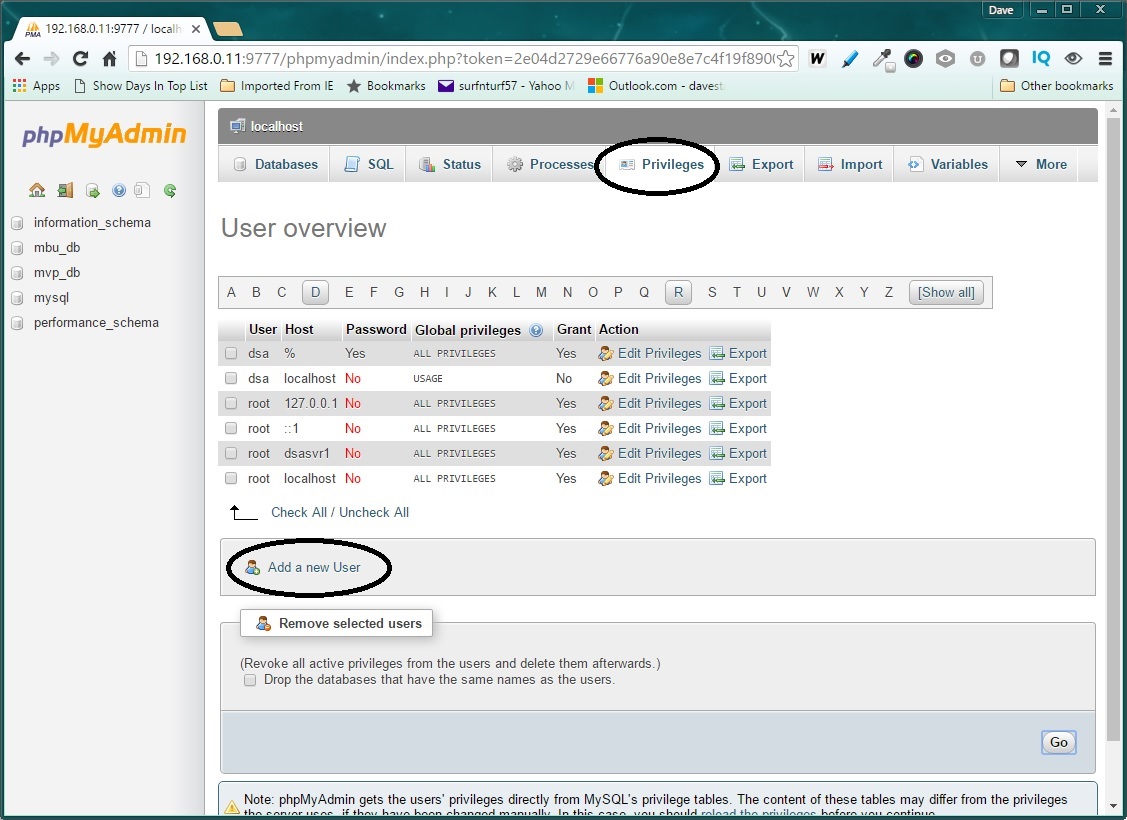
If you wish to add more users with password logins, click on the “Privileges” tab at the top of the phpMyAdmin screen. You will see a link to “Add a new User”.

phpmyadmin-adduser

After creating a new user, remember to set the user privileges (Use “edit Privileges” link) so that the user can gain access to selected databases and functions.

There is plenty of information available on-line on how to configure the phpMyAdmin utility. Just look for it.

phpMyAdmin Limitations

Note that this version of phpMyAdmin is 3.4.10. After using version 4.0.7 for a significant period of time, this older version lacks some of the features I had become used to being available. In fact, the only purpose to use this version of phpMyAdmin is to add and delete users, create databases, and import tables and procedures.

Essential functions, but you will need more…

 Still, I have found that even though the version of phpMyAdmin that is available with Precision Puppy is somewhat dated, it is sufficient for basic database administration. However, it is recommended once your database and users are initially setup with phpMyAdmin, subsequent table generation and stored procedure development use a third party tool. As noted earlier in this post, my favorite is the open-source MySQL Workbench.

In Closing

This series should provide  a great reference for anyone setting up a web server, either now or in the future. The server provides an excellent platform for several uses, including system development and test, learning about server configuration and capabilities, and even for deployment of a permanent installation.

There is just one more addition planned for the USB LAMP server…

The addition of the popular WordPress content management system (CMS). Stay tuned for that post coming soon.


Loading

Share This:
FacebooktwitterredditpinterestlinkedintumblrFacebooktwitterredditpinterestlinkedintumblr

USB LAMP Web Server Part 3 – Adding mySQL Server

phpmysql2

A web server is certainly not complete without a database server. Currently, the one-source server of choice is mySQL. At first, adding this database server to my Linux setup update appeared to be simple and straight-forward. Just add another package to the Puppy Linux installation and restart – instant mySQL server capability. But then I soon found that it was not going to be that simple.

Still, after persistent effort to overcome several patience-trying obstacles, the installation was finally complete. Presented here are the successful steps to adding mySQL Server, without having do deal with the problems. And for those who do not want to go through all the setup steps, a Linux session save file is included with this post.

Simply replace your existing save file with this one and you will be 99% complete with a web server that supports both php and mySQL server. Here it is. You can also refer to the Quick and Easy section of this post minimal installation steps.

But if you would like to understand the steps to installing  mySQL on the USB Puppy Linux setup, read on. Now let’s add the mySQL server to the USB LAMP web server installation from part 2 of this series.

Adding mySQL Server to the USB Web Server

IMPORTANT: The installation of mySQL Server will corrupt the save file. This will make it impossible to shut-down or start the USB Puppy Linux. Prior to proceeding, copy the save (*.sfs) file, located in the root USB directory (when viewed from Windows OS). It will be needed later to restore the Linux installation.

Start the USB installed Precision Puppy Linux from part 2. Then launch the Puppy Package Manager. In the search window (Find), enter “mysql”.

mysql_svr1

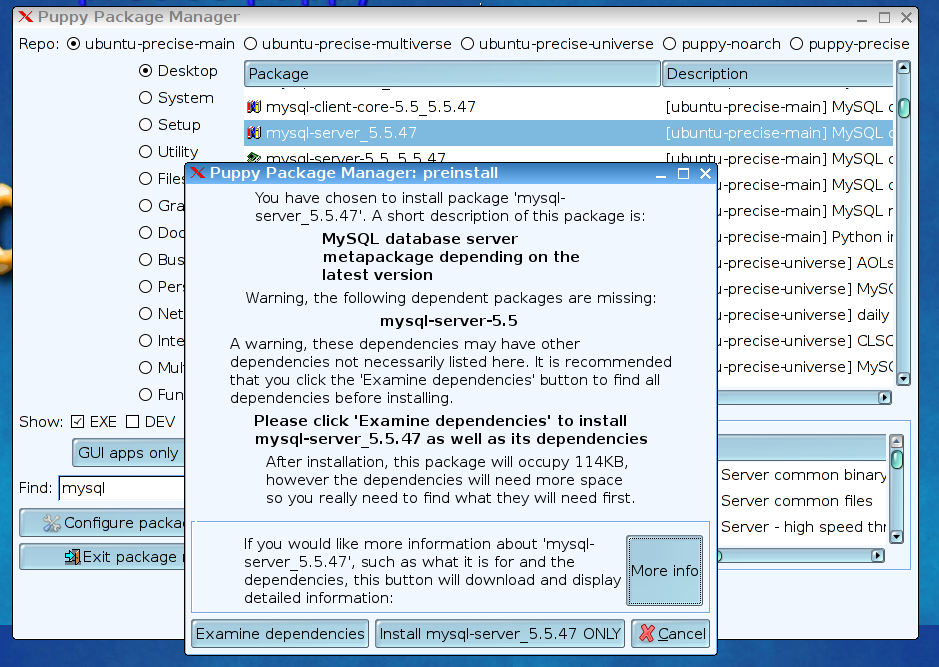
From the list of results, select mysql-server-5.5-47 metapackage.

Then click on “Examine dependencies”.

When a window pops up, click on the “Download and install selected packages” button.

Then click on “Download packages”.

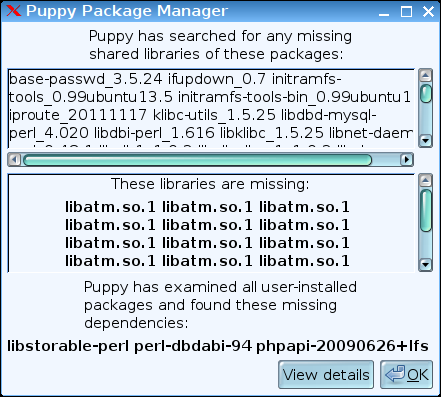
After the installation finishes, the following prompt appears:

mysql_svr5

In order to add  the missing library, first close and then re-opening the Puppy Package Manager.

This time, enter “libatm” in the find input. You will probably only find one results from searching all the repositories, “libatm1_2.5.1-1.3”.

Select it and install the package as done for the mySQL server package.

Backing up the installed packages

Now is the time to create a backup of the installed programs. Do not exit Puppy Linux until this is completed.

First, install a blank USB memory stick of at least 4MB into the computer that is running Puppy Linux. This drive will appear as an added device in the bottom left of the Linux screen. Take note of the name assigned to this drive (it will be something like sdb1 or sdc1).

From a console window, enter:

cd /

mksquashfs etc root usr /mnt/<drive name from above>/mybackup.sfs 

Wait for the SFS file creation to complete.

Now remove the added thumb drive and then hold down the PC start button until the PC shuts off.

Restoring the backed up configuration

These steps need to be performed from a PC running Windows OS.

Using the same USB memory stick we have been using to prepare this setup, first copy the save file (see red text above) to the root directory.

Then copy the “mybackup.sfs” file created above to the USB memory stick root directory.

Now lets boot from the USB memory stick, which should start in the Puppy Linux OS again.

NOTE: Make sure the PC you are using for this step has at least 4 GB of ram installed. I tried it with a 1GB netbook which failed the process after running out of RAM.

Open two file browser windows (Menu->Filesystem->ROX-Filer).

In one window, navigate to /etc/home/mybackup.sfs. After clicking on the file, select “view”. A folder with the 3 backed up directories (etc root usr) will appear.

In the other file manager windows, navigate to the top-level folder. Among the other directories, this window will also include etc, root, and usr. Copy the files from the first window to the second window.

This can be done by pressing Ctl-A in a blank space in the first window (Selects the 3 folders) and dragging these selected folders to the second window.

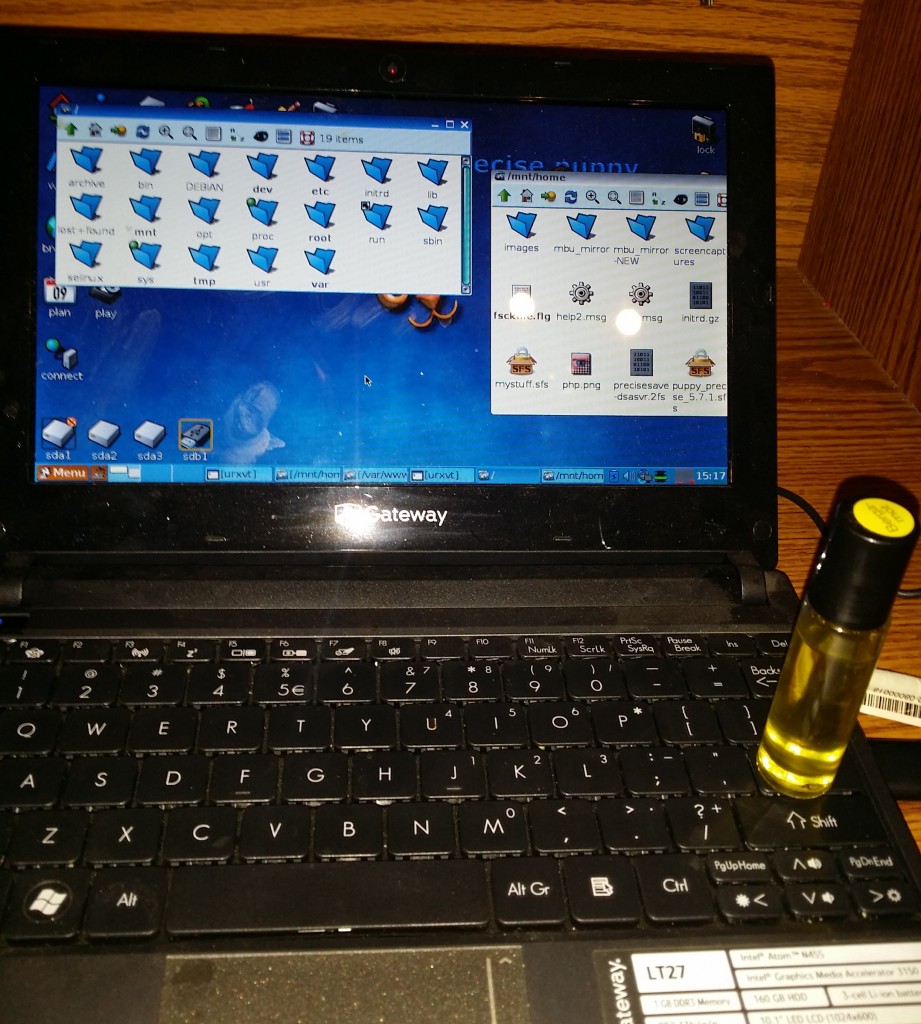
I found that a prompt to confirm the over-write of each file was required and could not figure out how to suppress it. Since there are thousands of files to copy, this requires many mouse clicks or pressing the enter key. As a work-around to automate this step, I used an object that was heavy enough to hold the enter key down. A bottle of essential oil worked well for my enter key.

Use your imagination here!

20160321_151721

And here is where patience is needed. This copy process took over an hour to complete.

Remember, a save file (*.sfs) is provided with this post which already includes these steps, so you don’t have to repeat this lengthy but necessary step.

Once the copy is completed, restart the Linux computer. This should created a clean save file.

Alas, we are ready to resume the mySQL installation!

Console Entries

A few steps are now needed to complete the installation of mySQL. Open a console window and enter the following:

# mkdir /var/lib/mysql

# adduser mysql

# chown -R mysql:mysql /var/lib/mysql

# chgrp -R mysql /var/lib/mysql

#mysql_install_db

# mkdir /var/run/mysqld

# chown mysql:mysql /var/run/mysqld

That’s it. The installation of mySQL Server is complete.

mySQL Server commands

Here are a few console commands to run the server:

Start Server:

# mysqld

Stop Server (Do this from a second console window):

# mysqladmin -u root -p shutdown

Change rood password:

# mysqldadmin -u root password ‘new-password’

or

# /usr/bin/mysqldadmin -u root password ‘new-password’

Here is a reference of other commonly used mySQL server commands.

Quick and Easy Setup

And as promised, I am providing a system image of the full USB LAMP installation in this section, so you can skip most of the steps outlined above and in the first two posts of this series.

Just follow these simple steps, eliminating most of the time-consuming setup:

Step 1: Create a Linux USB Memory stick installation per the first part of this post. You can stop prior to installing Apache Server. That package is included with the *.2fs file referenced below.

Step 2: Shut-down the Linux OS running from the USB stick. This will create a save file.

Step 3: Boot a PC to Windows. Install the USB memory stick and delete the save (*.2fs) file from the root directory. Then copy the *.2fs file from this location to the root directory.

NOTE: The file is contained in a ZIP compressed file. The compressed file is over 280MB in size and 1GB uncompressed. Expect the download to require some time (17 minutes with my connection).

Step 4: Boot a PC with the USB Stick installed to Puppy Linux. This stick now has a complete LAMP stack. But you may need to adjust the IP and port of the server to your specific system. The defaults are IP=192.168.0.110 and port=9777.

Step 5: Set the IP for your system

Step 6: Set the listen port for your system

Step 7: Reboot one more time to create your own save file.

Be sure and review the 3 posts in this series as a guide to using this LAMP stack. A sample HTML and PHP file is provided in the root folder for web pages, /var/www

In Conclusion

In these 3 articles, we have created a USB memory stick Linux environment and added an Apache Web Server, php and mySQL client libraries, and now the popular mySQL Server. Next, we will add phpmyAdmin as a basic tool for administering the mySQL database.

As always, I hope you find this information useful…


Loading

Share This:
FacebooktwitterredditpinterestlinkedintumblrFacebooktwitterredditpinterestlinkedintumblr

USB LAMP Web Server

servericon

Your Personal http Server

If you would  like to have your own personal web server, running industry standard software, all from a boot-able USB stick, read on…

One of the most useful tools for home automation and web development is a host server. And the most widely used server is of course, Apache.

This article marks the start of a 5-post series that provides step-by-step instructions for setting up your own USB memory stick based http server. We’ll start with the basic LAMP stack in the first three articles, and then add-on some extras to extend the functionality.

What’s LAMP?

LAMP covers the essential ingredients of a web server:

  1. Linux – The operating system
  2. Apache – http server
  3. mySQL – database
  4. PHP – server-side scripting language

Here are the topics planned for this series:

Update: Bonus Topics

Part 1 – Setting up the Linux Apache Server

When finished with part one, you will have the LA (Linux and Apache) LAMP components up and running.

Let’s get to it…

Prerequisites

  • Blank USB Memory stick (4GB minimum)
  • PC with USB port that can be dedicated for the server

While I cannot claim to be a Linux expert, I do have some experience working with the single user Puppy Linux distribution. Being a familiar setting, that is what was selected for this exercise.

But hold on, before you start there is one more selection to make….

You see, there are several versions of Puppy Linux to pick from. My first attempt at this used the most current version, called Slacko Puppy 6.3. However….sparing you the details, I ran into some insurmountable obstacles to completing a successful installation of Apache server with Slacko Puppy.

So I moved on to a Puppy Linux version that works with the Apache Server.

The version that worked is called Precise Puppy 5.7.1

Installing the Linux Operating System

As with many Linux distributions, the installation is really quite simple. Just download the ISO image and a USB installer. That’s it. Here is where you can get both:

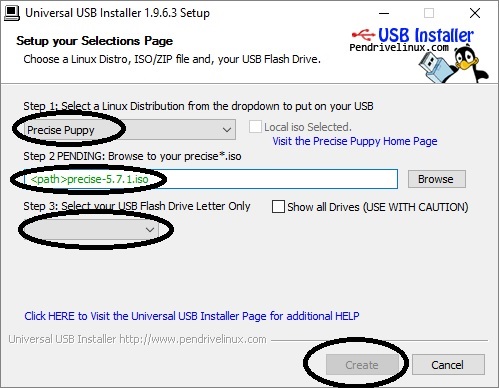
Now for the installation. Just install your USB stick and start the installer program. The start up screen will provide 3 easy-to-follow instruction steps.

  1. Select the distribution (Select “Precise Puppy”)
  2. Select the iso file (from the folder that has the downloaded ISO image)
  3. Select the USB stick drive letter.

UUSBinstaller

Then click on the “Create” button to start the installation.

Once the installer is finished, you can boot any PC to the newly installed Puppy Linux simply by putting this memory stick in the PC’s USB port and rebooting (Boot to USB first must be selected in the bios first, of course).

After the computer has booted to Linux and you have completed the self-guided first boot process, you need to perform one additional step before installing Apache.

NOTE: It is recommended that a wired internet connection be used for this and all processes during installation.

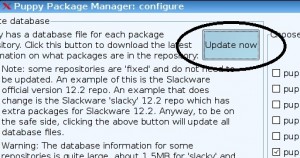
First, you need to update the package database. This is a very simply process. Just launch the Puppy Package Manager (Menu->Setup->Puppy Package Manager) and click on the “Configure package manager”. A window will appear with an “Update now” button.

updatenow

Click that button and press enter each time the yellow window prompts you. There will quite a few “Enter”s required to complete this step.

Once complete, exit the Puppy Package Manager. If this is still your first Linux session using the memory stick, it is also recommended that you restart the computer (from the bottom MENU option). The restart will create a save file that will be updated every time you exit Linux. This file contains all the changes you have made to the originally installed Linux distribution.

Adding Apache Server

Now let’s get Apache.

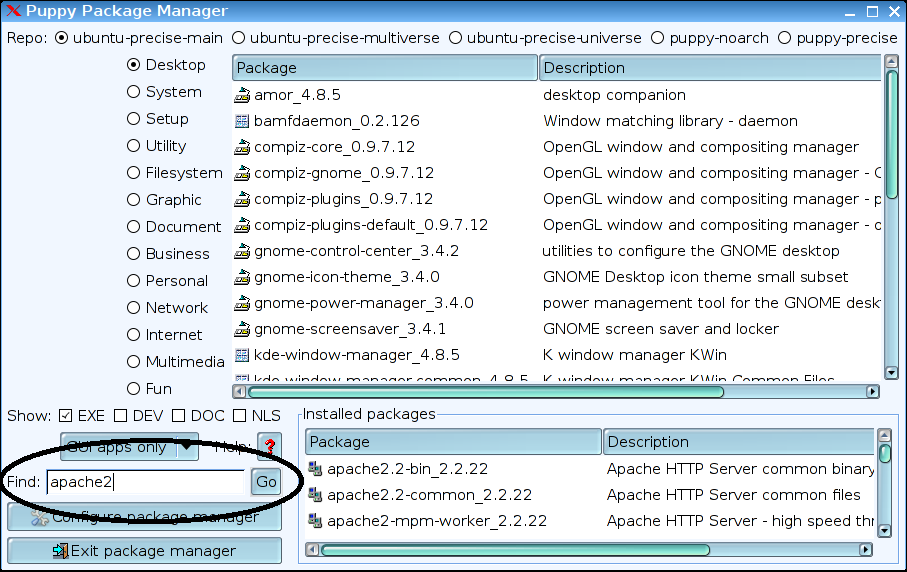
Launch the Puppy Package Manager again. In the search window (Find), enter “apache2”.

findapache

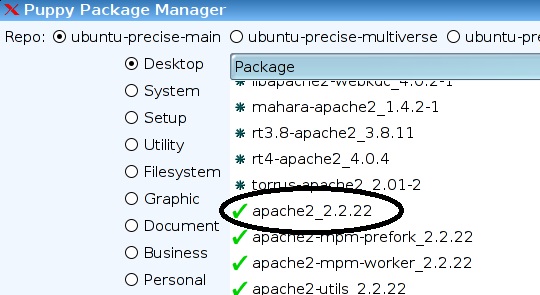
Select “apache2_2.2.22” from the listed results.

selectapache

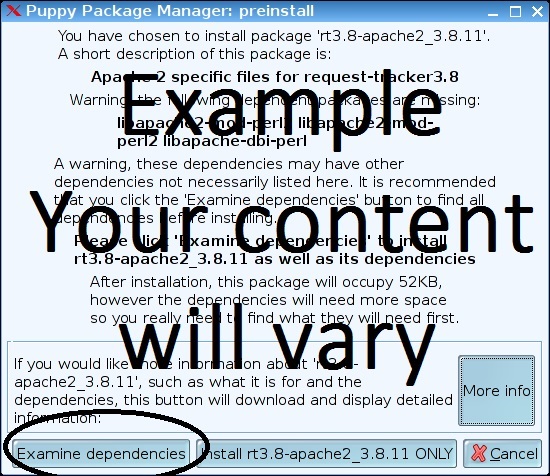
A pop-up windows will appear as shown below:

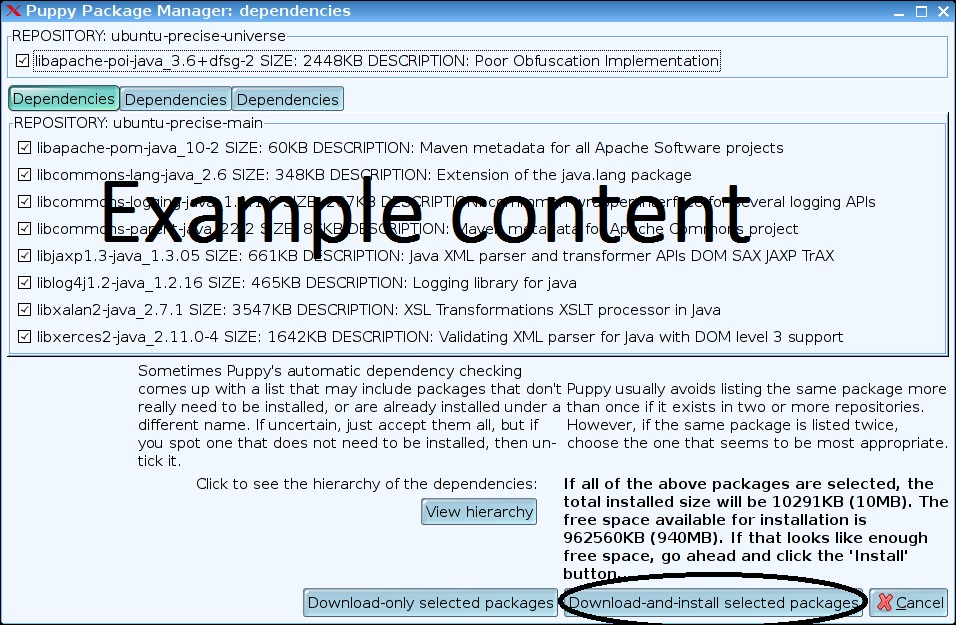
examinedepenancies

Click the “Examine dependencies” button.

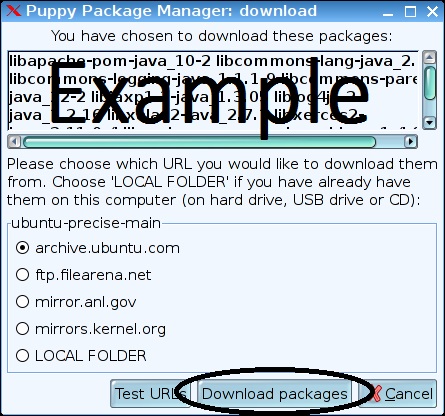
Click “Download-and-install selected packages” in the window below.

downloadinstall

Another window will appear. Click “Download packages” in this window.

downloadnow

Manual Apache Server Installation Steps

Once the download is complete, we are ready to make the necessary adjustments in order for the server to properly start. We will be adding a new user and add links to the files and directories the Apache server is expecting.

Open a terminal by clicking on the desktop icon “console”.

In the console window, enter the following lines. End each line with the <Enter> key. The entries are shown in red text:

# adduser www-data
adduser: /home/wwwdata: No such file or directory
Changing password for wwwdata
New password:
Retype password:
Password for wwwdata changed by root

Note that <enter> is pressed with no entry for the password.

Now lets continue with the next lines:

# touch /etc/apache2/httpd.conf

# ln -s /etc/apache2/mods-available/auth* /etc/apache2/mods-enabled/

# ln -s /etc/apache2/sites-available/default /etc/apache2/sites-enabled/

# ln -s /etc/apache2/mods-available/alias* /etc/apache2/mods-enabled/

# ln -s /etc/apache2/mods-available/ldap* /etc/apache2/mods-enabled/

# chown www-data:www-data /var/www

# touch index.html

# chown www-data:www-data /var/www/index.html

# ln -s /etc/apache2/mods-available/dir.* /etc/apache2/mods-enabled/

Server Test Page

Lets put the typical “hello world” message in our index.html file so we know it is served properly.

The file is in the /var/www directory, which is the apache server root folder. Open that file and fill it with the following text:


  1. &lt;html&gt;
  2.     &lt;body&gt;
  3.         &lt;h1&gt;Hello World!&lt;/h1&gt;
  4.     &lt;/body&gt;
  5. &lt;/html&gt;

Now there are only two more things needed to complete the server installation:

1. Set the IP
2. Set the Listening Port

Setting the IP

From the terminal, enter (a wired network cable should be installed):

# /sbin/ifconfig eth0

The computer will respond with several lines. The second line should contain the ip. My second line began with:

inet addr:192.168.0.110

This IP value needs to be added to the hosts file. It is at /etc/hosts.

The first line should be:

127.0.0.0 localhost <your computer id>

Change it to (using your IP value):

192.168.0.110 localhost <your computer id>

You can now save and close the hosts file.

Setting the Listen Port

Now lets finish this off by setting the server listening port. If you want to leave the server listening on the default port (80), you can skip this step.

Open the file: /etc/apache2/ports/ports.conf

Near the top of the file, you will see the following 2 lines:

NameVirtualHost  *:80

Listen 80

Change “80” in these lines to whatever port you want the server to listen on.

Save and close this file.

Now open the file: /etc/apache2/sites-enabled/default

The top line should be:

<VirtualHost *:80>

Change “80” in this line to the same port number in the first file.

Save and close this file.

Testing the Apache Server

First, start the server by entering the following in a console window:

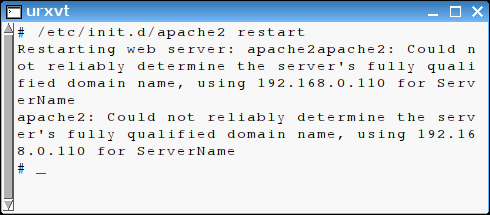
/etc/init.d/apache2 restart

The console should respond with:

startapache

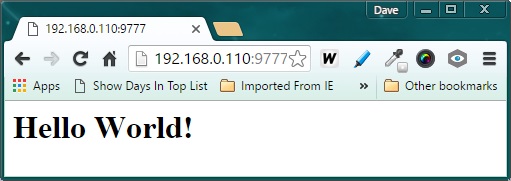
Now, using a web browser from a different computer on your network, enter (replacing 80 with the port number configured in the previous step):

192.168.0.110:80

The browser response should be (my listen port was 9777):

HelloWorld

Congratulations! Your Apache Server is now functional.

This is an enormous first step. You can now serve html files from this server, both within your local network and globally from anywhere on the planet!

In Closing

This is not the end, it is only the beginning of your own host server. I will share my setup as the components are added. Part 2, adding PHP to the server will be coming soon.

I hope you find this information useful…

Loading

Share This:
FacebooktwitterredditpinterestlinkedintumblrFacebooktwitterredditpinterestlinkedintumblr

Plugin Free WordPress Bootstrap

glycon

Bootstrap Plugins for WordPress are great for extending functionality and style without much coding. That is, until something breaks. There is nothing more frustrating than dealing with a website that is broken when you have not changed anything.

How could it happen?

I really don’t know. And while there are many great Bootstrap plugins for WordPress, I was depending on one of the most popular plugins (not mentioning names here) to support my responsive navigation menu. Worked great for almost a year, collapsing to the well-known 3-bar button for smartphones and small user browser windows-and expanding for larger screens. But then recently, it just stopped working.

It did not make sense. All I had done over the past few weeks was add a few posts to the site. That should have no effect on the navigation menu. Deactivating and reinstalling the plugin did not help. Yet the site needed to be fixed.

And fast!

After taking the “insanity” route for hours…trying the same things over and over with no improvement, I decided to delete the plugin and add Twitter Bootstrap manually to my WordPress site. While everything did not go smoothly at first, I did manage to restore my site’s bootstrap features. This time, without the non-transparent layer of a plugin.

Perhaps this guide may be of use to someone who encounters a similar situation…

Installing Bootstrap into a WordPress Site

First thing to do is to get the bootstrap files. I was unsuccessful in pointing to the CDN files so the actual files were downloaded and installed on the site. Go to getbootstrap.com and click on the “Download Bootstrap” button to get the needed files. The second download button looks like this:

download

You will also need the Jquery file, even if it is already installed as a WordPress plugin. As of this writing, Jquery is at version 2.1.4 and can be downloaded from this site.

It is important to copy the files to your WordPress theme folder as shown in the following table. It will not work if copied to a different directory.

File Name WordPress Folder
bootstrap.min.css /css
bootstrap-theme.min.css /css
bootstrap.min.js /js
jquery-2.1.4.min.js /js

The next thing to do is to modify  your themes functions.php file. This will make bootstrap functional within your WordPress theme. unfortunately, since functions.php is unique for each theme, the modifications must be made separately for each theme used.

Let’s first include the bootstrap style sheets when WordPress starts up. That is simply a matter of adding the following two “wp_register_style” and “wp”enqueue_style” lines to the function <your theme name>_of_styles():


  1. function &lt;your theme name&gt;_of_styles() {
  2.        wp_register_style( 'bootstrap', get_template_directory_uri() . '/css/bootstrap.min.css' );            
  3.        wp_register_style( 'bootstraptheme', get_template_directory_uri() . '/css/bootstrap-theme.min.css' );            
  4.        .
  5. .
  6. .            
  7.        wp_enqueue_style( 'bootstrap' );            
  8.        wp_enqueue_style( 'bootstraptheme' );            
  9.        .
  10. .
  11. .            
  12. }

Similarly, the Jquery files need to be included when WordPress starts up. This, however needs to be handled differently. That is because these files need to be introduced just before the bootstrap navigation bar html code is added, not when WordPress starts up.

This requires the addition of a new function to the functions.php file. Since the code is php, it simply echos the html script tags used to include the files. It is important for the jquery file to be listed before bootstrap:


  1. function ld_bootstrap_js() {
  2.    echo '&lt;script src="/js/jquery-2.1.4.min.js"&gt;&lt;/script&gt;';
  3.    echo '&lt;script src="/js/bootstrap.min.js"&gt;&lt;/script&gt;';
  4. }

As noted, this function needs to be called just before the navigation bar menu is introduced. This requires a change to one more theme file, “header.php”. Add the call just after the stylesheet in this file:


  1. .
  2. .
  3. &lt;link rel="stylesheet" type="text/css" media="all" href="&lt;?php echo get_stylesheet_uri(); ?&gt;" /&gt;
  4. &lt;?php ld_bootstrap_js(); ?&gt;
  5.    .   
  6. .
  7. &lt;/head&gt;

That’s it. Not really that difficult once you know how. With these changes, your WordPress website will support a responsive bootstrap navigation bar.

In Closing

While you may never have any problems using a bootstrap plugin, you might want to keep this information handy, just in case it fails you. This will bring your site back on line quickly. Independent of a third-party plug-in.

Loading

Share This:
FacebooktwitterredditpinterestlinkedintumblrFacebooktwitterredditpinterestlinkedintumblr

ESP8266 Free Space Assessment

percentage

Have you ever used the EspressIf SDK to compile code and wondered how much free space you have? How much more code you can add before running out of memory?

That information is very useful when developing code, and is readily available when using the Arduino IDE. So why is it missing from the SDK console output when you execute a build?

That used to bug me, until I figured out how to include it. Read on if you want a better view of the free space available after building your ESP8266 code.

Here is how I did it…

Evaluating Solution Options

First thing I did was review the Makefile that was provided with the SDK examples. I thought it might be a simple matter of adding a few lines to output the desired information. After all, the current Makefile outputs the number of byte used. And we know how much memory is available. A simple calculation and boom, you got the answer.

Wrong!

What I found was that the current memory statistics are generated by the utility “MemAnalyzer.exe” . This tool is included with the EspressIf SDK. So I figured all that it would take was a few changes to this utility to format the memory statistics in the format I wanted. Problem is, the source code for this utility is nowhere to be found. At least I had no luck finding it.

So what I decided to do was create another utility. One that would format the information provided by MemAnalyzer.exe and include it in the build Console output.

The Solution

Obviously, this requires some changes to the project’s “Make” file. The current information, while I find it inadequate, is produced by the following Makefile file line:


  1.  $(Q) $(SDK_TOOLS)/memanalyzer.exe $(OBJDUMP).exe $@

And the output from the memanalyzer tool is displayed like this example:


  1.    Section|              Description| Start (hex)| End (hex)|Used space
  2. ------------------------------------------------------------------------------
  3.       data|   Initialized Data (RAM)|    3FFE8000|  3FFE8D8C|    3468
  4.     rodata|      ReadOnly Data (RAM)|    3FFE8D90|  3FFEA3F4|    5732
  5.        bss| Uninitialized Data (RAM)|    3FFEA3F8|  3FFF4C08|   43024
  6.       text|       Cached Code (IRAM)|    40100000|  4010782C|   30764
  7. irom0_text|      Uncached Code (SPI)|    40240000|  4026F574|  193908
  8. Total Used RAM : 52224
  9. Free RAM : 29696
  10. Free IRam : 2022

In order to access this information, it was redirected to a text file (mem.txt) by adding a new line to the MakeFile:


  1. $(Q) $(SDK_TOOLS)/memanalyzer.exe $(OBJDUMP).exe $@
  2. <strong><span style="color: red;">$(Q) $(SDK_TOOLS)/memanalyzer.exe $(OBJDUMP).exe $@ &gt;mem.txt</span></strong>

My new utility reads the mem.txt file and outputs the re-formatted memory statistics to the build Console. The utility is named “EspMemUsage.exe” and is called in the Makefile with the addition of a second line:


  1. $(Q) $(SDK_TOOLS)/memanalyzer.exe $(OBJDUMP).exe $@
  2. $(Q) $(SDK_TOOLS)/memanalyzer.exe $(OBJDUMP).exe $@ &gt;mem.txt
  3. <strong><font style="color: red;">$(Q) $(SDK_TOOLS)/EspMemUsage.exe $(OBJDUMP).exe $@</font></strong>

And here is what the added Console output information looks like:


  1. ------------------------------------------------------------------------------
  2. Resource            |Size(bytes)|    Used|       %Used|        Free|   %Free
  3. --------------------|-----------|--------|------------|------------|----------
  4. IRAM - Cached Code  |      32768|   30746|          94|        2022|       6
  5. SPI - Uncached Code |     253952|  193908|          76|       60044|      24
  6. RAM - Data          |      81920|   52224|          63|       29696|      37
  7. ------------------------------------------------------------------------------

It help me a lot to see the memory usage in this format. I hope you find it useful too.

The utility, makefile, and source code are available on Github here. Installation instructions are provided in the readme file. It was developed using the free Microsoft code development  tool Visual Studio 2015 Community. Customize as you see fit to meet your specific needs and wants.

What It Does

The utility code is written using the c# programming language. The Program class is structured into 3 static functions.

  1. Main – This console application executes Main upon entry.  Main opens the file “mem.txt” and reads each line separately. If the line contains a memory value of interest, the information is extracted and formatted for output by calling the function “MemStat”. After completing the evaluation of the file “mem.txt”, the formatted results are output to the console.
  2. MemStat – This function extracts the value from the line read. Any spaces in the extracted value are removed by calling the 3rd and final function, “RemoveSpaces”. The memory used and free statistics are then calculated and formatted. The formatted string is returned to the function caller.
  3. RemoveSpaces – Removes spaces from a string.

In Closing

The utility presented here provides clarity to the ESP8266 code developer using the EspressIf SDK. So you know exactly how much memory is available for expansion, delineated by memory resource. Once installed, all you need to do is use the modified Makefile in your new projects to get the information displayed in the console output.

I hope you find this information useful.


Loading

Share This:
FacebooktwitterredditpinterestlinkedintumblrFacebooktwitterredditpinterestlinkedintumblr

How to test ASP.NET files locally

asp

You may come across webpages using Active Server Pages (ASP) that require some changes. I did. But how can you test the page locally, on your computer, before uploading it to a live website?Problem is, you just cannot open a local ASP file with a web browser and expect it to behave the same as it will when it resides on your web host server.

Why not?

Well, ASP is a server side technology. Simply stated, it means you need to run a server to render ASP pages locally. Not only that, ASP was developed by Microsoft. And they intended for developers to use Visual Studio for page creation. This created additional challenges for me. You see, I did not wish to install Visual Studio.

It took some research, gathering some useful tips from multiple sources to get the full picture of what was needed. I’ve distilled what was learned into step-by-step instruction.

So here’s a guide to help you get started running an Active Server Page (ASP) locally…using just a PC and any text editor. These steps assume you are using a PC with Windows 10 OS installed. Since ASP is a Microsoft creation, a Mac solution or using Linux is not recommended for this application.

Installing a Local Web Server

First thing that is needed is an active Windows Server running on the PC. The current Microsoft solution is called Internet Information Services (IIS).  This site provides instructions for installing and activating IIS for different versions of the Windows OS. 

But it does not cover Windows 10. So here is what I did to activate IIS on my PC…

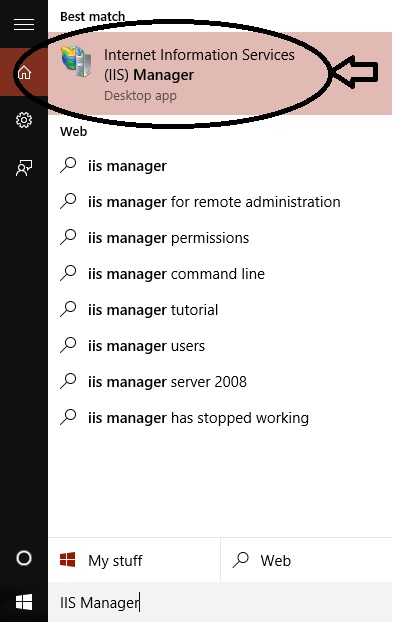
First. type “IIS Manager” into the “Search the web and Windows” box on the lower left part of the PC screen and select “Internet Information Services (IIS) Manager” from the list.

IIS_Open

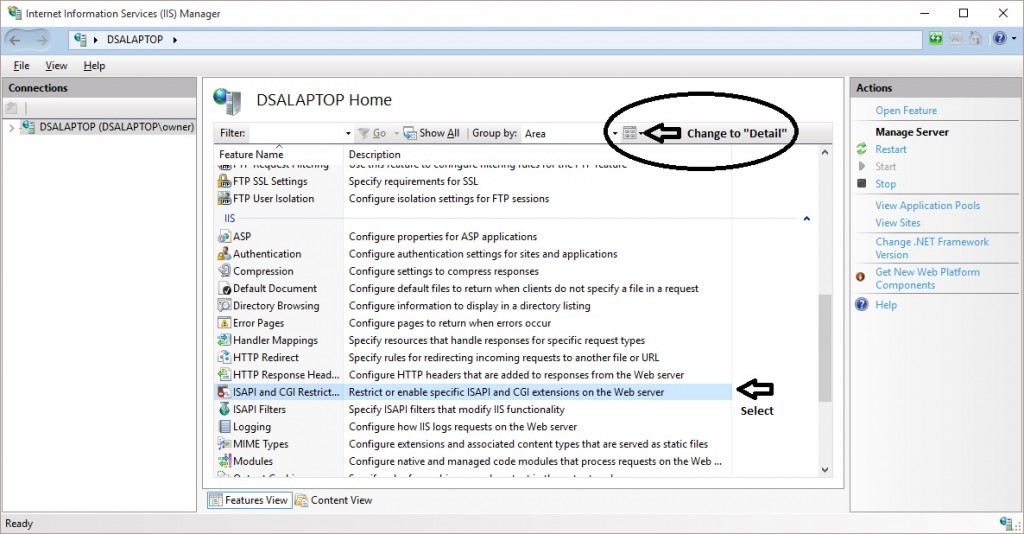
When the IIS Manager windows appears, change the view to “Detail”. Then, under the “IIS” section, select ISAPI and CGI Restrictions.

restrictions

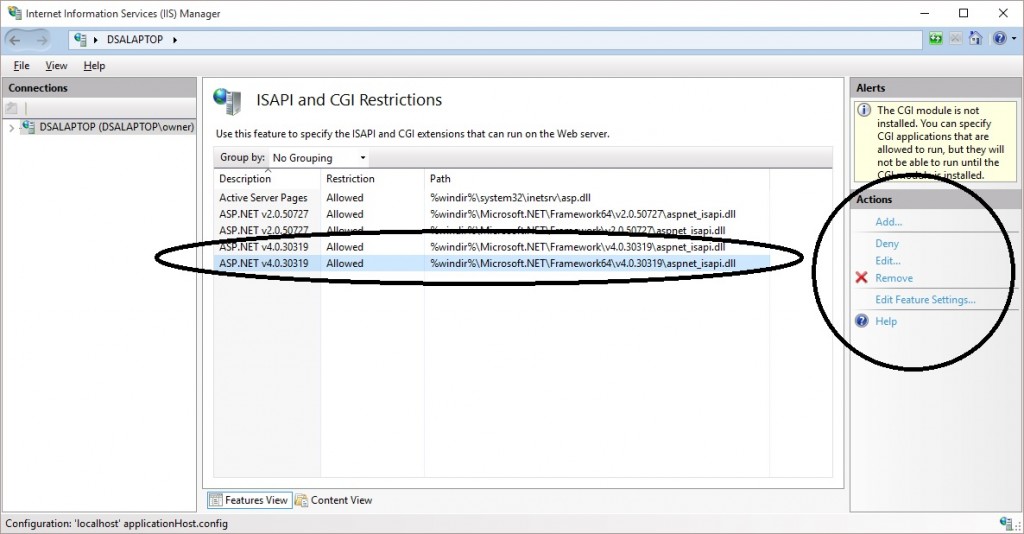
The list that appears should include ASP.NET v4.0.30319 as shown below. The Restriction should also be set to “Allowed”. You can Add the feature if it is missing and set the restriction to “Allowed” from the “Actions” options on the right part of this windows.

allow

That’s it. With these settings, the IIS should be active and you should be able to run ASP pages locally on your PC.

Hello World! ASP Test file

Now let’s run a simple test to verify the ASP server is working. Here are my step-by-step instructions:

1. Look for a new folder called Inetpub on your hard drive.

2. Open the Inetpub folder, and find a folder named wwwroot

3. Create a new folder, call it “asp”, under wwwroot. (Any folder name will do)

4. Write the following ASP code and save the file as “helloworld.aspx” in this new folder

Hello World
 
  1.  &lt;%@ Language="VBScript" %&gt;
  2.  &lt;!--- This page should display "Hello World!" ---&gt;
  3.  &lt;!--- if ASP is available to you locally.     ---&gt;
  4.   &lt;HTML&gt;
  5.     &lt;HEAD&gt;
  6.       &lt;TITLE&gt;ASP Hello World Test Page&lt;/TITLE&gt;
  7.     &lt;/HEAD&gt;
  8.     &lt;BODY&gt;
  9.       &lt;%
  10.        Response.Write("Hello World!&lt;br&gt;")
  11.        %&gt;   
  12.       &lt;/BODY&gt;
  13.   &lt;/HTML&gt;

5. Make sure your Web server is running (see below)

6. Open your browser and type “http://localhost/asp/helloworld.aspx“, to view your first web page.
If ASP is served correctly, the browser should display:

Hello World!

Now try to open the page using the full path in the browser:

C:/inetpub/wwwroot/asp/helloworld.aspx

As you can see, in the case, the IIS is not working to serve the ASP page. Instead, the file source is displayed the same as shown in step 4 above.

Useful ASP Links

Here are some links I have found useful in learning more about ASP.

In Closing

You now have a simple reference to install a local ASP server on your PC. This should prove to be valuable for anyone developing or maintaining ASP files.

Hope you find this information useful…


Loading

Share This:
FacebooktwitterredditpinterestlinkedintumblrFacebooktwitterredditpinterestlinkedintumblr

Native Android App Development Using Only HTML-Javascript-CSS

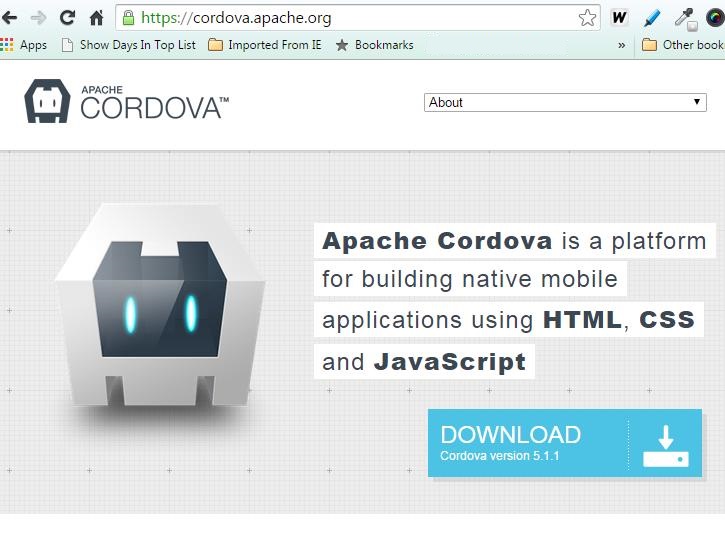
cordovaHere’s a handy gem for your bag of tricks. Did you know that a native Android App can be developed using only the web familiar html, javascript and css? Without the need to dig deep into the bowels of the OS.

Yep, it is definitely possible – all while still offering control of all your device’s interfaces such as cameras, bluetooth, wifi…you name it. You see, the hardware dependent components are supported with an Apache developed framework called Cordova. And while this article focuses on the Android platform, the same App can easily be ported to ios or Amazon Fire, with little or no change. Making it possible to develop your App once for distribution across several different device types.

Here is how to setup the development environment and install an application on an Android device.


Setting Up The Environment

The trick is using Cordova to provide a platform for building native applications using only HTML. CSS, and Javascript.

What is Cordova?

This is a group of  APIs supporting the development of native Apps without using the language of the device. These APIs provide access to the device’s hardware sensors. And with a few simple steps, you are up and running, developing your unique application.

Step 1:

Install node.js from nodejs.org

This will allow you to run “node” and “npm” from a command line window.

Step 2:

Install a git client from http://git-scm.com/.

This will allow you to invoke “git” from a command line.

Step 3:

Install the Cordova module using npm by entering the following at the command line:

npm install -g cordova

Step 4:

Setup the Eclipse for Android App Development Environment by following the following instructable:

http://www.instructables.com/id/How-To-Setup-Eclipse-for-Android-App-Development/?ALLSTEPS


Creating A New Application

Step 1:

Open a cmd windows.

Step 2:

Change directory to the base directory for your workspaces (your choice).

Cd c:\myworkspace

Step 3:

Create new folder with app name (no spaces):

mkdir mynewapp

cd mynewapp

Step 4:

Create app file structure:

cordova create appfiles com.author.mynewapp MyAppTitle

Where

  • “appfiles” is the folder to create the app file structure
  • “com” is the convention used to start the app filename
  • “author” is the developer or company name or initials
  • “mynewapp” is the bame of the app
  • “MyAppTitle” is the title of the app

Step 5:

Add platform (android or ios)

cd appfiles

cordova platform add android

Step 6:

Add plugins as needed (basic required plugins;device,console,file shown here)

Get plugin names from plugins.cordova.io/#/ Then enter the following for each plugin to be added:

cordova plugins add org.apache.cordova.device

cordova plugins add org.apache.cordova.console

cordova plugins add org.apache.cordova.file

In the future, plugins will be delivered using npm. See the instruction at plugins.cordova.io/#/ for more information regarding npm plugin delivery.


Building the Application

Step 1:

Open Eclipse

Step 2:

Install your USB cable from the PC running eclipse to the Android device.

Step 3:

Select Import from the File menu.

Step 4:

Select the base folder created for the newly created project.

Step 5:

First Select “Clean” from the Project Menu.

Step 6:

Then Click on the “Run” icon to build and launch the new app on your device


Editing The Application

The App starts with the launching of the index.html file located at:

<your base app workspace folder>\iotmobile\appfiles\platforms\android\assets\www

this file should be edited to change the functionality of the App. Javascript/Jquery and css files can similarly be customized. They are located at:

<your base app workspace folder>\iotmobile\appfiles\platforms\android\assets\www\js


Conclusion

There you have it!

A quick reference to setting up the Android Development Environment, creating a blank project, building the App and finally loading running it on your device. Now it’s your turn. What will you create?

I hope you find this information useful…

droid

Loading

Share This:
FacebooktwitterredditpinterestlinkedintumblrFacebooktwitterredditpinterestlinkedintumblr

Adding Contact Form Icons

Want to add some accent to your WordPress Contact Form? Like adding icons to the form field labels. You’ve seen them. An image of an envelope next to the email field. Or a pencil next to the message label. There are hundreds of icons to chose from. Want a quick and easy way to add these images to YOUR form? This video shows you how…

Loading

Share This:
FacebooktwitterredditpinterestlinkedintumblrFacebooktwitterredditpinterestlinkedintumblr

Shortening Domain URLs

Are your website URLs getting too long? Difficult to remember or enter? There is an easy answer, a way to shorten them within your host path structure….without depending on external redirection services such as tinyURL or Bitly. This video shows you how…

Loading

Share This:
FacebooktwitterredditpinterestlinkedintumblrFacebooktwitterredditpinterestlinkedintumblr

Press Ctrl+C to copy the following code.
"