Archives for November 2015

ESP8266 Arduino IDE Web Server Using Callbacks

sdkcall

While the Arduino IDE is a convenient and familiar platform to develop ESP8266 Web Server based projects, it does have a significant drawback. That is, once the Web Server is started, it is necessary to poll the server each iteration of the loop() function to check for new connections before processing the request.

Putting the check in a loop with other activities, such as reading sensors could and often does result in significant response delays. And possible loss of communication due to connection timeouts.

A better approach is to use a callback that fires whenever an external client connects to the ESP8266 server. This frees up the sketch loop() from the task of servicing http request using inefficient polling code.

And callbacks is how a Web Server is implemented using the ESP8266 EspressIf SDK. But why is it missing from the Arduino IDE? I suspect it is because that is the way it is done with Arduino-based systems—making it both familiar and perhaps suitable for Arduino code reuse with the ESP8266.

But it is not the best solution for new designs.

So that got me thinking…

Why not customize the typical web server sketch to use the SDK callback schema? After all, it is possible to  call ESP8266 SDK functions from the Arduino IDE. While searching, I could not find any examples of this being done, so I’ve created one myself.

And here it is…

The SDK Server Architecture

The SDK API requires several layers of callbacks in a web server design. Since these callbacks are usable in a sketch without modification, the actual sketch functions included in this example are shown.

First,  the server must be setup in the sketch setup() routine. This initialization code was encapsulated in the following function, “SdkWebServer_Init()”, called in setup():


  1. void SdkWebServer_Init(int port) {
  2.     LOCAL struct espconn esp_conn;
  3.     LOCAL esp_tcp esptcp;
  4.     //Fill the connection structure, including "listen" port
  5.     esp_conn.type = ESPCONN_TCP;
  6.     esp_conn.state = ESPCONN_NONE;
  7.     esp_conn.proto.tcp = &esptcp;
  8.     esp_conn.proto.tcp->local_port = port;
  9.     esp_conn.recv_callback = NULL;
  10.     esp_conn.sent_callback = NULL;
  11.     esp_conn.reverse = NULL;
  12.     //Register the connection timeout(0=no timeout)
  13.     espconn_regist_time(&esp_conn,0,0);
  14.     //Register connection callback
  15.     espconn_regist_connectcb(&esp_conn, SdkWebServer_listen);
  16.     //Start Listening for connections
  17.     espconn_accept(&esp_conn); 
  18. }

Upon an external TCP connection, the callback “SdkWebServer_listen” is executed:


  1. void SdkWebServer_listen(void *arg)
  2. {
  3.     struct espconn *pesp_conn = ( espconn *)arg;
  4.     espconn_regist_recvcb(pesp_conn, SdkWebServer_recv);
  5.     espconn_regist_reconcb(pesp_conn, SdkWebServer_recon);
  6.     espconn_regist_disconcb(pesp_conn, SdkWebServer_discon);
  7. }

This functions registers 3 connection-specific callbacks:

  1. SdkWebServer_recv – Called when connection data is received. This callback replaces the polling loop when using the Arduino library.
  2. SdkWebServer_recon – Called when TCP connection is broken.
  3. SdkWebServer_discon-Called when a TCP connection is closed.

The SdkWebServer_recv() function processes http GET and POST requests in a similar manner as the processing in the loop() after an Arduino client connection is detected.

Putting It All Together

In order to contrast the commonly used Arduino Web Server library with the SDK API, I’ve put together an example sketch that supports both web server approaches. It’s on Github:

ESP8266-12 Arduino IDE Web Server Example 

This example provide the same functionality with either server interface. The selection is made prior to building the sketch, using precompilation directives. When possible, the same code is used with both selections. The difference is that the SDK uses callbacks while the Arduino polls for connections.

While no additional hardware is needed to run and test the Web Server, this example assumes the ESP8266 circuit from this post. But the code will work with any ESP8266 circuit, even with no externally connected sensors or controls. But without the ADC multiplexer from the referenced post, the ADC will simply make the same measurement for each multiplexer setting. Which is just fine for the purposes of this example.

Testing the Server From A Web Browser

Since both versions of the Web Server provide the same functionality, the same test can be performed for verification.

You might need to changed the static IP set in this example to match your own LAN subnet. The defaults are currently set to:

IP: 192.168.0.132

Listen Port: 9701

The test url is thus:

192.168.0.132:9701/?request=GetSensors

And the JSON returned from the Web Server should be in the following format:

{
"Ain0":"316.00",
"Ain1":"326.00",
"Ain2":"325.00",
"Ain3":"314.00",
"Ain4":"316.00",
"Ain5":"163.00",
"Ain6":"208.00",
"Ain7":"333.00",
"SYS_Heap":"25408",
"SYS_Time":"26"
}

And if connected, the server will also support changing the LED on/off state:

To turn it on, use the URL:
192.168.0.132:9701/?request=LedOn

And the off URL i:
192.168.0.132:9701/?request=LedOff

Adding server functionality should be obvious after reviewing the sketch.

Conclusions

Using a callback to process Web Server connection requests is far superior to polling. CPU bandwidth is only used in response to client connection events. And with the example framework provided in this post, you can still utilize many of the Arduino sensor libraries without modification.

With a Web Server application, you get the efficiency of the callback with the familiarity of the Arduino IDE.

I hope you find this information useful…

Loading

Share This:
FacebooktwitterredditpinterestlinkedintumblrFacebooktwitterredditpinterestlinkedintumblr

ESP8266 MQTT Publication & External Subscription

mqtt

Publishing data produced by ESP8266 sensors to an MQTT broker server is a great option to making your IoT data visible to outside consumers with minimal consumption of precious MCU bandwidth. Simple, easy to implement and very light-weight.

What a great distribution system!

Simply publish your ESP8266 sensor data once, and many subscribers can consume the information, virtually at the same time. Sweet!

MQTT Basics

In case you are new to MQTT, here are a few basics. MQTT is the acronym for message queuing telemetry transport. Now that’s a mouthful! It is essentially a protocol that follows the publish/subscribe model to distribute information from one source to many users.

Here’s a few links for more MQTT information:

I’ve put together an ESP8266 MQTT demo project using an Arduino IDE sketch to publish data for consumption by subscribers using the MQTT protocol. Several options for consuming the data as a subscriber are also presented…

MQTT Broker/Server

For demo purposes, I wanted to use a free broker. After testing a few of the available options, I settled on using the Mosquitto MQTT server. While unsecured, meaning anyone who knows your “topic” can subscribe to the data, it works great for a proving out your design.

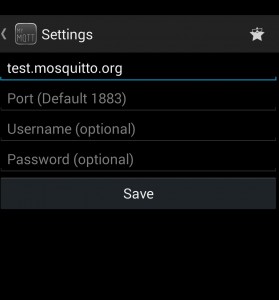
server: test.mosquitto.org

port: 1883

Arduino IDE Sketch

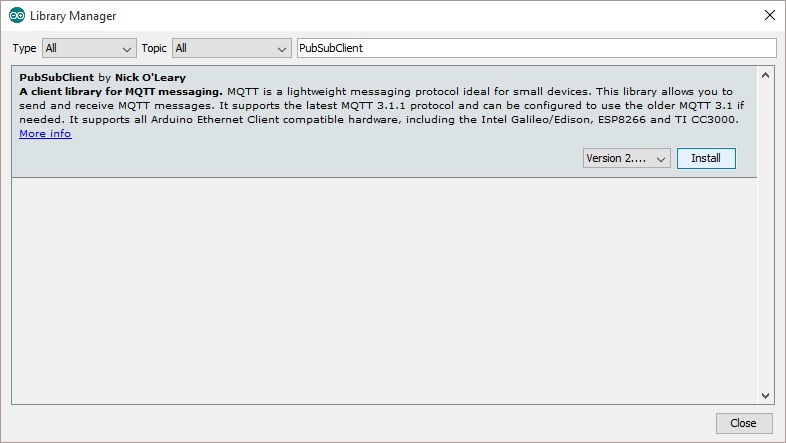
There is one library that needs to be added to the Arduino IDE to access the MQTT broker. It’s called “PubSubClient”. Here is how to install it…

Step 1: Open the Arduino IDE

Step 2: From the menu, select Sketch>Include Library>Manage Libraries…

Step 3: Enter “PubSubClient” in the search box.

PubSubClient

Step 4: Click on the “Install” button

Now that was easy.

Great!

But there is one more thing to do  after installing PubSubClient. I have found that the default maximum packet size (128 bytes) is insufficient. You should at least double it to 256 bytes.

How?

Just open the file “…/Arduino/libraries/pubSubClient/src/PubSubClient.h and change the following line:

From:

#define MQTT_MAX_PACKET_SIZE 128

To:

#define MQTT_MAX_PACKET_SIZE 256

Now lets talk about the sketch to test MQTT with the ESP8266…

The setup() function performs 3 basic tasks:

Setup()

  • setup serial port
  • connect to wifi
  • set MQTT broker/server

And loop() maintains the Wifi and MQTT connections, reads the sensors, and publishes the values to the MQTT broker.

Loop()

  • Reconnect to WiFi if disconnected
  • Reconnect to MQTT broker/server if disconnected
  • Read Sensor(s)
  • Publish Sensor data

Here is a break-down of the sketch. First, the objects must be identified


  1. #include <ESP8266WiFi.h>
  2. #include <PubSubClient.h>
  3. #define wifi_ssid "Your SSID"
  4. #define wifi_password Your Wifi password"
  5. #define mqtt_server "test.mosquitto.org"
  6. #define mqtt_user "not used in this example"
  7. #define mqtt_password "not used in this example"
  8. #define topic1 "t1"
  9. #define topic2 "t2"
  10. WiFiClient espClient;
  11. PubSubClient client(espClient);

And then the sketch setup…


  1. void setup() {
  2.    Serial.begin(115200);
  3.    setup_wifi();
  4.    client.setServer(mqtt_server, 1883);
  5. }

A typical Wifi connect function:


  1. void setup_wifi() {
  2.    delay(10);
  3.    // We start by connecting to a WiFi network
  4.    Serial.println();
  5.    Serial.print("Connecting to ");
  6.    Serial.println(wifi_ssid);
  7.    WiFi.begin(wifi_ssid, wifi_password);
  8.    while (WiFi.status() != WL_CONNECTED) {
  9.      delay(500);
  10.      Serial.print(".");
  11.    }
  12.    Serial.println("");
  13.    Serial.println("WiFi connected");
  14.    Serial.println("IP address: ");
  15.    Serial.println(WiFi.localIP());
  16. }

The loop() simply makes sure a connection to the MQTT is made, reads the sensors, and publishes the results. The publish rate is set at 2 seconds minimum.


  1. void loop() {
  2.   if (!client.connected()) {
  3.     reconnect();
  4.   }
  5.   client.loop();
  6.   //2 seconds minimum between Read Sensors and Publish
  7.   long now = millis();
  8.   if (now - lastMsg > 2000) {
  9.       lastMsg = now;
  10.       //Read Sensors (simulated by increasing the values, range:0-90)
  11.       t1 = t1>90 ? 0 : ++t1;
  12.       t2 = t2>90 ? 0 : ++t2;
  13.       //Publish Values to MQTT broker
  14.       pubMQTT(topic1,t1);
  15.       pubMQTT(topic2,t2);
  16.   }
  17. }

Just copy and paste this complete sketch as a starting template to test your own MQTT publishing with the ESP8266. Remember, you will need to set the WIFI ssid & password in the sketch to your access point values before running.


  1. #include <ESP8266WiFi.h>
  2. #include <PubSubClient.h>
  3. #define wifi_ssid "YOURSSID"
  4. #define wifi_password "YOURPASSWORD"
  5. #define mqtt_server "test.mosquitto.org"
  6. #define mqtt_user "your_username"
  7. #define mqtt_password "your_password"
  8. #define topic1 "t1"
  9. #define topic2 "t2"
  10. WiFiClient espClient;
  11. PubSubClient client(espClient);
  12. void setup() {
  13.    Serial.begin(115200);
  14.    setup_wifi();
  15.    client.setServer(mqtt_server, 1883);
  16. }
  17. void setup_wifi() {
  18.    delay(10);
  19.    // We start by connecting to a WiFi network
  20.    Serial.println();
  21.    Serial.print("Connecting to ");
  22.    Serial.println(wifi_ssid);
  23.    WiFi.begin(wifi_ssid, wifi_password);
  24.    while (WiFi.status() != WL_CONNECTED) {
  25.      delay(500);
  26.      Serial.print(".");
  27.    }
  28.    Serial.println("");
  29.    Serial.println("WiFi connected");
  30.    Serial.println("IP address: ");
  31.    Serial.println(WiFi.localIP());
  32. }
  33. void reconnect() {
  34.    // Loop until we're reconnected
  35.    while (!client.connected()) {
  36.      Serial.print("Attempting MQTT connection...");
  37.      // Attempt to connect
  38.      if (client.connect("TestMQTT")) { //* See //NOTE below
  39.        Serial.println("connected");
  40.      } else {
  41.        Serial.print("failed, rc=");
  42.        Serial.print(client.state());
  43.        Serial.println(" try again in 5 seconds");
  44.        // Wait 5 seconds before retrying
  45.        delay(5000);
  46.      }
  47.    }
  48. }
  49. //NOTE: if a user/password is used for MQTT connection use:
  50. //if(client.connect("TestMQTT", mqtt_user, mqtt_password)) {
  51. void pubMQTT(String topic,float topic_val){
  52.     Serial.print("Newest topic " + topic + " value:");
  53.     Serial.println(String(topic_val).c_str());
  54.     client.publish(topic.c_str(), String(topic_val).c_str(), true);
  55. }
  56. //Variables used in loop()
  57. long lastMsg = 0;
  58. float t1 = 75.5;
  59. float t2 = 50.5;
  60. void loop() {
  61.   if (!client.connected()) {
  62.     reconnect();
  63.   }
  64.   client.loop();
  65.   //2 seconds minimum between Read Sensors and Publish
  66.   long now = millis();
  67.   if (now - lastMsg > 2000) {
  68.       lastMsg = now;
  69.       //Read Sensors (simulate by increasing the values, range:0-90)
  70.       t1 = t1>90 ? 0 : ++t1;
  71.       t2 = t2>90 ? 0 : ++t2;
  72.       //Publish Values to MQTT broker
  73.       pubMQTT(topic1,t1);
  74.       pubMQTT(topic2,t2);
  75.   }
  76. }

Testing Tools

While there are many tools available, here are a few I have found that you can use to verify the ESP8266 is actually publishing the data.

How?

Simply subscribe to the topic and watch the information updates in real-time.

Google Chrome Application

First try using MQTTLens, an off-the-shelf tool to subscribe to the published data. You can get MQTTLens here. Although this app is installed via Google Chrome, it runs as standalone application. At this time, Chrome apps are supported using Windows, Mac and Linux operating systems.

This app provides basic functionality for testing MQTT publish/subscribe messages.

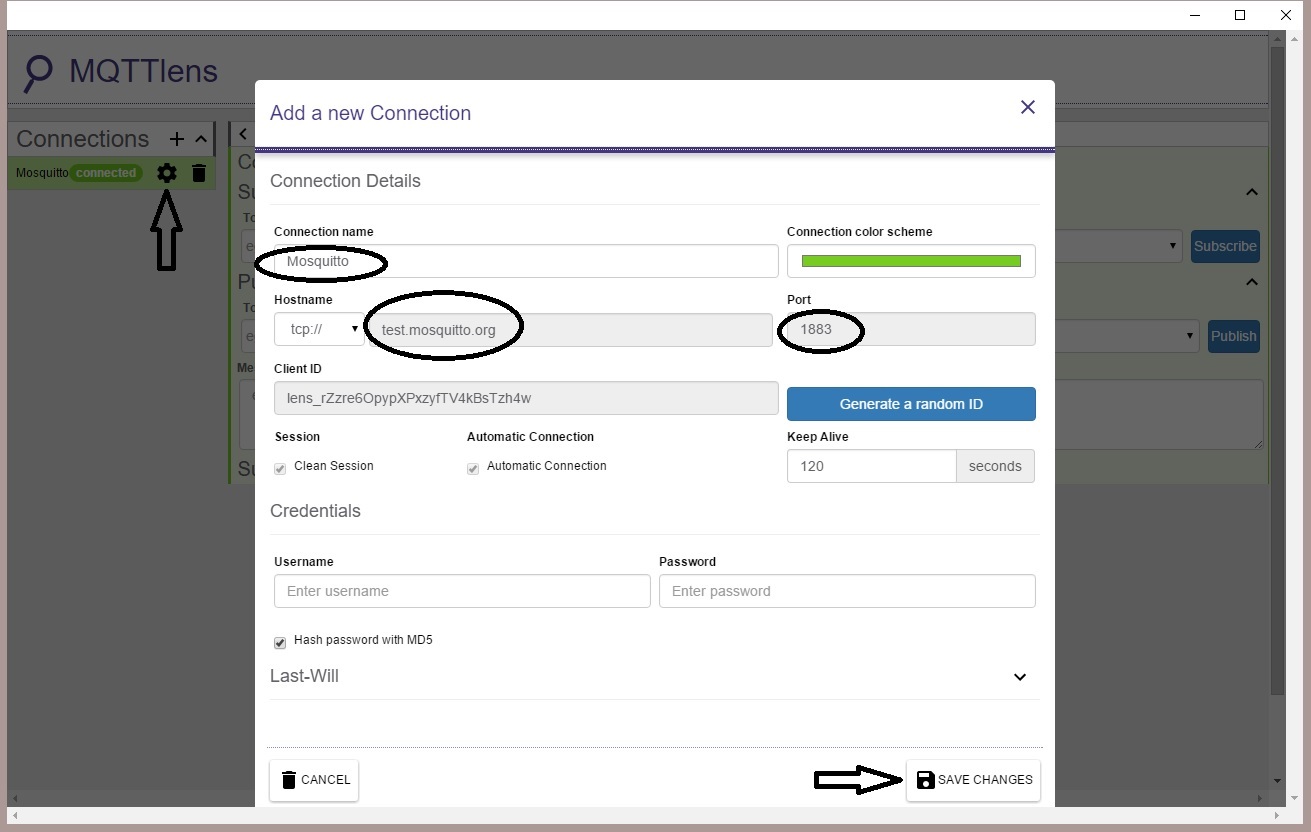
Once the app has been installed and started, a few configuration steps are needed to connect to our MQTT broker and subscribe to the ESP8266 published topics.

Just click on the configuration icon and fill in the information as shown below:
mqttlenssetup
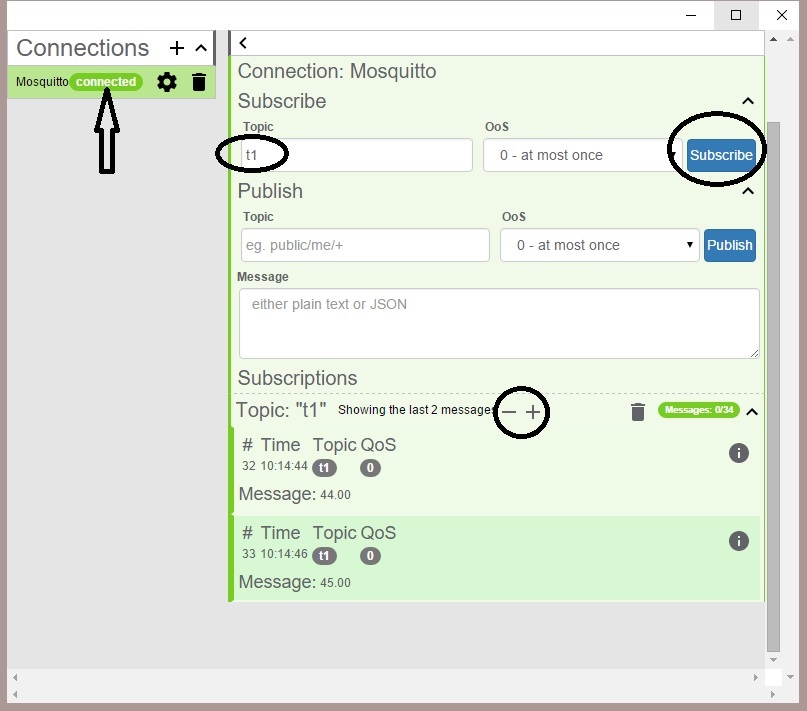
Once you are connected to the broker, the only thing left to do is subscribe to the data feed. For this example, two topics are published by the ESP8266; t1 and t2. Enter one of these and click on the subscribe button to monitor the data as it is published.
mqqtlens_subscribe
Notice you can change the number of messages displayed using the “-+” icons.

Web Page using JavaScript

MQTTLens is a great tool to get a quick look at your MQTT published data. But when you move from merely testing the data feed to developing a custom application, full control to manipulate and display the information is essential.
Fortunately, this is a simple task using only JavaScript and html.
I’ve developed the following html code to subscribe to the ESP8266 published data. This may be useful as a template on your own website. Simply open a file with this code in a web browser to test. Name this file as you please, using “.html” as the file name extension. In this example, I have named the file “mqtt_subscribe.html”.


  1. <!DOCTYPE html>         
  2. <html>         
  3. <head>         
  4. <title>MQTT JavaScript Client Example</title>         
  5. <!-- Latest compiled and minified CSS - add here as needed -->         
  6. </head>         
  7. <body>         
  8. <!-- HTML to display MQTT topic values -->         
  9. <div><strong>Published ESP8266 topics via MQTT:</strong></div><br>         
  10. <div id="t1"></div>         
  11. <div id="t2"></div>         
  12. <!-- mosquitto MQTT -->         
  13. <script type="text/javascript" src="http://test.mosquitto.org/mosquitto.js"></script>         
  14. <!-- jQuery -->         
  15. <script src="https://ajax.googleapis.com/ajax/libs/jquery/1.11.2/jquery.min.js"></script>         
  16. <!-- Custom MQTT client for this example -->         
  17. <script>         
  18. // Create a client instance         
  19. client = new Mosquitto();         
  20. // Connect to MQTT broker         
  21. var url = "ws://test.mosquitto.org:8080/mqtt";         
  22. client.connect(url);         
  23. // Callback executed upon connection         
  24. client.onconnect = function(rc){         
  25. var topic = 't1';         
  26. client.subscribe('t1', 0);         
  27. client.subscribe('t2', 0);         
  28. };         
  29. //Callback executed upon disconnection         
  30. client.ondisconnect = function(rc){         
  31. client.connect(url);         
  32. };         
  33. //Callback executed upon receipt of MQTT message         
  34. client.onmessage = function(topic, payload, qos){         
  35. if(topic=="t1") {         
  36. $("#t1").html("Topic: t1 Value: " + payload);         
  37. }         
  38. if(topic=="t2") {         
  39. $("#t2").html("Topic: t2 Value: " + payload);         
  40. }         
  41. };         
  42. </script>         
  43. </body>         
  44. </html>

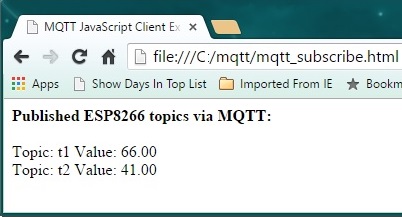
Just to keep things clean and simple, no css styling is included in this example. Here is a snapshot of the browser windows when this file is viewed:

mqqt_javascript_

Android

While I have not yet explored the development of a custom Android App to interface with an MQTT broker, it is certainly possible. What immediately comes to mind, in the spirit of App portable, would be to develop an Android Cordova App. This would allow you to reuse the above html code, without modification.
Here is my step-by-step guide to get started.
But if you are looking for an off-the-shelf MQTT test application, I recommend using MyMQTT . This is a free App available in Google Play Store. Once installed, there are only a few steps needed to subscribe to the ESP8266 example MQTT feed.
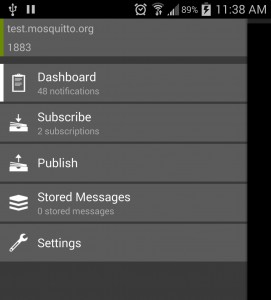
The App will startup with the following screen:
Mymqtt_main
First set the app to connect with the broker we are using for this example. Click on “Settings” and enter the broker information as shown:
Mymqtt_setup
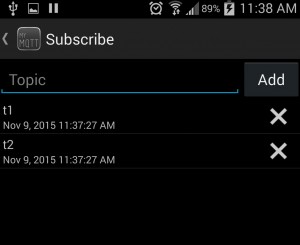
Then subscribe to the ESP8266 published topics (t1 and t2):
Mymqtt_subscribe
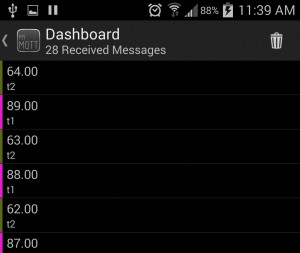
The dashboard will then display the topic data as it is published:
Mymqtt_messages

Iphone/iPad

MQTTInspector is the most popular App to test MQTT feeds from an iOS device. At $1.99, is not free, yet certainly low-cost. As a Windows, Android and Linux user, I cannot provide any additional information regarding this tool. It appears to be similar to other MQTT client test tools, and can be found on iTunes here.

In Conclusion

Here you have it. A simple guide to publishing topics from an ESP8266 device to an MQTT broker. All you need is a simple Arduino IDE sketch.

Once published, this data feed can be consumed cross-platform, on any device that supports MQTT. From this article, this includes but is certainly not limited to Windows, Mac and iOS. There are also Linux packages available to support MQTT clients.

As always, I hope you find this information useful…

Loading

Share This:
FacebooktwitterredditpinterestlinkedintumblrFacebooktwitterredditpinterestlinkedintumblr

Plugin Free WordPress Bootstrap

glycon

Bootstrap Plugins for WordPress are great for extending functionality and style without much coding. That is, until something breaks. There is nothing more frustrating than dealing with a website that is broken when you have not changed anything.

How could it happen?

I really don’t know. And while there are many great Bootstrap plugins for WordPress, I was depending on one of the most popular plugins (not mentioning names here) to support my responsive navigation menu. Worked great for almost a year, collapsing to the well-known 3-bar button for smartphones and small user browser windows-and expanding for larger screens. But then recently, it just stopped working.

It did not make sense. All I had done over the past few weeks was add a few posts to the site. That should have no effect on the navigation menu. Deactivating and reinstalling the plugin did not help. Yet the site needed to be fixed.

And fast!

After taking the “insanity” route for hours…trying the same things over and over with no improvement, I decided to delete the plugin and add Twitter Bootstrap manually to my WordPress site. While everything did not go smoothly at first, I did manage to restore my site’s bootstrap features. This time, without the non-transparent layer of a plugin.

Perhaps this guide may be of use to someone who encounters a similar situation…

Installing Bootstrap into a WordPress Site

First thing to do is to get the bootstrap files. I was unsuccessful in pointing to the CDN files so the actual files were downloaded and installed on the site. Go to getbootstrap.com and click on the “Download Bootstrap” button to get the needed files. The second download button looks like this:

download

You will also need the Jquery file, even if it is already installed as a WordPress plugin. As of this writing, Jquery is at version 2.1.4 and can be downloaded from this site.

It is important to copy the files to your WordPress theme folder as shown in the following table. It will not work if copied to a different directory.

File Name WordPress Folder
bootstrap.min.css /css
bootstrap-theme.min.css /css
bootstrap.min.js /js
jquery-2.1.4.min.js /js

The next thing to do is to modify  your themes functions.php file. This will make bootstrap functional within your WordPress theme. unfortunately, since functions.php is unique for each theme, the modifications must be made separately for each theme used.

Let’s first include the bootstrap style sheets when WordPress starts up. That is simply a matter of adding the following two “wp_register_style” and “wp”enqueue_style” lines to the function <your theme name>_of_styles():


  1. function &lt;your theme name&gt;_of_styles() {
  2.        wp_register_style( 'bootstrap', get_template_directory_uri() . '/css/bootstrap.min.css' );            
  3.        wp_register_style( 'bootstraptheme', get_template_directory_uri() . '/css/bootstrap-theme.min.css' );            
  4.        .
  5. .
  6. .            
  7.        wp_enqueue_style( 'bootstrap' );            
  8.        wp_enqueue_style( 'bootstraptheme' );            
  9.        .
  10. .
  11. .            
  12. }

Similarly, the Jquery files need to be included when WordPress starts up. This, however needs to be handled differently. That is because these files need to be introduced just before the bootstrap navigation bar html code is added, not when WordPress starts up.

This requires the addition of a new function to the functions.php file. Since the code is php, it simply echos the html script tags used to include the files. It is important for the jquery file to be listed before bootstrap:


  1. function ld_bootstrap_js() {
  2.    echo '&lt;script src="/js/jquery-2.1.4.min.js"&gt;&lt;/script&gt;';
  3.    echo '&lt;script src="/js/bootstrap.min.js"&gt;&lt;/script&gt;';
  4. }

As noted, this function needs to be called just before the navigation bar menu is introduced. This requires a change to one more theme file, “header.php”. Add the call just after the stylesheet in this file:


  1. .
  2. .
  3. &lt;link rel="stylesheet" type="text/css" media="all" href="&lt;?php echo get_stylesheet_uri(); ?&gt;" /&gt;
  4. &lt;?php ld_bootstrap_js(); ?&gt;
  5.    .   
  6. .
  7. &lt;/head&gt;

That’s it. Not really that difficult once you know how. With these changes, your WordPress website will support a responsive bootstrap navigation bar.

In Closing

While you may never have any problems using a bootstrap plugin, you might want to keep this information handy, just in case it fails you. This will bring your site back on line quickly. Independent of a third-party plug-in.

Loading

Share This:
FacebooktwitterredditpinterestlinkedintumblrFacebooktwitterredditpinterestlinkedintumblr

Press Ctrl+C to copy the following code.
"