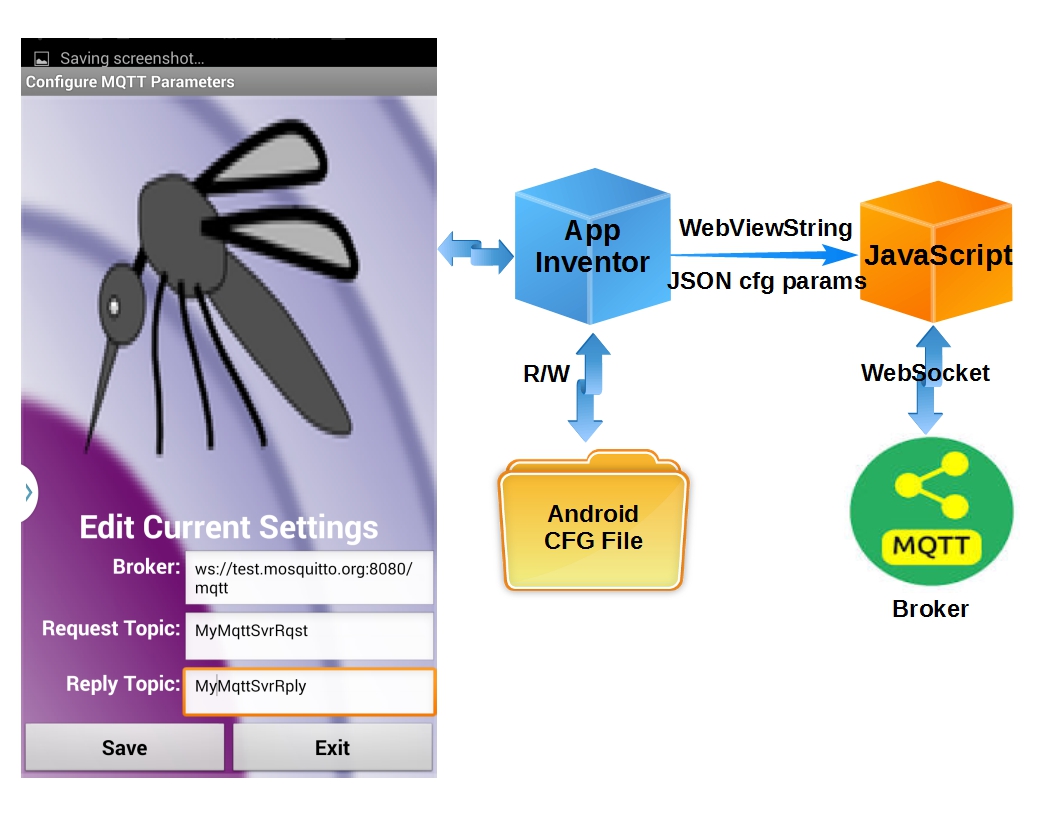
App Inventor to MQTT Communication
In my last post, a basic MQTT client portal for App Inventor was introduced. As result, there has been some interest expressed for TCP socket support. Note that the implementation presented relies on WebSockets. Due to security vulnerabilities, pure TCP sockets are simply not possible with this design. If TCP sockets are needed for MQTT communication at your IoT device, a broker capable of both WebSockets and TCP sockets should be used – Websockets on the App Inventor side, and TCP sockets on the IoT device end.
Adding Configurable Setting
My next step was to refine the App Inventor project to support configurable MQTT setting.
NOTE: If you just want to review and use the updated App Inventor project without the walk-through that follows, simply use the files provided in this Github repository.
The first challenge while adding this capability was the inability to grant file system access to the JavaScript code. Native Android Apps can overcome this with a change to the App’s manifest file. But App Inventor does not expose this application setting.
So the App Inventor file component had to be used to read and write to the file system. The configuration file settings are then passed on to the JavaScript to update the MQTT connection parameters.
App File Location
This App now uses two files stored on the Android device. These files have been moved to a common location which should be the same on most Android devices:
[wptg_comparison_table id=”15″]
Configuration file
For this example, 3 parameters are configurable:
- Broker: This can be any on-line broker, on your own network or either publicly or privately provided.
- Request Topic: MQTT topic used to send a client request
- Reply Topic: MQTT topic used to reply results to the client.
Since this example uses the publicly available broker ‘test.mosquitto.org’, username/password authentication is not provided. You could easily be add this to the example provided here, however, if you are using a broker requiring authentication.
The file is formatted as a JSON string. This makes it very easy for the JavaScript to parse the values. The first time the App is run, these configurable parameters are set to the values shown in this JSON string:
{
“mqtt_broker”:”ws://test.mosquitto.org:8080/mqtt”,
“mqtt_txtopic”:”MyMqttSvrRqst”,
“mqtt_rxtopic”:”MyMqttSvrRply”
}
App Inventor File Read/Write
When the screen used to edit the configurable parameters is open, it first reads the cfg.txt file, extracts the parameter setting, and uses those values to populate the screen fields.
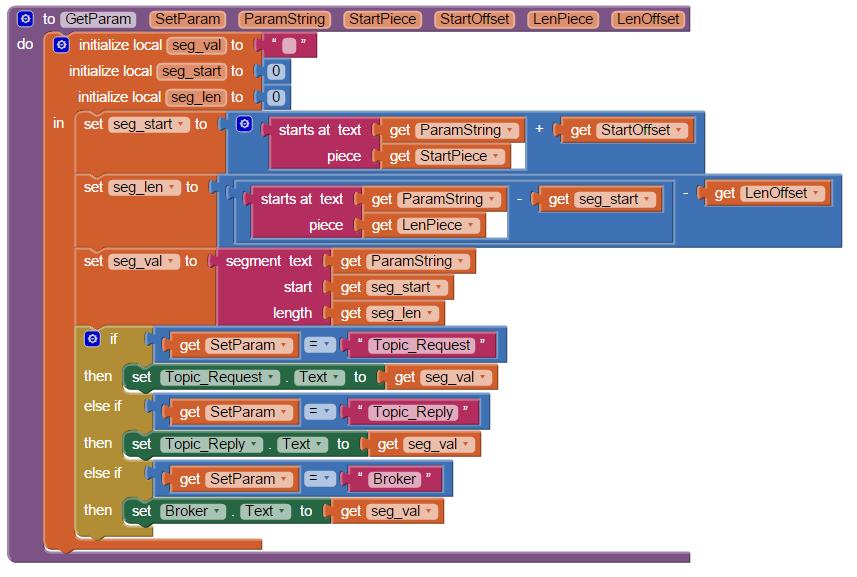
But when using App Inventor, there are no (at least none that I am aware) libraries available for parsing JSON. So I created the procedure “GetParam”, which extracts the cfg.txt values with 3 calls, one for each parameter.
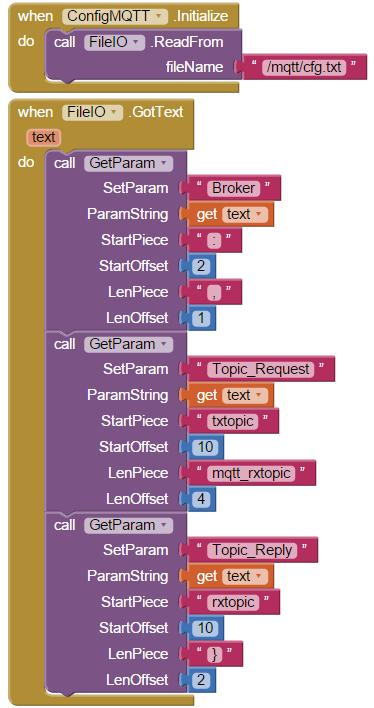
Two values are determined initially in order to extract the value. First is the position in the string that the value starts. The other value is the string length. These values are determined by using App Inventor’s string search (starts at) feature to find something unique (StartPiece and LenPiece) around the value wanted, and an offset from the parameter value’s exact position in the string.
Once extracted, the “Edit Configuration” screen is populated with the values from this file.
Saving the values is just the opposite. The values from the screen are formatted into a JSON string and then saved back to the same file, cfg.txt.

When this screen is exited, the new configuration values are sent to the JavaScript code. The JavaScript uses these new values and closes, then opens the MQTT connection with the new values. Here is how that has been implemented…
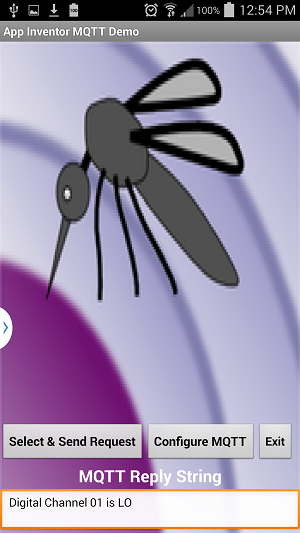
Updated Main Screen
As I have gained knowledge coding with the App Inventor, it became obvious that meaningful names were needed for project components. Much to my surprise, this does not extend to the main screen. It is called “Screen1” by default, and cannot be changed.
The screen GUI was changed somewhat for this update. Two new buttons were added. One to open the configuration screen and one to exit the application. The components were also move to the bottom of the screen (don’t want to cover the mosquito, do we?).
Every time the main screen is open, it’s 100 ms timer restarts. That is where the command is sent to the JavaScript to update the configuration settings.
Once.
It is sent 1/2 second (500 ms) after the screen is open. An important note: I found that the command did not execute if initiated concurrently with the opening of the screen. So the 500 ms delay (5 timer iterations) was introduced using a timer, which works every time.
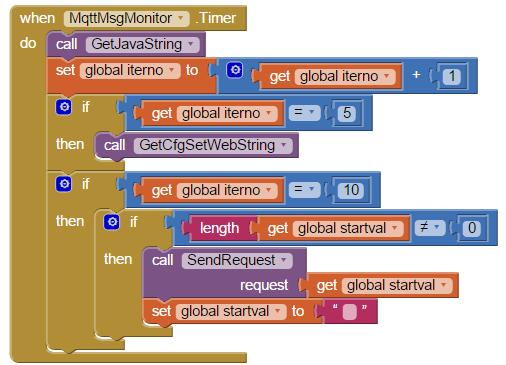
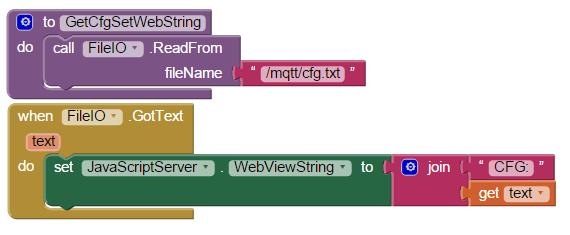
At 500 ms, the cfg.txt file is read. “CFG:” is inserted at the beginning of the string before being sent to JavaScript via the WebViewString.
A handler is also included for the first time this application is run. In that case, the cfg.txt file does not exists. As result, an exception is thrown when attempting to “ReadFrom” the file. An error handler was added for this condition.
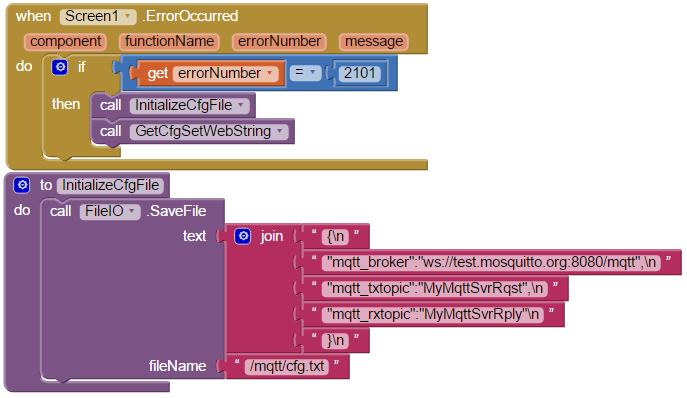
Error 2101 occurs when the file does not exist. In this case, a file is created with default values for the configurable parameters.
JavaScript for Configurable MQTT
The JavaScript also required revisions to support MQTT configurable parameters. The original version only handled IoT requests. These were identified with ‘GET:’ as the first 4 characters. Similarly, the added configuration command is now recognized as WebViewStrings beginning with “CFG:”
// 10 Hz WebViewString polling timer function -------------------------------------->
function AppInventorServer() {
    var request = window.AppInventor.getWebViewString(); // Get WebViewString
    if(request.substring(0, 4)=="GET:") {                // Validate request
        window.AppInventor.setWebViewString("");         // Reset String (process once)
        $("#request").val(request.substring(4, request.length)); //set request html textbox
        SendMqttRequest();                               // Send Mqtt Request
    }
    if(request.substring(0, 4)=="CFG:") {                // Validate request
        window.AppInventor.setWebViewString("");         // Reset String (process once)
        var cfgpar = JSON.parse(request.substring(4, request.length));
        txtopic = cfgpar.mqtt_txtopic;
        rxtopic = cfgpar.mqtt_rxtopic;
        mqtturl = cfgpar.mqtt_broker;
        client.disconnect();
    }
    setTimeout(AppInventorServer, 100);   // run AppInventorServer() in 100 ms
}
As you can see, parsing and extracting values from a JSON string is very simple and straight-forward with JavaScript. Once the new values are set, the MQTT broker connection is updated with a call to ‘client.disconnect()’.
// Callback executed upon MQTT broker disconnection -------------------------------->
client.ondisconnect = function(rc){
    client.connect(mqtturl);
};
// Callback executed upon MQTT broker connection ----------------------------------->
client.onconnect = function(rc){
    client.subscribe(rxtopic, 0);
};
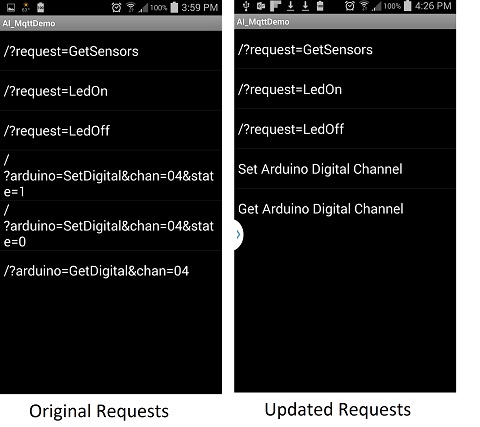
Improving the Arduino Digital Commands
The original project used hard-coded values for the Digital Get and Set commands. Ok for an example, but not so good if you need access to a channel outside the card-coded value. That was rectified with this update, which now supports digital channel selection.
Select “Set Arduino Digital Channel” and a new screen is open. This screen allows you to select the channel to set.
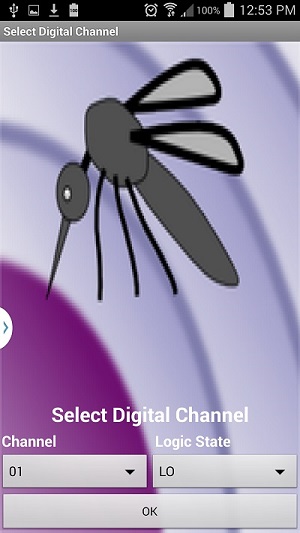
This screen is open with a “start value” received from the main screen that called it.
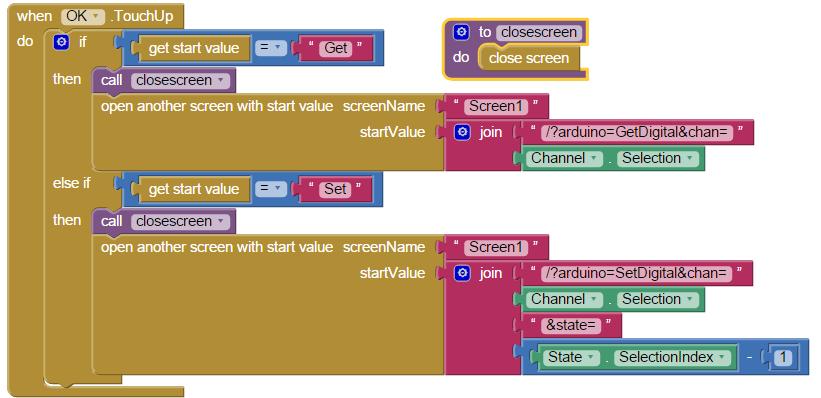
The value returned when OK is clicked depends on the startValue. If it is a “Set” command, an Arduino SetDigital request string is returned. The selected channel and logic state from the screen’s selections are also returned with the request.
Notice that a call to close the screen is made before the main screen (Screen1) is re-opened. That is necessary when returning a startValue. If the screen is not closed, it remains open for the duration of the App execution.
Another call to this window will open another instance of the window. This is effectively a memory leak which will crash you Android device eventually. Takeaway: Close the screen before opening a new screen when passing a start value to avoid memory leaks.
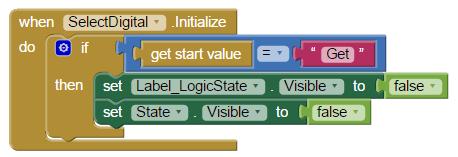
As you can see, a similar value is returned for “Get” requests. But when “Get” requests are received, the channel state is not selected, it is returned from the request. When this screen is open with a “Get” request, the channel state selection GUI is suppressed.
Sending the Arduino Digital Request
When the Digital channel selection screen is closed, the main screen is reopened. But how does it know to send the Arduino command to MQTT? After all, the screen is opened fresh, just like when the app is started.
Not quite. Remember the ‘startValue’ returned from the digital selection? That is checked to determine whether an arduino request is needed. It is done in the 100ms timer callback.
At 500 ms after the screen is open, the MQTT configuration is sent to the JavaScript. But then, at 1000 ms (10 100 ms intervals), the startval string is check for a non-null value. If a string is present, it is sent to the JavaScript via the WebViewString, by calling the SendRequest procedure.

Exiting the Application
Just one more thing and we are done with this update. I thought it would be nice to add an ‘Exit’ button to close the app. What I found was that it required several clicks before the app would actually close. What was happening was that every time a different screen returned to the main screen, the previous main screen remained open and a new main screen instance was created.
Not exactly what I had in mind. Another memory leak!
This was corrected by adding a ‘close screen’ before each time one of the two added screens was open. This guarantees only one screen is open at a time while the app is running.
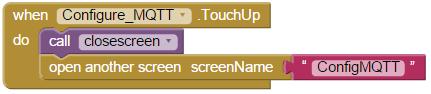
With this correction, the Exit button works as intended, with only one click required.
In Closing
This example should provide a framework for anyone needing to use MQTT with an App Inventor project. The main caveat is that a broker that supports WebSockets is required. I leave it up to you as an exercise to add username and password credentials to the mqtt connection settings. The basic structure is here. And it should also be a simple task to add “GetAnalog” to the Arduino request options. Go ahead, you can do it! If you need it.
Again, here are the project files.
I hope you find this information useful…
Social tagging: App Inventor configurable MQTT > configuring App Inventor
Wow! Awesome.
I will read this article carefully later, and try by myself.
Thanks for all.
Hi,
This MQTT/APPINVENTOr series is really useful. I successfully implemented it with a ESP8266 NodeMCU, to build node that read the temperature and can operate two channels.
I am completely new to Javascript, but it was an easy task to configure the topics to suit my needs.
What I miss is the possibility to include user/password, required by other brokers. I’ve reviewed the MQTT librarie, but I could not find the way of setting them. Colud you provid a tip of how to do it?
Thanks for your comment Enrique. I just check my notes and noticed a draft blog post that I had never completed which addressed Mqtt/AppInventor/Javascript for user/password enabled brokers. Got side-tracked with many other projects!
Please look for a post regarding this subject around July 22, 2016.
Enrique,
Please not I have posted information which addresses your need for a username/password MQTT login to an MQTT broker with App Inventor. You can access it here.
This update uses a different JavaScript library and might also resolve your problems experienced recently “no longer works”.
Thanks a lot,
By the way, it seems that the mqtt library included in the Javascript is no longer working.
BR.
eHc