Archives for May 2015

Using Javascript AJAX to read ESP8266 data

Okay, so you got your ultra low-cost ESP8266 workhorse setup to read some sensors. And you have an awesome webpage built to visually display the readings. But how do you get the data from the ESP8266 to your website?

PHP and/or Javascript are the two most popular methods. I have used both.

This writing presents a simple Javascript solution. I have also posted an approach to this task using PHP here.

My need came about while developing a mobile app to monitor and control devices in my home. My personal IoTs. Using the Apache Cordova API with the Eclipse IDE. I was developing my App with just HTML, CSS, and JavaScript. Yet it will compile and install onto my Android device like any other application. It is my understanding that the same code can be built into an iOS App as well…but…being strictly a PC user, I have not attempted that.

And let’s get back to using Javascript to pull information from an ESP8266 based web server.

The thing was, I needed to pull my weather, sprinkler, garage and other sensor data from the ESP8266 circuit that monitors these devices to my App. I also wanted maintain control of the data. To be free from a cloud middleman such as ThingsSpeak.

With this in mind, we have two sides to this solution; The micro-controller unit (MCU), which is the ESP8266 in this case, and the client App. The ESP8266 must read all the devices connected to it and then send this data, on request, to the App client. The preferred format is either JSON or XML.

I use JSON strings.

Here is an example of a short function that can be used to create a JSON string in an Arduino IDE sketch. It is critical to include the http header information provided in this example. The header authorizes your domain, allowing the Javascript AJAX to retrieve the ESP8266 http response.

Here is the Javascript with AJAX code used to request a JSON string from the  ESP8266, decode it, and display the values on a webpage.

function updateWeatherSensorData() {
    requestURL = "http://myrouterdomain.com:9999/?request=GetSensors";
    if ( typeof updateWeatherSensorData.timeout == 'undefined' ) {
        // It has not... perform the initialization
        updateWeatherSensorData.timeout = 0;
    }
    //Get Weather Sensor Value
    $.ajax({
        url: requestURL,
        error: function(error){
            if(updateWeatherSensorData.timeout++ <10) {
                setTimeout(updateWeatherSensorData, 1000);
            }
            else {
                updateWeatherSensorData.timeout = 0;
            }
        },
        success: function(thedata){
            $("#baro").html(thedata.B_Pressure + " inHg");
            $("#tempIn").html(thedata.DS_TempInside + " F");
            $("#tempOut").html(thedata.DS_TempOutside + " F");
            $("#tempAttic").html(thedata.DS_TempAttic + " F");
            $("#humidity").html(thedata.DH_Humidity + " %");
            updateWeatherSensorData.timeout = 0;
        },
        timeout: 7000 // sets timeout to 7 seconds
    });
}


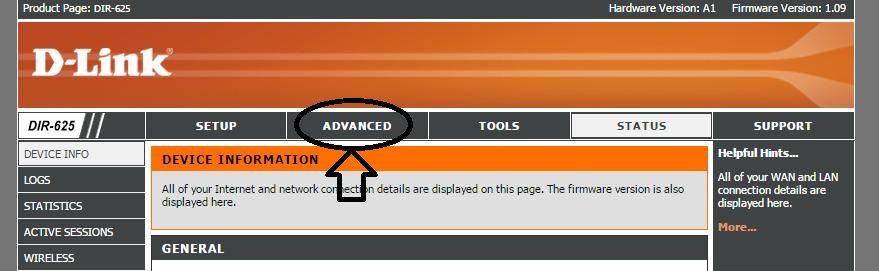
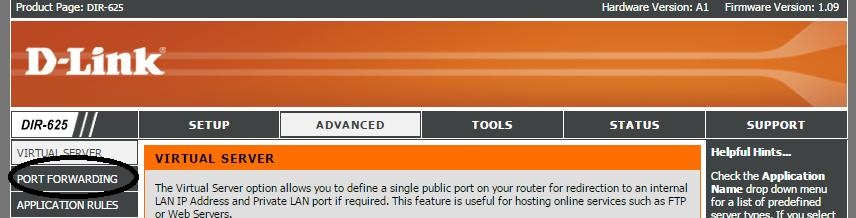
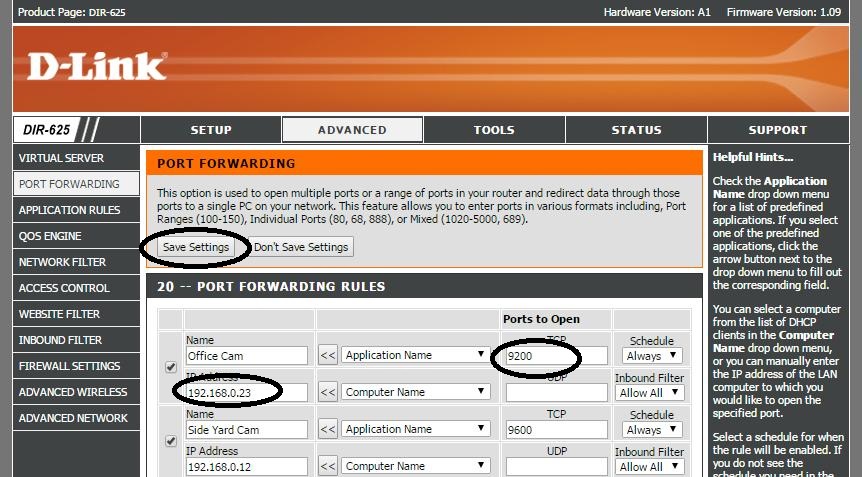
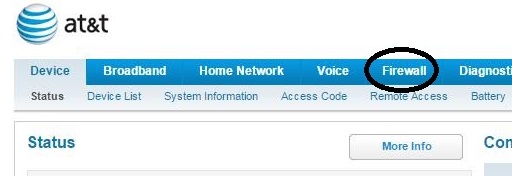
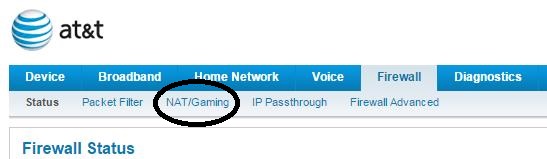
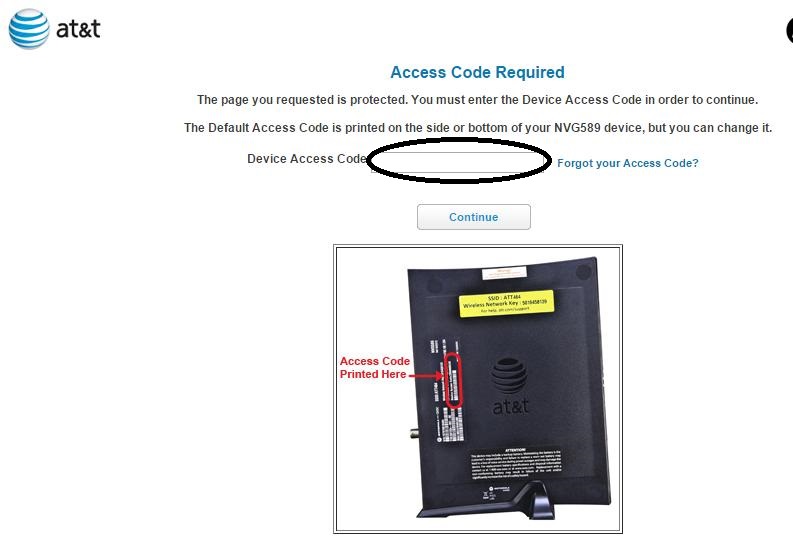
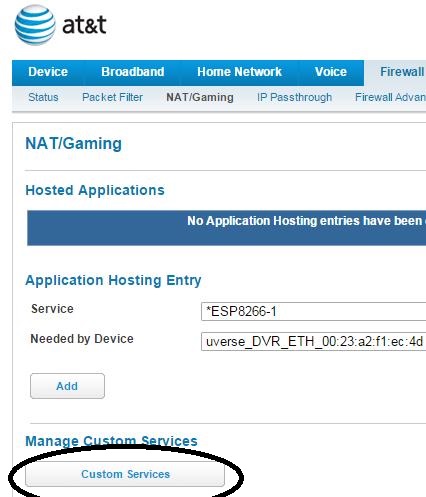
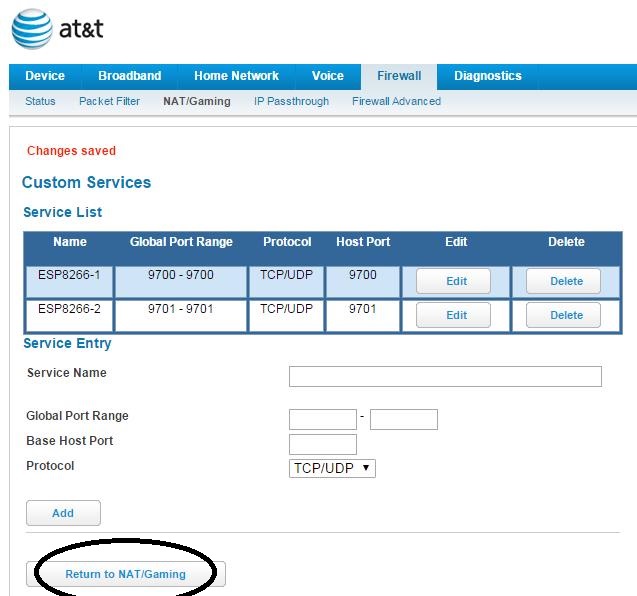
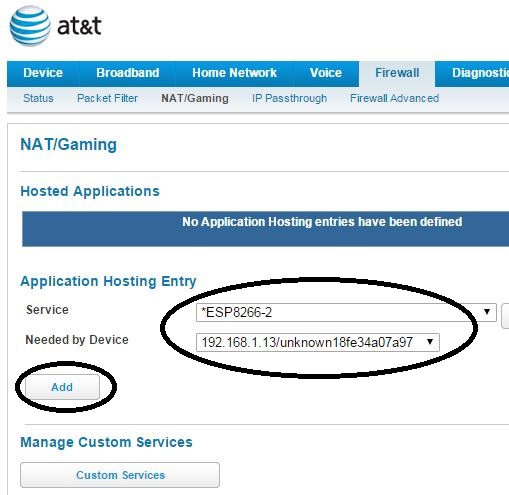
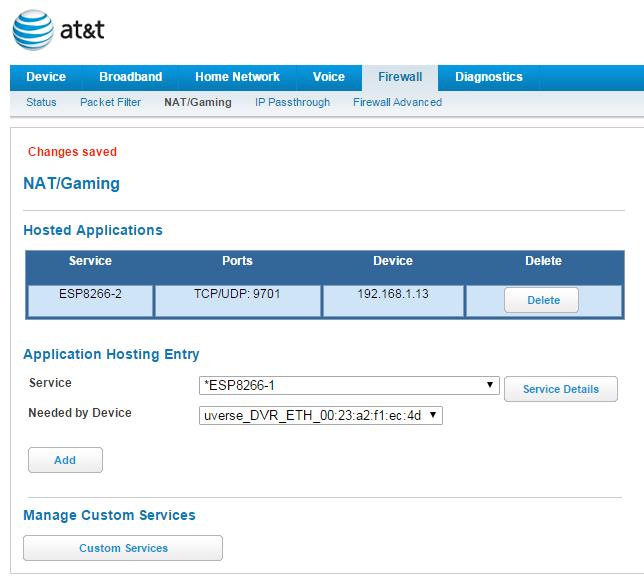
I am assuming you have a domain name pointed to your router and your router is configured to port forward internet requests. For reference, here is how to set this up.

How this Javascript code works:

First, the URL used to send the http GET request to the ESP8266 is defined. This URL has 3 parts

  1. The domain name: http://myrouterdomain.com
  2. The port your ESP8266 web server is listening on: 9999
  3. The request string recognized by the web server: /?request=GetSensors

Then we need to define a timeout property for this function. The timeout is actually used to store the number of attempts to retrieve the JSON from the ESP8266 before successful.

And now, the AJAX call. As you can see, the code is structured like a JSON string, with 4 keys and 4 values:

  1. url: This defines where to send the request.
  2. error: In case the request fails, the call is repeated, up to 10 times
  3. success: When successful, the webpage elements with the indicated ID are filled with the value retrieved from the ESP8266
  4. timeout: Up to 7 seconds is allowed before a timeout error is declared.

That’s it! This is what I have been using to retrieve JSON strings from my ESP8266 using an AJAX call.

In Summary

Here are a few closing thoughts of my observations for your information…

  • The error handling is essential. This call fails frequently, perhaps every 2 or 3 requests.
  • Most of the time, the error is because a blank string is filled from this call. I do not know if that is an ESP8266 issue or a problem with AJAX.
  • The timeout was set to 7 seconds because I have seen it take up to 4 seconds to get a response.

Hope you find this information useful for your ESP8266, Arduino and other MPU projects.

Loading

Share This:
FacebooktwitterredditpinterestlinkedintumblrFacebooktwitterredditpinterestlinkedintumblr

Using DDNS with port forwarding to access Internet connected things

Setting up the mechanism to access your home network from the Internet is straightforward and often available as a free service.
You could simply determine the IP address your Internet service provider (ISP) has assigned and use that address from anywhere you happen to be.

This is quick and easy.

Problem is…your ISP may change this address at any time, and if you are away from the home network, it will be difficult to determine the updated address. So you become cut off from your home network.

To resolve this issue, a DDNS (Dynamic domain name server) account is needed. A DNS simple resolves a domain host name to an IP address. Using a dynamic DNS updates the IP address that the domain name points to whenever it changes…automatically.

DDNS Providers

There are both free and fee based DDNS accounts available. The following lists some of the options currently available. If you don’t like any of these, just do a google search for DynDNS providers.

Name Website Cost Description
1 DynDns http://dyn.com/dns/ $25/year One of oldest and well-known providers
2 Duck DNS https://duckdns.org/ FREE Hosted on Amazon EC2
3 NO-IP http://www.noip.com/free FREE Advanced paid plans offered
4 DtDNS https://www.dtdns.com/ FREE Advanced paid plans offered
5 yDNS https://ydns.eu/ FREE Another option
6 FreeDNS https://freedns.afraid.org/ FREE Yet another option

The instructions for setting up these accounts are typically quick and simple. You pick a domain name, one of your choice, and this name will likely have a suffix appended to it. This part is selected by the provider. This is a very small price to pay for a FREE service. Then this name gets synchronized with your current network IP. That’s it.

Setting up the router for port forwarding

You will undoubtedly have more than one device to connect from your local network to the Internet. But there is only one IP assigned to your network. So how can the traffic initiated from your DDNS domain name, which resolves to your Internet IP, know which device on your network to deliver the  message to?

Simple-Ports…

Think of the IP for your Internet connection as a post office and the ports as the individual boxes.

The connection to your device will almost certainly use Transmission Control Protocol (TCP). And TCP identifies the destination by port number. The valid range is 0 to 65535. So for each device on your local network, a port needs to be assigned for delivery of packets from the network.

The key to making this work is to configure your router to forward packets from the Internet to the intended recipient, that is, the destination port. Hence, the name port forwarding.

While this is not too difficult to set up, the step-by-step directions for port forwarding are unique for each router. That is simply because router firmwares are all different. The setup is typically found in the firewall settings. Here is how to do in with a D-Link DIR-625 router. Just 3 simple steps. 1-2-3… Your router should have similar options for setting up port forwarding:

Port forwarding a D-Link DIR-625

1. First, select the ADVANCED menu item from the initial router screen.

D-link Port Forwarding 1


2.Next, click on the PORT FORWARDING tab.

D-Link Router Port Forwarding


3. Now all you need to do is identify your local network device by IP, assign a port to it, and save your configuration.

Port Forwarding with a D-LINK Router


My ISP is AT&T U-verse. Setting up the router they provide for port forwarding was not so obvious, at least at first glance. Since this is such a popular home router, I am also providing port forwarding setup instructions here.

Port forwarding an AT&T NGV-589

Now the AT&T router configuration for port forwarding is a bit more tedious. I’ve broken it down into the following 8 steps.

1. Access your router’s main web portal page and select the Firewall tab.

AT&T NVG589 router port forwarding setup

2. Select NAT/Gaming.


AT&T NVG589 router port forwarding setup

3. You’ll then be instructed to enter the router access code.

portforwardatt3

4. Now, click on the “Custom Services” button.

portforwardatt9

5. Alas, we have now arrived at the screen to identify the port! Here, enter a name for your device and the port number(s) you with to assign to your device. In this illustration, I have assigned port 9701 to my second ESP8266. Click on the Add button to include this port/device(Service Name) to the router’s list.

portforwardatt6

6.The entry should now appear in the Service List. Next step is to click on the “Return to NAT/Gaming” button.

portforwardatt10

7. Now, Select the Service that was just defined (ESP8266-2) and the needed by device. You should see your needed by device in the drop-down list by the IP that it has been assigned. The device MAC is also shown on this list. Click on the “Add” button to complete the port forwarding setup for your device.

portforwardatt11

8. Your router’s “Hosted Applications” list should now display the device that you have just configured for port-forwarding.

portforwardatt12

NOTE regarding the AT&T NVG589: I have experienced issues with my router which did not allow me to access devices locally. While not universal among all users, I am not the only one to have this problem. This appears to be an issue with the router’s firmware, which did not appear to have a solution.

My answer was to use my own router and put the AT&T router in pass-through mode. If anyone has experienced similar problems, that would be my recommended solution. While using 2 routers was not particularly appealing, it does work. Allowing you to move on to other things…

In Summary

This should de-mystify port forwarding. Some routers require more steps than others to accomplish the same thing. Simple, yet this is an essential step to connecting your things to the internet.

Hope you find this information useful…


Loading

Share This:
FacebooktwitterredditpinterestlinkedintumblrFacebooktwitterredditpinterestlinkedintumblr

Using php to read ESP8266 data

While I have published another post, covering this topic using a Javascript AJAX call, using php has unique attributes, and must be used in certain cases. Please refer to that post is anything here is unclear.

In my case, I needed to periodically save my home weather sensor values into a mySQL database. While this can be accomplished with a CRON triggered php server side script, the client sided AJAX will not work. So here is my php script to pull data from my ESP8266 and save the values in a mySQL database.

<?php

include("access.php");
session_start(); //We need to have static variables
$Esp8266SensorURL = $esp8266_9702_GetSensors_URL;

//---------------------------------------------------------------------
//Functions
//---------------------------------------------------------------------
//
//---------------------------------------------------------------------
//Name: get_fcontent( $url, $javascript_loop = 0, $timeout = 5 )
//Function: CURL that gets URL contents
//Parameter 1: $url - URL to retrieve
//Parameter 2: $javascript_loop - IDK, this function pulled from internet
//Parameter 3: $timeout - IDK, this function pulled from internet
//---------------------------------------------------------------------
function get_fcontent( $url, $javascript_loop = 0, $timeout = 15 ) {
    $url = str_replace( "&", "&", urldecode(trim($url)) );
    $cookie = tempnam ("/tmp", "CURLCOOKIE");
    $ch = curl_init();
    curl_setopt( $ch, CURLOPT_URL, $url );
    curl_setopt( $ch, CURLOPT_COOKIEJAR, $cookie );
    curl_setopt( $ch, CURLOPT_FOLLOWLOCATION, true );
    curl_setopt( $ch, CURLOPT_ENCODING, "" );
    curl_setopt( $ch, CURLOPT_RETURNTRANSFER, true );
    curl_setopt( $ch, CURLOPT_AUTOREFERER, true );
    curl_setopt( $ch, CURLOPT_SSL_VERIFYPEER, false ); # required for https urls
    curl_setopt( $ch, CURLOPT_CONNECTTIMEOUT, $timeout );
    curl_setopt( $ch, CURLOPT_TIMEOUT, $timeout );
    curl_setopt( $ch, CURLOPT_MAXREDIRS, 10 );
    $content = curl_exec( $ch );
    $response = curl_getinfo( $ch );
    curl_close ( $ch );

    if ($response['http_code'] == 301 || $response['http_code'] == 302) {
        ini_set("user_agent", "Mozilla/5.0 (Windows; U; Windows NT 5.1; rv:1.7.3) Gecko/20041001 Firefox/0.10.1");

        if ( $headers = get_headers($response['url']) ) {
            foreach( $headers as $value ) {
                if ( substr( strtolower($value), 0, 9 ) == "location:" )
                    return get_url( trim( substr( $value, 9, strlen($value) ) ) );
            }
        }
    }

    if ( ( preg_match("/>[[:space:]]+window\.location\.replace\('(.*)'\)/i", $content, $value) || preg_match("/>[[:space:]]    +window\.location\=\"(.*)\"/i", $content, $value) ) && $javascript_loop < 5) {
        return get_url( $value[1], $javascript_loop+1 );
    } 
    else {
        return array( $content, $response );
    }
}

//---------------------------------------------------------------------
//Name: getEsp8266Sensor($getUrl,$update,$k)
//Function: Gets value from ESP8266 (Return last value if 0)
//Parameter 1: $getUrl - ESP8266 URL that returned JSON with sensor values
//Parameter 2: $update - if "Y", get JSON from ESP8200, else use last JSON
//Parameter 3: $k - key to retrieve value of (key:value)
//---------------------------------------------------------------------
function getEsp8266Sensor($getUrl,$update,$k) {
    if($update=="Y") {
        $_SESSION['fetches']=0;
        $status[0]="";
        ob_start();
        while((substr($status[0],0,1)!='{')&&($_SESSION['fetches']<20)) {
            $status=get_fcontent($getUrl);
            $_SESSION['fetches']=$_SESSION['fetches']+1;
            ob_flush();
            sleep(5);
        }
        $_SESSION['jsonstr'] = $status[0];
    }
    if($_SESSION['fetches']<20) {
        $status_array = json_decode($_SESSION['jsonstr']); //Decode json
        foreach($status_array as $key => $value) {
            if(strstr($key,$k)) {
                $val = $value;
            }
        }
    }
    else {
        $val=0;
    }
    //return last value if current value is 0
    if($val!=0) {
        return $val;
    }
    else {
        if(strstr($k,"DS_TempInside")) return $last_in;
        if(strstr($k,"DS_TempOutside")) return $last_ou;
        if(strstr($k,"DS_TempAttic")) return $last_at;
        if(strstr($k,"DH_Humidity")) return $last_hu;
        return $val;
    }
}

//Insert "spaces" spaces
function insertSpace($spaces) {
    for ($cnt=0; $cnt<$spaces; $cnt++) {
        $sp .= "&nbsp";
    }
    return $sp;
}

//---------------------------------------------------------------------
//Connect to database
//---------------------------------------------------------------------

$link = mysqli_connect("localhost", $mysqlUser, $mysqlPass, $mysqlUser);
if (mysqli_connect_error()) {
    die("Could not connect to database");
}
//---------------------------------------------------------------------
//Get latest values from database
//---------------------------------------------------------------------
$query = "SELECT * FROM temperature ORDER BY id DESC LIMIT 1";

if($result=mysqli_query($link, $query)) {
    $row = mysqli_fetch_array($result);
    $last_id = $row['id'];
    $last_in = $row['inside'];
    $last_ou = $row['outside'];
    $last_at = $row['attic'];
    $last_hu = $row['humidity'];
}

//---------------------------------------------------------------------
//Get Sensor Data
//---------------------------------------------------------------------

//----------------------------------------
//-----Get current LOCAL time
//----------------------------------------
$now = time();
date_default_timezone_set('America/Los_Angeles');
$localtime_assoc = localtime($now, true);

//Time
$now_hr = sprintf('%02u',$localtime_assoc['tm_hour']);
$now_mn = sprintf('%02u',$localtime_assoc['tm_min']);
$now_sc = sprintf('%02u',$localtime_assoc['tm_sec']);
$now_tm = $now_hr.":".$now_mn.":".$now_sc;

//Date
$now_yr = $localtime_assoc['tm_year']+1900;
$now_mo = sprintf('%02u',$localtime_assoc['tm_mon']+1);
$now_dy = sprintf('%02u',$localtime_assoc['tm_mday']);
$now_dt = $now_yr."-".$now_mo."-".$now_dy;

//Get Temperatures
$temp_in = getEsp8266Sensor($Esp8266SensorURL,"Y","DS_TempInside");
$temp_ou = getEsp8266Sensor($Esp8266SensorURL,"N","DS_TempOutside");
$temp_at = getEsp8266Sensor($Esp8266SensorURL,"N","DS_TempAttic");

//Get Humidity
$temp_hu = getEsp8266Sensor($Esp8266SensorURL,"N","DH_Humidity");

//Get Free Heap and ms since ESP8266 started
$temp_hp = getEsp8266Sensor($Esp8266SensorURL,"N","SYS_Heap");
$temp_tm = getEsp8266Sensor($Esp8266SensorURL,"N","SYS_Time");

//Insert a record into mySql
$query = "INSERT INTO `temperature` (`inside`,`outside`,`attic`,`humidity`,`time`,`date`,`FreeHeap`,`SysTime`,`fetches`)
VALUES('".$temp_in."','".$temp_ou."','".$temp_at."','".$temp_hu."','".$now_tm."','".$now_dt."','".$temp_hp."','".$temp_tm."','".$_SESSION['fetches']."')";
//Report Results
if ($result=mysqli_query($link, $query)) {
    echo('<br>Success<br>');
}
else {
    echo('<br>Failed<br>');
}

?>

Now let’s break this down.

include("access.php");
$Esp8266SensorURL = $esp8266_9702_GetSensors_URL;

The included “access.php” file contains definitions for my URLs used to access my home devices. Maintaining these in a separate file keeps things tidy and hidden. The variable $esp8266_9702_GetSensors_URL is assigned in the access.h file to my ESP8266 that implements a web server listening on port 9702.

session_start(); //We need to have static variables $Esp8266SensorURL = $esp8266_9702_GetSensors_URL;

session_start() enables the use of static variables

function get_fcontent( $url, $javascript_loop = 0, $timeout = 15 )

This function retrieves the contents returned from an URL, using CURL.

function getEsp8266Sensor($getUrl,$update,$k) {
    if($update=="Y") {
        $_SESSION['fetches']=0;
        $status[0]="";
        ob_start();
        while((substr($status[0],0,1)!='{')&&($_SESSION['fetches']<20)) {
            $status=get_fcontent($getUrl);
            $_SESSION['fetches']=$_SESSION['fetches']+1;
            ob_flush();
            sleep(5);
        }
        $_SESSION['jsonstr'] = $status[0];
    }


Now this is the meat of this method. The function getEsp8266Sensor() mechanizes the process of retrieving values from a JSON string returned from an ESP8266. Since a single GET request returns a JSON string that contains all the sensor values, only one request is needed, the first one. The “$update” parameter is set to “Y” from the caller to perform the GET request. The GET is declared a success if the first character (after the header) returned is “{“, the start of the expected JSON string.

I have observed this request to fail sometimes, which is why it is put in a while loop, allowing up to 20 retries. Since one of the values stored in the mySQL is the number of GET requests required before a successful attempt, I have data to characterize the failure rate. After running this script 3 times per hour for a few days now, a maximum of six attempts before success have been recorded. Twenty retries were set to provide some margin. I’ll be reviewing the data as more run time is accumulated.

Notice the ob_start() and ob_flush() statements. This was necessary to clear out the buffers from the last GET request. Without these, the request often failed continuously, regardless of how many retries were attempted.

The session variable $_SESSION[‘jsonstr’] saves the returned JSON string for subsequent calls to this function, when a request is not needed.

The rest of the function simply decodes the JSON string and extracts the requested key value.

The code snippet below retrieves the latest values stored in the database.

//---------------------------------------------------------------------
//Get latest values from database
//---------------------------------------------------------------------
$query = "SELECT * FROM temperature ORDER BY id DESC LIMIT 1";

if($result=mysqli_query($link, $query)) {
    $row = mysqli_fetch_array($result);
    $last_id = $row['id'];
    $last_in = $row['inside'];
    $last_ou = $row['outside'];
    $last_at = $row['attic'];
    $last_hu = $row['humidity'];
}

These values are used if no valid values are received from the ESP8266 during the http GET transaction.

I leave the rest of the code up to you to understand. It is all very straightforward stuff.

Here is an extract from the data stored in mySQL. The data is recorded every hour. This slice is from 3 am to 2 pm April 30,2015. As you can see, the temperatures bottomed at 6 am and the worst case performance for the software was at 9 and 11 am when 6 GET requests were required before it was received successfully.

temperature sensor database

Wow, things really got toasty in my attic that day! 119.9 F at 1 pm.

Hope you find this information as useful to you as it has been to me. Until next time…

Loading

Share This:
FacebooktwitterredditpinterestlinkedintumblrFacebooktwitterredditpinterestlinkedintumblr