Archives for March 2016

USB LAMP Web Server Part 3 – Adding mySQL Server

phpmysql2

A web server is certainly not complete without a database server. Currently, the one-source server of choice is mySQL. At first, adding this database server to my Linux setup update appeared to be simple and straight-forward. Just add another package to the Puppy Linux installation and restart – instant mySQL server capability. But then I soon found that it was not going to be that simple.

Still, after persistent effort to overcome several patience-trying obstacles, the installation was finally complete. Presented here are the successful steps to adding mySQL Server, without having do deal with the problems. And for those who do not want to go through all the setup steps, a Linux session save file is included with this post.

Simply replace your existing save file with this one and you will be 99% complete with a web server that supports both php and mySQL server. Here it is. You can also refer to the Quick and Easy section of this post minimal installation steps.

But if you would like to understand the steps to installing  mySQL on the USB Puppy Linux setup, read on. Now let’s add the mySQL server to the USB LAMP web server installation from part 2 of this series.

Adding mySQL Server to the USB Web Server

IMPORTANT: The installation of mySQL Server will corrupt the save file. This will make it impossible to shut-down or start the USB Puppy Linux. Prior to proceeding, copy the save (*.sfs) file, located in the root USB directory (when viewed from Windows OS). It will be needed later to restore the Linux installation.

Start the USB installed Precision Puppy Linux from part 2. Then launch the Puppy Package Manager. In the search window (Find), enter “mysql”.

mysql_svr1

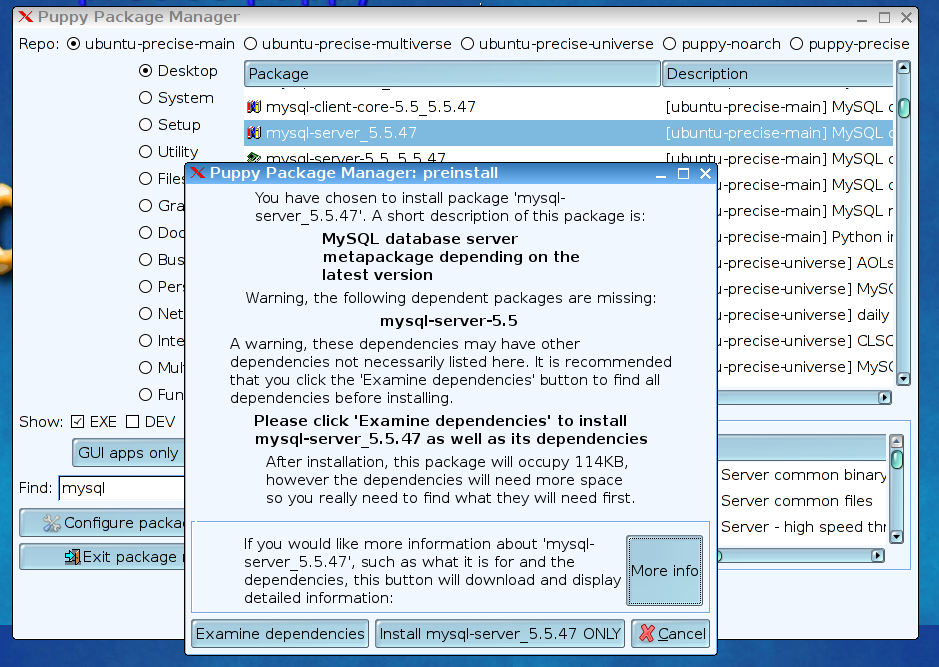
From the list of results, select mysql-server-5.5-47 metapackage.

Then click on “Examine dependencies”.

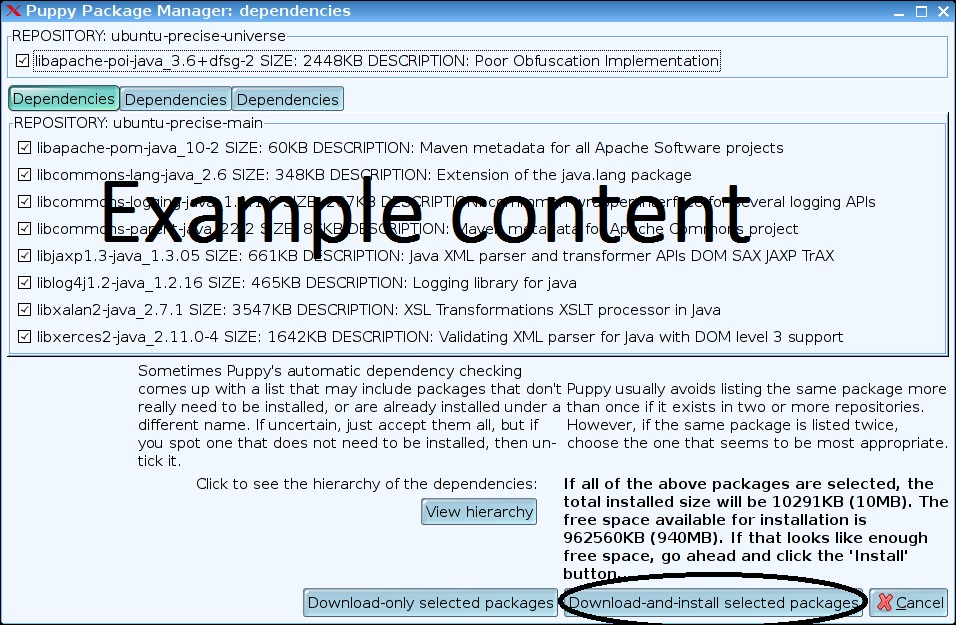
When a window pops up, click on the “Download and install selected packages” button.

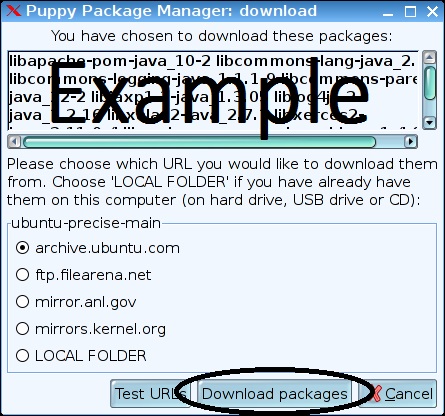
Then click on “Download packages”.

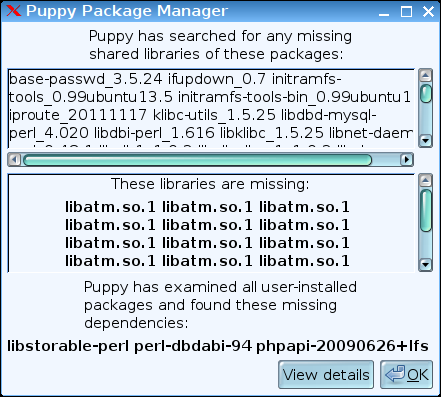
After the installation finishes, the following prompt appears:

mysql_svr5

In order to add  the missing library, first close and then re-opening the Puppy Package Manager.

This time, enter “libatm” in the find input. You will probably only find one results from searching all the repositories, “libatm1_2.5.1-1.3”.

Select it and install the package as done for the mySQL server package.

Backing up the installed packages

Now is the time to create a backup of the installed programs. Do not exit Puppy Linux until this is completed.

First, install a blank USB memory stick of at least 4MB into the computer that is running Puppy Linux. This drive will appear as an added device in the bottom left of the Linux screen. Take note of the name assigned to this drive (it will be something like sdb1 or sdc1).

From a console window, enter:

cd /

mksquashfs etc root usr /mnt/<drive name from above>/mybackup.sfs 

Wait for the SFS file creation to complete.

Now remove the added thumb drive and then hold down the PC start button until the PC shuts off.

Restoring the backed up configuration

These steps need to be performed from a PC running Windows OS.

Using the same USB memory stick we have been using to prepare this setup, first copy the save file (see red text above) to the root directory.

Then copy the “mybackup.sfs” file created above to the USB memory stick root directory.

Now lets boot from the USB memory stick, which should start in the Puppy Linux OS again.

NOTE: Make sure the PC you are using for this step has at least 4 GB of ram installed. I tried it with a 1GB netbook which failed the process after running out of RAM.

Open two file browser windows (Menu->Filesystem->ROX-Filer).

In one window, navigate to /etc/home/mybackup.sfs. After clicking on the file, select “view”. A folder with the 3 backed up directories (etc root usr) will appear.

In the other file manager windows, navigate to the top-level folder. Among the other directories, this window will also include etc, root, and usr. Copy the files from the first window to the second window.

This can be done by pressing Ctl-A in a blank space in the first window (Selects the 3 folders) and dragging these selected folders to the second window.

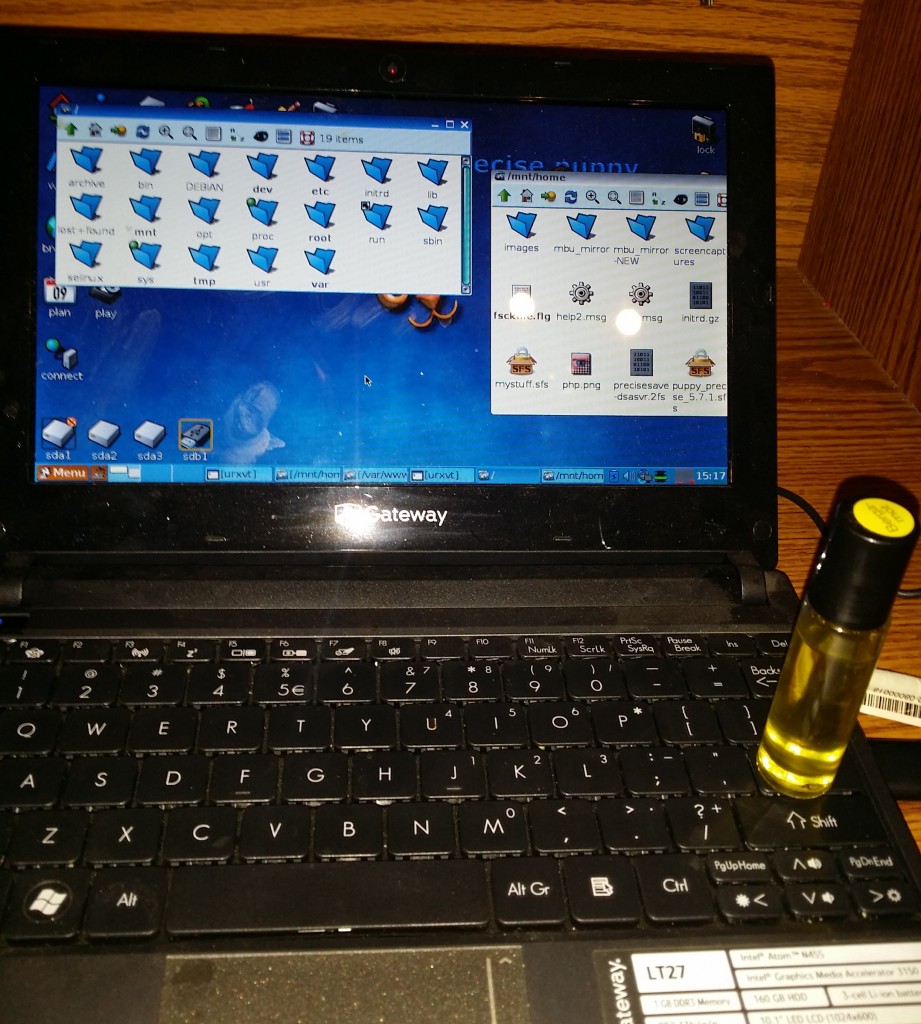
I found that a prompt to confirm the over-write of each file was required and could not figure out how to suppress it. Since there are thousands of files to copy, this requires many mouse clicks or pressing the enter key. As a work-around to automate this step, I used an object that was heavy enough to hold the enter key down. A bottle of essential oil worked well for my enter key.

Use your imagination here!

20160321_151721

And here is where patience is needed. This copy process took over an hour to complete.

Remember, a save file (*.sfs) is provided with this post which already includes these steps, so you don’t have to repeat this lengthy but necessary step.

Once the copy is completed, restart the Linux computer. This should created a clean save file.

Alas, we are ready to resume the mySQL installation!

Console Entries

A few steps are now needed to complete the installation of mySQL. Open a console window and enter the following:

# mkdir /var/lib/mysql

# adduser mysql

# chown -R mysql:mysql /var/lib/mysql

# chgrp -R mysql /var/lib/mysql

#mysql_install_db

# mkdir /var/run/mysqld

# chown mysql:mysql /var/run/mysqld

That’s it. The installation of mySQL Server is complete.

mySQL Server commands

Here are a few console commands to run the server:

Start Server:

# mysqld

Stop Server (Do this from a second console window):

# mysqladmin -u root -p shutdown

Change rood password:

# mysqldadmin -u root password ‘new-password’

or

# /usr/bin/mysqldadmin -u root password ‘new-password’

Here is a reference of other commonly used mySQL server commands.

Quick and Easy Setup

And as promised, I am providing a system image of the full USB LAMP installation in this section, so you can skip most of the steps outlined above and in the first two posts of this series.

Just follow these simple steps, eliminating most of the time-consuming setup:

Step 1: Create a Linux USB Memory stick installation per the first part of this post. You can stop prior to installing Apache Server. That package is included with the *.2fs file referenced below.

Step 2: Shut-down the Linux OS running from the USB stick. This will create a save file.

Step 3: Boot a PC to Windows. Install the USB memory stick and delete the save (*.2fs) file from the root directory. Then copy the *.2fs file from this location to the root directory.

NOTE: The file is contained in a ZIP compressed file. The compressed file is over 280MB in size and 1GB uncompressed. Expect the download to require some time (17 minutes with my connection).

Step 4: Boot a PC with the USB Stick installed to Puppy Linux. This stick now has a complete LAMP stack. But you may need to adjust the IP and port of the server to your specific system. The defaults are IP=192.168.0.110 and port=9777.

Step 5: Set the IP for your system

Step 6: Set the listen port for your system

Step 7: Reboot one more time to create your own save file.

Be sure and review the 3 posts in this series as a guide to using this LAMP stack. A sample HTML and PHP file is provided in the root folder for web pages, /var/www

In Conclusion

In these 3 articles, we have created a USB memory stick Linux environment and added an Apache Web Server, php and mySQL client libraries, and now the popular mySQL Server. Next, we will add phpmyAdmin as a basic tool for administering the mySQL database.

As always, I hope you find this information useful…

 

Loading

Share This:
FacebooktwitterredditpinterestlinkedintumblrFacebooktwitterredditpinterestlinkedintumblr

Triple Server Update – Part 3: More Server Features

server_update_part3

More Server Features

Ever heard the saying “some’s good, but more is better” ? That idiom certainly rings true when it comes to the capabilities of the multi-purpose server I began developing recently.

The Triple Server introduced with this series initially supported http, mqtt and coap. Subsequently, coap was dropped and replaced with the addition of an Arduino interface. Web configuration was also introduced.

But even then, the system lacked a few highly desirable features. This update builds upon the basic  structure developed so far. Here are the new capabilities introduced with this update:

  • Configurable FOTA port and password
  • Configurable MQTT connection port and client id
  • URL decoding for configurable parameters with special characters
  • FOTA – sketch embedded wireless firmware update support
  • MQTT topics linked to ChipID(MAC)
  • Support for MQTT connection password enabled
  • Unsolicited Arduino MQTT Publications
  • Current GMT added to http header

There features are individually portable. When needed, they can be a great addition to many different IoT projects.

And in case you have not seen the prior posts in this series, here is the story from the beginning:

ESP8266 Triple Protocol Server

Triple Server Update – Part 1: Serving Arduino

Triple Server Update – Part 2: Web Configuration

Triple Server Update – Part 3: More Server Features

Let’s get to the details of the implementation…

Web Configuration

Starting with the Web Configuration panel:

WebConfig
FOTA password and network port settings are added to the configuration page options. When a FOTA password is specified, the user will be prompted to enter it prior to proceeding with a firmware update.

A setting for the MQTT client id has also been included with this update. The past versions of this project simply set the client id to the MQTT username. Finally, a check-box has been added to enable MQTT password connections.

However, the remaining MQTT connection options specified in MQTT Version 3.1.1 such as a last will message have not been implemented in this project. There additional options were not considered essential for this application.

URL decoding

The parameters updated on the Web Configuration page are passed from the html web code back the ESP8266 sketch code using an http “GET” request. Each parameter is added to the URL, a method that can easily be parsed by the ESP8266 c-code using the functions imported from the EspressIf SDK.

This all worked well until special characters were introduced in a password string. In these cases, the special characters are URL encoded, which converts the special characters into something an URL will accept. For example, a space is considered a special character and gets converted to “%20” in an URL.

The problem occurs when the parameter is saved. If “Hello World” is sent as an URL parameters, it becomes “Hello%20World”. This situation is resolved by using an URL decoder prior to saving the value. This restores the parameter to it’s original value, “Hello World” in this example.

Here’s the code used for URL decoding. It should be fairly easy to follow. The basic algorithm looks for a “%hh” code and converts it back to the original “special character” value in the string:


  1. /********************************************************
  2.  *  URL Message Decoder
  3.  ********************************************************/
  4.  
  5. int url_decode(char *encoded_str, char *decoded_str) {
  6.    
  7.     // While we're not at the end of the string (current character not NULL)
  8.     while (*encoded_str) {
  9.         // Check to see if the current character is a %
  10.         if (*encoded_str == '%') {
  11.     
  12.             // Grab the next two characters and move encoded_str forwards
  13.             encoded_str++;
  14.             char high = *encoded_str;
  15.             encoded_str++;
  16.             char low = *encoded_str;
  17.     
  18.             // Convert ASCII 0-9A-F to a value 0-15
  19.             if (high &gt; 0x39) high -= 7;
  20.             high &amp;= 0x0f;
  21.     
  22.             // Same again for the low byte:
  23.             if (low &gt; 0x39) low -= 7;
  24.             low &amp;= 0x0f;
  25.     
  26.             // Combine the two into a single byte and store in decoded_str:
  27.             *decoded_str = (high &lt;&lt; 4) | low;
  28.         } else {
  29.             // All other characters copy verbatim
  30.             *decoded_str = *encoded_str;
  31.         }
  32.     
  33.         // Move both pointers to the next character:
  34.         encoded_str++;
  35.         decoded_str++;
  36.     }
  37.     // Terminate the new string with a NULL character to trim it off
  38.     *decoded_str = 0;
  39. }

FOTA Support

Firmware over-the-air (FOTA) is a very useful option to include with your sketch. The Arduino makes this capability very clean and easy to embed in your code. I found it very useful for debugging code, as it freed up the serial port for test messages. The drawback, however, is that FOTA reduces your effective maximum sketch size in half. This was not a problem in this project, which currently only uses 26% of the available 4MB of my ESP8266-12 flash chip. Just be aware if you are using an older ESP8266-1 with this project, FOTA cannot be used as the sketch uses more than 50% of the 512K flash installed on many of the older ESP8266 versions.

Here is the implementation in this sketch:

A function was added and called in the setup() function.

init_FOTA();


  1. void init_FOTA() {
  2.     String buff;
  3.     int pt;
  4.     //Hostname defaults to esp8266-[ChipID] (no change to default, which is unique (ChipID = last 3 MAC HEX)
  5.     //ArduinoOTA.setHostname("myesp8266");
  6.     
  7.     //Set FOTA Network Port
  8.     GetEepromVal(&amp;buff, EEPROM_MQTT_PT, EEPROM_INT16);
  9.     pt = atoi(buff.c_str());
  10.     ArduinoOTA.setPort(pt);
  11.      
  12.     //Set OTA authentication (password)
  13.     GetEepromVal(&amp;buff, EEPROM_FOTA_PW, EEPROM_CHR);
  14.     ArduinoOTA.setPassword((char *)buff.c_str());
  15.     
  16.     ArduinoOTA.onStart([]() {
  17.         Serial.println("Start");
  18.     });
  19.     ArduinoOTA.onEnd([]() {
  20.         Serial.println("\nEnd");
  21.     });
  22.     ArduinoOTA.onProgress([](unsigned int progress, unsigned int total) {
  23.         Serial.printf("Progress: %u%%\r", (progress / (total / 100)));
  24.     });
  25.     ArduinoOTA.onError([](ota_error_t error) {
  26.         Serial.printf("Error[%u]: ", error);
  27.         if (error == OTA_AUTH_ERROR) Serial.println("Auth Failed");
  28.         else if (error == OTA_BEGIN_ERROR) Serial.println("Begin Failed");
  29.         else if (error == OTA_CONNECT_ERROR) Serial.println("Connect Failed");
  30.         else if (error == OTA_RECEIVE_ERROR) Serial.println("Receive Failed");
  31.         else if (error == OTA_END_ERROR) Serial.println("End Failed");
  32.     });
  33.     ArduinoOTA.begin();
  34.     Serial.print("FOTA Initialized using IP address: ");
  35.     Serial.println(WiFi.localIP());
  36. }

Note that the FOTA port and password values are set from values stored in EEPROM. That means they can be set from the application, so the sketch does not require modification to change the values.

More on that when we go through the updates to the Web Configuration page.

Unique MQTT topics

It a system is built using multiple devices, it may be desirable to ensure that each device sends and receives MQTT message over unique topic names. In order to link the MQTT topic to the ESP8266 device, the default topic now includes an expanded ChipID.

That is to say, while the official ChipID uses the last 3 hex characters of the device’s MAC address, the expanded id in this application uses all six MAC address hex values.

The implementation here simply appends the MAC to a topic prefix. The result is a topic name unique to each ESP8266 device.


  1.  void AddMAC(char * prefix, char * topic) {
  2.      uint8_t MAC_array[6];
  3.      WiFi.macAddress(MAC_array);
  4.      sprintf(topic,"%s", prefix);
  5.      for (int i = 0; i &lt; sizeof(MAC_array); ++i){
  6.           sprintf(topic,"%s%02x",topic, MAC_array[i]);
  7.      }
  8.  }

MQTT Password Connection

The initial design of the MQTT server in this project relied solely on the test.mosquitto.org broker. This simple test site does not offer the option of connecting with passwords. But, of course, a password protected connection is preferred. And recently, I had set up my own MQTT broker, with the capability to require username/password credentials with connections. So adding this to the ESP8266 based server was obviously needed.

Here is the mqtt connection code used to establish password enabled and password-free connections.  Note that the MQTT client class object uses a different client.connect() prototype when using a password to connect.:


  1. void MqttServer_reconnect(void) {
  2.     int fst=10;
  3.     bool connected = false;
  4.     // Loop until we're reconnected (give up after 10 tries)
  5.     while (!client.connected()&amp;&amp;(fst!=0)) {
  6.         Serial.print("Attempting MQTT connection...");
  7.         // Connect to MQTT Server
  8.         if(mqtt_pw_enable) {
  9.             connected = client.connect(mqtt_ci.c_str(),mqtt_un.c_str(),mqtt_pw.c_str()); 
  10.         }
  11.         else {
  12.             connected = client.connect(mqtt_ci.c_str()); 
  13.         }
  14.         if (connected) {
  15.             // Successful connection message &amp; subscribe
  16.             Serial.println("connected");
  17.             client.subscribe((char *)mqtt_rt.c_str());
  18.             fst--;
  19.         } else {
  20.             // Failed to connect message
  21.             Serial.print("failed, rc=");
  22.             Serial.print(client.state());
  23.             Serial.println(" try again in 5 seconds");
  24.             // Wait 5 seconds before retrying
  25.             delay(5000);
  26.         }
  27.     }
  28. }

Unsolicited Arduino MQTT Publications

The Arduino server has been designed to query the Arduino for sensor or pin status. These queries are initiated from external http or MQTT requests. But this structure did not allow the Arduino to independently publish messages to an MQTT topic. That capability has now been added. MQTT messages originating in the Arduino are now possible.

Adding this capability required a simple restructure of the serial part data handler. Now, any time the end of line is received from the serial port, the ESP8266 sends the response to the http or mqtt channels when initiated, and to the mqtt topic when received without an initial request originating from the ESP8266.

This change impacted the function that initiates requests to the Arduino via the serial port. With the revised implementation, the function no longer waits for a reply:


  1. String ArduinoSendReceive(String req) {
  2.     String fromArduino = "";
  3.     Serial.println(req);
  4.     long start = millis();
  5.     fromArduino = "";
  6.     return fromArduino;
  7. }

Instead, a new function, “MonitorSerialLine()”, was added to process all data received on the serial port, both initiated and unsolicited.


  1. void MonitorSerialLine() {
  2.     if(arduino_server) {
  3.         while (Serial.available()) {
  4.             // get the new byte:
  5.             char inChar = (char)Serial.read();
  6.             // add it to the inputString:
  7.             SerialInString += inChar;
  8.             // if the incoming character is a newline, set a flag
  9.             // so the following code can process it
  10.             if (inChar == '\n') {
  11.                 NewSerialLineRx = true;
  12.             }
  13.         }
  14.         //Send Received String as MQTT Message
  15.         if(NewSerialLineRx) {
  16.             //If not server request, just forward Arduino Message to MQTT
  17.             if(active_svr_rqst == SVR_NONE) {
  18.                 active_svr_rqst = SVR_MQTT;  
  19.             }
  20.             Server_SendReply(active_svr_rqst, REPLY_TEXT, SerialInString);
  21.             active_svr_rqst = SVR_NONE;
  22.             SerialInString="";
  23.             NewSerialLineRx=false;
  24.         }
  25.         //Check for timeout for Arduino Server requests
  26.          if(active_svr_rqst != SVR_NONE) {
  27.              if(start_wait==0) start_wait = millis();
  28.              if( (millis() - start_wait)  &gt;5000 ) { //5 sec timeout
  29.                   SerialInString = "no arduino reply received";
  30.                   Server_SendReply(active_svr_rqst, REPLY_TEXT, SerialInString);
  31.                   //Reset Request Parameters
  32.                   active_svr_rqst = SVR_NONE;
  33.                   start_wait=0;
  34.                   SerialInString="";
  35.                   NewSerialLineRx=false;
  36.              }
  37.          }
  38.     }
  39. }

Current GMT

gmt

The http response header requires an identification of current GMT (for the Date header) and a current date offeset (for expiration headers). Prior versions of this project simply added hard-coded, static values for these headers. While it did no impact the http response transmission, it was obviously inaccurate header content.

In order to create accurate date headers, current GMT must be known. So time is now retrieved from a NIST server. This required an initialization routine to be run in the sketch’s setup() function. The offset is set to 0 so we get GMT when time is requested.


  1. void init_GmtTime() {
  2.     configTime(0, 0, "pool.ntp.org", "time.nist.gov");
  3.     Serial.print("\nWaiting for time");
  4.     while (!time(nullptr)) {
  5.         Serial.print(".");
  6.         delay(1000);
  7.     }
  8.     Serial.print("\r\nTime has been acquired from internet time service\r\nCurrent GMT: ");
  9.     time_t now = time(nullptr);
  10.     Serial.println(ctime(&amp;now));
  11. }

Here is how time is now retrieved when creating an http header:


  1. String gmt,expire;
  2. time_t now = time(nullptr);
  3. gmt = ctime(&amp;now);
  4. now += 3600 * 24;  //Expires in 1 day
  5. expire = ctime(&amp;now);
  6. gmt = gmt.substring(0,3) + "," + gmt.substring(7,10) + gmt.substring(3,7) + gmt.substring(19,24) + 
  7. gmt.substring(10,19) + " GMT";
  8. expire = expire.substring(0,3) + "," + expire.substring(7,10) + expire.substring(3,7) + 
  9. expire.substring(19,24) + expire.substring(10,19) + " GMT";

The string returned from a call to ctime() is in a different format than what is needed in the http. The String class “substring” method is uses to re-sort the ctime() string into the needed http header format.

ctime() format:

Mon Mar 14 08:23:14 2016

http header format:

Mon,13 Mar 2016 08:23:14 GMT

In Closing

This update establishes a solid framework for building IoT projects with both http and MQTT server support. While Arduino is used in the example, any external device with a standard serial link can also be easily added to this structure. And when the system is deployed, updates can be deployed wirelessly, eliminating the need to connect a physical serial interface to the system.

Here is the updated GitHub repository for this project.

I hope you find this information useful…
Loading

Share This:
FacebooktwitterredditpinterestlinkedintumblrFacebooktwitterredditpinterestlinkedintumblr

USB LAMP Web Server Part 2 – Adding php

php

PHP is an essential component of a majority of contemporary web servers. Initially, PHP was an acronym for “Personal Home Page”. But it is actually a widely used server-side scripting language. PHP is also the foundation for the popular WordPress content management system (CSM).

Now let’s add php to the USB LAMP web server installation from part 1 of this series.

Adding php to the Web Server

Launch the Puppy Package Manager again. In the search window (Find), enter “php”.

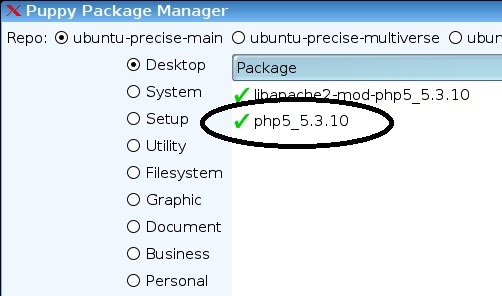
From the list of results, select php5_5.3.10.

php-install

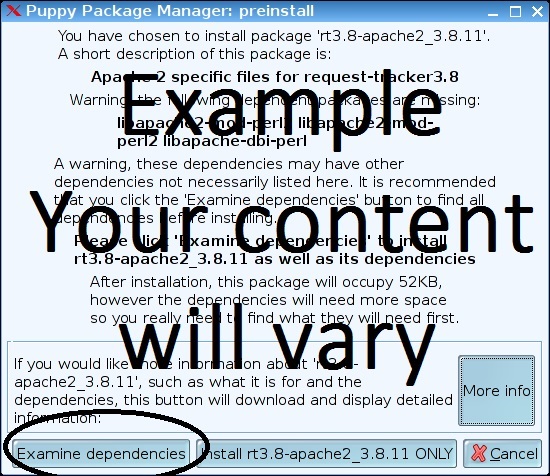
A pop-up windows will appear as shown below:

examinedepenancies

Click the “Examine dependencies” button. If this button is not present, just click on the Install button.

Next, click “Download-and-install selected packages” in the window below.

downloadinstall

Another window will appear. Click “Download packages” in this window.

downloadnow

Once the installation completes, only one step remains to complete the basic php setup. You must file link php for it to become enabled and active. That is done by entering the following line from a console window:

# ln -s /etc/apache2/mods-available/php5* /etc/apache2/mods-enabled/

Testing the php Installation

Now lets run a simple script to verify php is working. Open a new file:

/var/www/helloworld.php

Enter the following and save the file:

<?php

echo “Hello World!”;

?>

Just like in Part 1, the web server is started by entering the following from the console window:

/etc/init.d/apache2 restart

Our test script can now be tested by entering the following into a web browser connected to the same local network as the server:

http://192.168.0.110:9777/test.php

Note: In Part 1, the ip of the server was set to 192.168.0.110 on port 9777. If your server is configured differently, change your test URL as appropriate.

You should see

Hello World!

displayed in the browser. This confirms php is working.

Additional php Packages

While your php installation is complete, you may wish to add additional packages to extend the php functionality. Two widely used packages are APIs for  XSLT and mySQL.

xsl

XSLT is a language for transforming XML documents.  For a web server, the result is an HTML web page.  The transformation is done by matching templates in an XSLT style-sheet against an XML document.

mySQL

mySQL is a widely used database management system (DMS). it is used on many websites to store and retrieve information. It is important to understand that the package we are about to install is an API to communicate with a mySQL database.

This package is not the mySQL DMS. That will come in part 3 of this series.

Here are the specific packages known to support these APIs with the Precision Puppy distribution we are working with:

php5-xsl_5.3.10

libxslt1.1_1.1.26

xsltproc_1.1.26

php5-mysql_5.3.10

mysql-common_5.5.47

libmysqlclient18_5.5.47

These are installed in the same manner as php was installed.

For the XSLT packages, open the puppy package manager, search for XSLT, and select the bold package “php5-xsl_5.3.10″. The other two packages should get installed as “dependent” packages.

Likewise, for the mysql packages, open the puppy package manager, search for mysql, and select the bold package “php5-mysql_5.3.10″. The other two packages should get installed as “dependent” packages.

Coming Attractions

That’s it for php. But there are additional php packages available to support unique website requirements. You can add any additional packages needed following the same process described in this post.

php-checklist

In part 3, we will be adding the mySQL database management system to our Apache server.

Loading

Share This:
FacebooktwitterredditpinterestlinkedintumblrFacebooktwitterredditpinterestlinkedintumblr

Press Ctrl+C to copy the following code.
"